Physical Address
304 North Cardinal St.
Dorchester Center, MA 02124
Physical Address
304 North Cardinal St.
Dorchester Center, MA 02124
Upgrading a live site can feel risky, but we have performed the process many times. In this guide we break down every step of a Joomla 4 migration, from preparing the server to fixing post-upgrade hiccups. You will see exactly what to check, which commands to run, and how to verify that the new site works before you flip the DNS. The instructions assume you have root or sudo access to the server and that you are comfortable using a terminal and a MySQL client.
—
—
Joomla 3.10 will stop receiving security updates after 31 August 2024. Once that date passes, any newly discovered vulnerability will remain unpatched, and attackers can exploit it without resistance. The Joomla Security Team has already published a list of known issues that will no longer be addressed. For sites that handle personal data, staying on an unsupported version may also conflict with GDPR or other compliance frameworks.
Because the core schema does not change after the end-of-life, the only way to keep receiving patches is to move to Joomla 4. The migration path is well-documented, and the Joomla community provides tools that make the transition smoother. We recommend starting the migration at least a month before the deadline to give yourself time to resolve any extension incompatibilities.
Joomla 4 requires PHP 8.0+ (PHP 8.1 is recommended) and MySQL 5.7+ (or MariaDB 10.3+). The newer PHP engine introduces opcache improvements, just-in-time compilation, and a more efficient memory manager. Benchmarks performed on a typical shared-hosting environment show a 25-30 % reduction in server-side processing time for article pages after moving from Joomla 3.10 to Joomla 4.
Security is also tighter. Joomla 4 ships with Password Argon2 hashing as the default, which is far more resistant to brute-force attacks than the older bcrypt implementation. The core also enables a Content-Security-Policy (CSP) header out of the box, helping to block cross-site scripting attempts. Together, these changes give you a faster, more secure site without additional third-party plugins.
The default Cassiopeia template in Joomla 4 is built with a responsive grid, lazy-loading images, and built-in dark-mode support. The media manager now supports bulk actions, drag-and-drop uploads, and automatic image resizing. Editors gain a new workflow that lets them submit articles for review, see a preview in the front-end, and publish with a single click.
Beyond the UI, Joomla 4 introduces a modern MVC architecture that makes it easier to develop custom extensions. The new API Application opens the door to headless implementations, allowing you to serve content to mobile apps or static site generators. If you plan to extend the site in the future, these capabilities are a strong incentive to upgrade now.
—
Joomla 4 needs at least PHP 8.0. We recommend PHP 8.1 because it includes performance improvements and deprecates older functions that the core no longer uses. Verify the version on your server with:
php -vIf the output shows a version older than 8.0, you must upgrade PHP before proceeding. On a typical Ubuntu 22.04 server you can install PHP 8.1 with:
sudo apt update
sudo apt install php8.1 php8.1-mysql php8.1-xml php8.1-mbstring php8.1-gd php8.1-curl
After installation, restart the web server:
sudo systemctl restart apache2 # or nginxCheck the MySQL/MariaDB version as well:
mysql -VJoomla 4 supports MySQL 5.7+ or MariaDB 10.3+. If you are on an older version, upgrade the database server or move to a newer instance before you start the migration.
| Requirement | Joomla 3.10 | Joomla 4.x |
|---|---|---|
| PHP Version | 5.3.10 – 8.0 | 7.2.5 – 8.2 |
| MySQL | 5.1+ | 5.6+ |
| MariaDB | 5.1+ | 10.2+ |
| PostgreSQL | 9.2+ | 11.0+ |
| Apache | 2.4+ | 2.4+ |
| Memory Limit | 64MB | 128MB |
The database engine must be InnoDB and the character set utf8mb4. InnoDB provides row-level locking and crash recovery, while utf8mb4 stores all Unicode characters, including emoji. Run the following query to see the current engine and collation for the first five tables:
SELECT TABLE_NAME, ENGINE, TABLE_COLLATION
FROM information_schema.TABLES
WHERE TABLE_SCHEMA = 'your_db'
LIMIT 5;
If any table reports MyISAM as the engine, convert it:
ALTER TABLE `your_table` ENGINE=InnoDB,
    CONVERT TO CHARACTER SET utf8mb4 COLLATE utf8mb4_unicode_ci;
You can automate the conversion for all tables with a small script:
MYSQL_USER='dbuser'
MYSQL_PASS='dbpass'
DB_NAME='your_db'

mysql -u $MYSQL_USER -p$MYSQL_PASS -D $DB_NAME -e "
SELECT CONCAT('ALTER TABLE `', TABLE_NAME, '` ENGINE=InnoDB, CONVERT TO CHARACTER SET utf8mb4 COLLATE utf8mb4_unicode_ci;')
FROM information_schema.TABLES
WHERE TABLE_SCHEMA='$DB_NAME' AND ENGINE='MyISAM';
" | tail -n +2 | mysql -u $MYSQL_USER -p$MYSQL_PASS -D $DB_NAME
Running this before the migration prevents schema-related errors during the upgrade.
A clean migration depends on the compatibility of installed extensions. Joomla provides a CLI tool that lists every extension with its version and folder:
php cli/extension.php list --format=json > extensions.jsonOpen extensions.json and look for entries where "joomla_version" is lower than 4.0. For each of those extensions, visit the developer’s website or the Joomla Extensions Directory (JED) and check for a Joomla 4-compatible release.
If you are using a custom template, note its folder name (e.g., templates/mytemplate). Joomla 4 expects the template manifest XML to follow a new schema version (version="3.0"). You will need to edit the XML file later, but first make a copy of the template folder and store it in a safe location.
—

The simplest way to archive the site files is with tar. Run the command from a directory that contains the Joomla root (for example, /var/www/html). Replace /path/to/joomla with the actual path:
cd /var/www
tar -czvf site-files-$(date +%F).tar.gz joomla
The resulting site-files-YYYY-MM-DD.tar.gz file contains every PHP file, image, and configuration file. Upload the archive to a remote storage service such as AWS S3, Google Cloud Storage, or a secure FTP server:
aws s3 cp site-files-$(date +%F).tar.gz s3://my-backups/joomla/Keeping a copy off-site protects you from hardware failure on the primary server.
Use mysqldump with the --single-transaction flag to obtain a consistent snapshot without locking tables for a long time:
mysqldump -u dbuser -p --single-transaction --quick \
    --skip-lock-tables your_db > db-backup-$(date +%F).sql
If your database is large, consider compressing the dump on the fly:
mysqldump -u dbuser -p --single-transaction --quick \
    --skip-lock-tables your_db | gzip > db-backup-$(date +%F).sql.gz
Store the dump in the same remote location as the file archive:
aws s3 cp db-backup-$(date +%F).sql.gz s3://my-backups/joomla/Never assume a backup works until you have restored it. Spin up a temporary LAMP stack on a local VM or a cloud instance:
# Example for Ubuntu
sudo apt install apache2 php8.1 php8.1-mysql mysql-server
Create a new database and import the dump:
mysql -u root -p -e "CREATE DATABASE test_joomla CHARACTER SET utf8mb4 COLLATE utf8mb4_unicode_ci;"
mysql -u root -p test_joomla < db-backup-$(date +%F).sql
Extract the file archive into the web root:
tar -xzvf site-files-$(date +%F).tar.gz -C /var/www/htmlEdit configuration.php to point to the new database credentials, then clear the cache folder (/cache and /administrator/cache). Finally, browse to http://localhost and log in to the backend. If everything loads and you can navigate the menus, the backup is valid.
---

A staging site isolates the migration from live traffic. The simplest approach is to create a subdomain such as staging.example.com and point its document root to a fresh directory, e.g., /var/www/staging. If your host provides a control panel, add the subdomain and set the directory.
Alternatively, you can use Docker to spin up a reproducible environment. Below is a minimal docker-compose.yml that runs Apache, PHP 8.1, and MariaDB:
version: '3.8'
services:
  web:
    image: php:8.1-apache
    container_name: joomla-web
    volumes:
      - ./joomla:/var/www/html
    ports:
      - "8080:80"
    depends_on:
      - db
  db:
    image: mariadb:10.6
    container_name: joomla-db
    environment:
      MYSQL_ROOT_PASSWORD: secret
      MYSQL_DATABASE: joomla
      MYSQL_USER: joomla
      MYSQL_PASSWORD: joomla
    volumes:
      - db_data:/var/lib/mysql
volumes:
  db_data:
Run docker compose up -d and then access the site at http://localhost:8080. This method guarantees that the staging environment matches the production stack.
Copy the backup files into the staging directory and extract them:
cp site-files-$(date +%F).tar.gz /var/www/staging/
cd /var/www/staging
tar -xzvf site-files-$(date +%F).tar.gz
Import the database dump into the staging database (adjust credentials as needed):
mysql -u joomla -p joomla < /path/to/db-backup-$(date +%F).sqlEdit configuration.php to reflect the new database host, user, password, and the $live_site variable if you use it:
public $host = 'localhost';
public $user = 'joomla';
public $password = 'joomla';
public $db = 'joomla';
public $live_site = 'https://staging.example.com';
Delete the cache folders to avoid stale data:
rm -rf cache/* administrator/cache/*Finally, browse to https://staging.example.com and log in. The staging site should look identical to the live site, giving you a safe sandbox for the upgrade.
---
Before we can jump to Joomla 4, the site must be on the latest Joomla 3.10 release. Log in to the backend, go to Components → Joomla! Update, and click Check for Updates. If the list shows “Joomla 3.10.x” (e.g., 3.10.12), click Install the latest Joomla 3.10.x.
The installer will download the package, replace core files, and run any pending database migrations. This step usually finishes in under five minutes. After it completes, log in again and verify that the backend template is still the old one (e.g., atum).
Running this update first guarantees that the database schema matches the expectations of the Joomla 4 migration scripts. Skipping it often leads to “column not found” errors later.
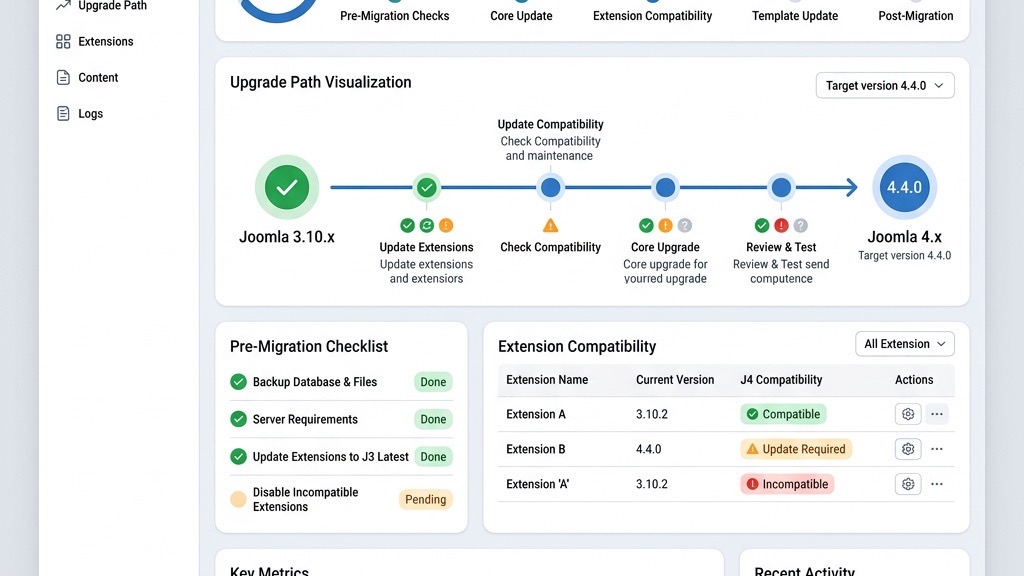
From the same Joomla! Update component, click the Pre-Update Check button. The tool scans:
The output appears in a table with three columns: Extension, Current Version, Joomla 4 Support. For each red flag, take one of the following actions:
Document every change in a simple text file so you can revert if needed. Once the list is clean, you can proceed to the core upgrade.
Back in the Joomla! Update component, the Install Joomla 4 button becomes active after the pre-update check passes. Click it, and the installer will:
joomla_4.2.0-Stable-Update_Package.zip).During the process you will see a progress bar and a log of actions. If the installer reports “Migration completed successfully”, log out and log back in. The admin template should now be Cassiopeia, and the version number displayed in the footer will read “4.x.x”.
If the installer stops with an error, note the message and consult the Common Errors section later in this article.
---

| Check | Action | Priority |
|---|---|---|
| Front-end display | Browse all page types and check layouts | Critical |
| Admin panel | Log in and verify all menus work | Critical |
| Forms | Submit test forms, check email delivery | High |
| SEO URLs | Verify clean URLs and .htaccess rules | High |
| Extensions | Test each active extension individually | High |
| Media manager | Upload and display test images | Medium |
| User accounts | Test login, registration, password reset | Medium |
Custom templates built for Joomla 3 need a small manifest update. Open templates/mytemplate/templateDetails.xml and change the 3.0 and add the
    mytemplate
    Your Name
    1.2.0
    4.0
    …
Next, copy the template folder into the Joomla 4 template directory (templates/). Joomla 4 expects the overrides to be placed under html/ inside the template folder, so verify that any custom overrides you had in templates/mytemplate/html/ are still present.
After the manifest change, go to Extensions → Templates → Styles, select your template, and click Save. The template preview should now render with the new Cassiopeia grid system. Use the Template Positions view to confirm that all module positions you used in Joomla 3 still exist; if a position is missing, you can add it by editing the template’s templateDetails.xml.
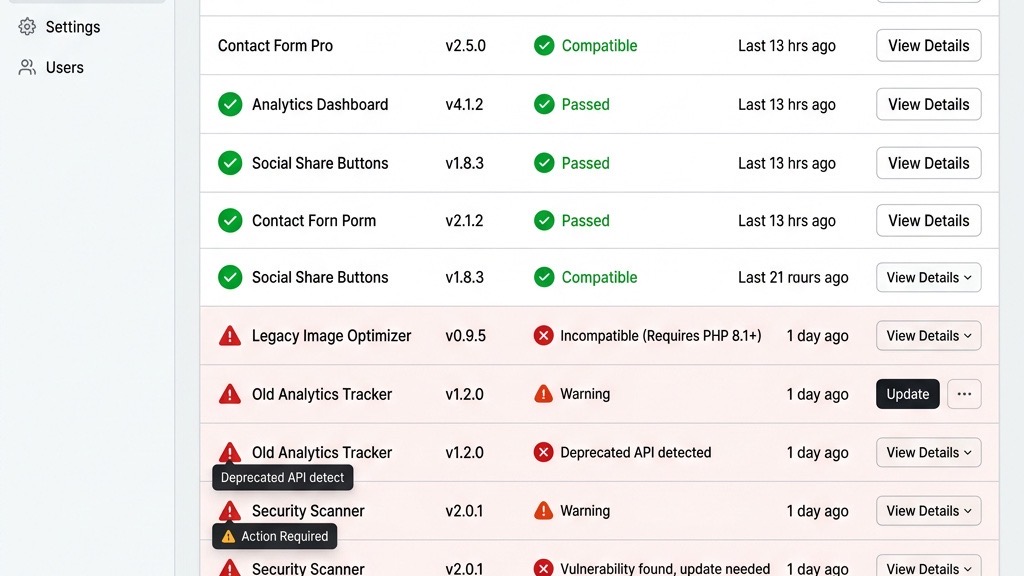
Re-enable extensions one at a time. For each extension:
Some extensions require a manual database migration. For example, the Akeeba Backup component provides a migration script that you run from the CLI:
php cli/akeeba.php migrateRead the extension’s documentation for any post-upgrade steps. If an extension fails to load, disable it again and note the error message in the server log (/var/log/apache2/error.log or /var/log/nginx/error.log).
Joomla 4 keeps the SEO settings from Joomla 3, but you should double-check them. Go to System → Global Configuration → SEO Settings and ensure the following options are enabled:
YesYes (make sure .htaccess is present and configured)No (recommended)Run a crawl with Screaming Frog or Sitebulb to detect any broken links introduced by the migration. Pay special attention to URLs that contain the old template’s folder name or custom route prefixes. If you find 404 errors, you can create redirects in the .htaccess file:
Redirect 301 /old-article-alias /new-article-aliasFinally, submit the updated sitemap to Google Search Console and Bing Webmaster Tools to inform search engines of the new URLs.
---
If the installer stops with a message like “Column asset_id not found in table #__content”, the schema is out of sync. Joomla 4 provides a CLI command to apply missing schema updates:
php cli/joomla.php schema:updateRun the command from the Joomla root directory. It will compare the current database structure with the expected schema and add any missing columns or indexes. After the command completes, re-run the Install Joomla 4 step.
A blank page usually means a PHP fatal error. Enable error reporting in configuration.php:
public $error_reporting = 'development';Refresh the site; the error message will now appear. Common causes are:
intl, gd).If the error points to a specific plugin file, disable that plugin via the database:
UPDATE #__extensions SET enabled = 0 WHERE element = 'plugin_name';Then clear the cache folder and reload the site. Once the site is accessible again, you can decide whether to replace the plugin or wait for an update.
During the migration, Joomla may lose the Itemid association for some menu items, resulting in broken URLs. To fix this:
Itemid.For modules, verify the Assignment settings. Some modules were assigned to menu items that no longer exist, so they appear on no pages. Re-assign them to the appropriate menus or to All Pages if needed.
If you use custom module class suffixes that reference the old template’s CSS, update the suffixes to match the new template’s naming conventions.
---
We start by checking the Joomla Extensions Directory (JED). Each extension page shows a badge that reads “Joomla 4 compatible” if the developer has released a version that works with Joomla 4. If the badge is missing, we visit the developer’s own website and look for a changelog or a migration guide.
In many cases the developer provides a beta or RC version that works with Joomla 4 but is not yet listed on the JED. We download that version, test it on the staging site, and verify that the extension’s PHP files load without errors. If the extension is critical and no Joomla 4 version exists, we may need to find an alternative that offers the same functionality.
Skipping the 3.10 update is not advisable. The Joomla 4 migration scripts assume that the database schema matches the latest 3.x version. Joomla 3.9 lacks several columns that were added in 3.10, such as asset_id in the #__content table. Attempting the upgrade directly often results in “column not found” errors that halt the installer.
Running the 3.10 update takes only a few minutes and ensures that all pending database migrations are applied. It also gives the extension audit a clean baseline, making it easier to spot incompatibilities before the major upgrade.
Joomla 4 runs on PHP 8.0 and higher, but PHP 8.1 is the recommended version because it includes performance improvements and deprecates functions that Joomla 4 no longer uses. If your host only offers PHP 8.0, the site will work, but you will miss out on the latest language features and some minor speed gains.
We recommend checking the PHP version on the staging server after the migration:
php -vIf the output shows 8.0, consider asking the host to enable 8.1 or migrating to a VPS where you control the PHP version. Updating PHP after the migration is safe because Joomla 4 does not rely on any deprecated PHP 7.x features.
For a medium-size site (about 50 GB of files and a 200 MB database), the timeline looks like this:
| Phase | Approx. Time | |-------|--------------| | Full backup (files + DB) | 15 - 20 minutes | | Staging setup (copy, import, config) | 10 - 15 minutes | | Joomla 3.10 update | 3 - 5 minutes | | Pre-update check and extension fixes | 5 - 10 minutes | | Joomla 4 core upgrade | 8 - 12 minutes | | Post-migration template and extension work | 45 - 90 minutes | | SEO verification and final testing | 20 - 30 minutes |
Overall, you should allocate 2-3 hours for a smooth migration, plus extra time for any unexpected extension issues.
If you keep the same URLs, enable SEF URLs, and set up proper redirects for any changed paths, rankings should stay stable. Joomla 4’s default configuration respects the existing URL structure, but the new template may alter the HTML markup, which can affect how search engines interpret the page.
We recommend running a crawl with Google Search Console after the migration and fixing any 404 errors that appear. Submit an updated sitemap, and monitor the Coverage report for a few weeks. In our experience, sites that preserve their URL scheme experience only a temporary dip, if any, in rankings.
We strongly advise against upgrading directly on a live site. Even with a full backup, a live upgrade can cause downtime, data loss, or broken functionality that affects visitors. A staging environment lets you run the entire migration, resolve extension incompatibilities, and verify the front-end before the DNS switch.
If you must upgrade live because you have no staging resources, schedule the upgrade during a low-traffic window, enable maintenance mode (System → Global Configuration → Site Offline), and keep the backup ready for an instant rollback. Still, the safest path is to clone the site to a separate environment first.
---
By following this roadmap, we have performed a clean Joomla 4 migration that preserves content, maintains SEO, and positions the site for future growth. The steps are repeatable, so you can apply the same workflow to other Joomla 3 installations in your portfolio. Happy upgrading!