Physical Address
304 North Cardinal St.
Dorchester Center, MA 02124
Physical Address
304 North Cardinal St.
Dorchester Center, MA 02124
When we start a new Joomla project we often wonder whether a component, a module, or a plugin is the right tool. In Joomla’s architecture a component is the primary container for the main content of a site. It handles the full request‑response cycle, from routing to data storage and presentation. Modules and plugins, by contrast, are auxiliary pieces that modify or supplement the output of a component.
Components follow the Model‑View‑Controller (MVC) pattern, which keeps business logic, data handling, and the user interface separate. This separation makes our code easier to test, extend, and maintain. The MVC approach is built into Joomla 4 and 5, so every component we create automatically benefits from the framework’s routing, language handling, and security layers.
We usually decide to build a custom component when the existing extensions do not provide the exact data structures or workflows we need. If the requirement is limited to a small piece of content that appears in a fixed position, a module might be sufficient. For event‑driven tasks such as content filtering or authentication, a plugin is the appropriate choice. If you are new to the platform, our guide on what Joomla is covers the fundamentals.
| Feature | Component | Module | Plugin |
|---|---|---|---|
| Purpose | Full‑page application, handles routing and CRUD | Side‑box or position‑based output | Event listener, modifies behavior |
| Entry point | index.php?option=com_… | Rendered in template positions | Triggered by Joomla events |
| Structure | admin + site folders, MVC classes | Single folder, layout files | Single folder, event handlers |
| Typical use case | Complex data management (e.g., a booking system) | Banner, login box, custom HTML | SEO meta‑tags, content filters |
For a deeper look at the MVC pattern in Joomla, the official Joomla MVC documentation provides a solid foundation. The Joomla component development manual also walks through the lifecycle of a component request.
Before we write any code we need a reliable local environment. Most of us use XAMPP or Docker to spin up a LAMP stack that matches the production server. After installing Joomla 4 or 5, we point the web root to the htdocs (or Docker volume) and create a database for the site.
Our file structure looks like this:
joomla/
 ├─ administrator/
 │   └─ components/
 │       └─ com_example/      ← admin side of the component
 ├─ components/
 │   └─ com_example/          ← site side of the component
 ├─ templates/
 │   └─ cassiopeia/
 └─ configuration.php
We recommend using an IDE that understands PHP namespaces, such as PhpStorm or VS Code with the PHP Intelephense extension. Xdebug integration lets us set breakpoints inside model or controller files, which speeds up troubleshooting.
When the environment is ready, we can access the Joomla admin panel to install our component later. The install Joomla extensions guide explains the upload process in detail.
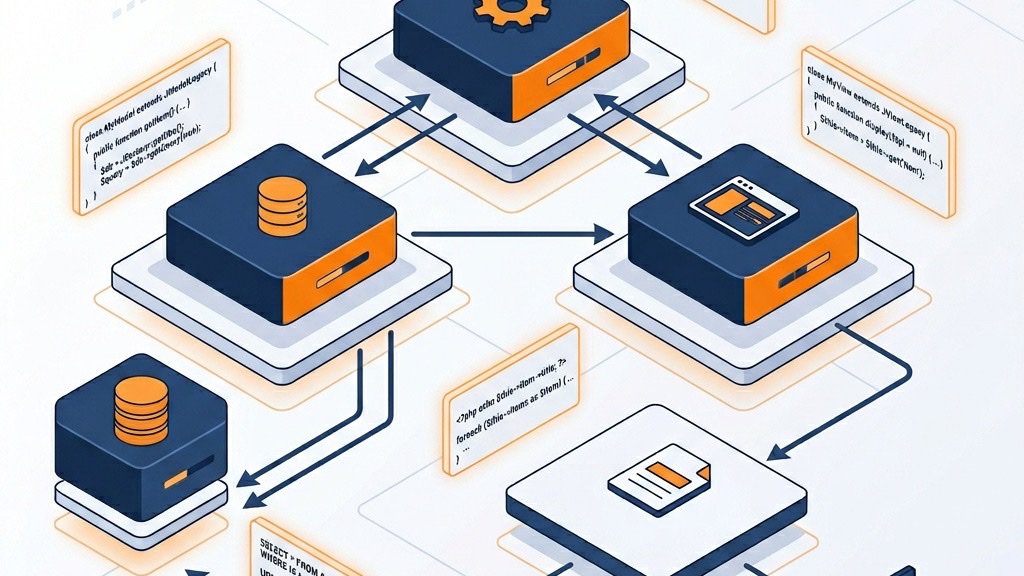
Joomla’s MVC implementation relies on PHP namespaces and the service container introduced in Joomla 4. Each part of the MVC trio lives in a dedicated folder and follows a naming convention that the autoloader can resolve automatically.
Model – The model contains all database interactions. We typically extend Joomla\CMS\MVC\Model\BaseDatabaseModel and use the DatabaseDriver object for queries. The model returns plain PHP objects or arrays that the view can consume.
View – The view prepares data for output. It receives the model’s result, assigns it to the template, and loads a layout file from tmpl. Views inherit from Joomla\CMS\MVC\View\HtmlView and can override methods such as display() to add custom logic.
Controller – The controller maps HTTP requests to model actions. Joomla routes the request to a controller class that extends Joomla\CMS\MVC\Controller\BaseController. Inside the controller we can call $model->save($data), $model->delete($id), and then redirect to the appropriate view.
All three layers share the same namespace, for example Example\Component\Example\Site for the front‑end and Example\Component\Example\Administrator for the back‑end. This namespace structure is reflected in the folder hierarchy:
src/
 ├─ Controller/
 │   ├─ DisplayController.php
 │   └─ ItemController.php
 ├─ Model/
 │   ├─ ItemsModel.php
 │   └─ ItemModel.php
 └─ View/
     ├─ Items/
     │   ├─ tmpl/
     │   │   └─ default.php
     │   └─ HtmlView.php
     └─ Item/
         ├─ tmpl/
         │   └─ edit.php
         └─ HtmlView.php
Because Joomla 4/5 uses Composer‑style autoloading, we only need to declare the namespace in the component’s services provider. The framework automatically registers the service provider, which lets us inject the model into the controller without manual includes.
Let us walk through the skeleton of a new component called com_example. We start with the manifest XML file, which tells Joomla how to install the extension and where to find its files.
<?xml version="1.0" encoding="utf-8"?>
<extension type="component" version="4.0" method="upgrade">
    <name>com_example</name>
    <author>Your Name</author>
    <version>1.0.0</version>
    <description>A simple example component</description>
    <namespace path="src">Example\Component\Example</namespace>

    <files folder="site">
        <folder>src</folder>
        <folder>tmpl</folder>
    </files>

    <administration>
        <menu>Example</menu>
        <files folder="admin">
            <folder>forms</folder>
            <folder>services</folder>
            <folder>sql</folder>
            <folder>src</folder>
            <folder>tmpl</folder>
        </files>
    </administration>
</extension>
Next we create the basic folder layout. The admin folder holds the back‑end MVC files, while the site folder contains the front‑end equivalents. Both sides have a src directory where we place the namespaced PHP classes.
com_example/
 ├─ admin/
 │   ├─ forms/
 │   ├─ services/
 │   │   └─ provider.php
 │   ├─ sql/
 │   │   ├─ install.mysql.utf8.sql
 │   │   └─ uninstall.mysql.utf8.sql
 │   ├─ src/
 │   │   ├─ Controller/
 │   │   ├─ Model/
 │   │   ├─ Table/
 │   │   └─ View/
 │   └─ tmpl/
 ├─ site/
 │   ├─ src/
 │   │   ├─ Controller/
 │   │   ├─ Model/
 │   │   └─ View/
 │   └─ tmpl/
 └─ example.xml
We add a service provider to register our classes with Joomla’s dependency injection container. The provider lives in admin/services/provider.php and is the entry point for the framework.
<?php
defined('_JEXEC') or die;

use Joomla\CMS\Dispatcher\ComponentDispatcherFactoryInterface;
use Joomla\CMS\Extension\ComponentInterface;
use Joomla\CMS\Extension\Service\Provider\ComponentDispatcherFactory;
use Joomla\CMS\Extension\Service\Provider\MVCFactory;
use Joomla\CMS\MVC\Factory\MVCFactoryInterface;
use Joomla\DI\Container;
use Joomla\DI\ServiceProviderInterface;

return new class implements ServiceProviderInterface
{
    public function register(Container $container)
    {
        $container->registerServiceProvider(new MVCFactory('\\Example\\Component\\Example'));
        $container->registerServiceProvider(new ComponentDispatcherFactory('\\Example\\Component\\Example'));

        $container->set(
            ComponentInterface::class,
            function (Container $container) {
                $component = new \Joomla\CMS\Extension\MVCComponent();
                $component->setMVCFactory($container->get(MVCFactoryInterface::class));
                return $component;
            }
        );
    }
};
With the manifest, folder structure, and service provider in place, we can zip the component and install it through the Joomla admin panel. The sections below flesh out the model, view, and controller files, and we will show how to create a database table and build both admin and frontend interfaces.
Our component stores its data in a custom table. Joomla expects an SQL file that runs during installation and another that runs on removal. We keep both files in the sql folder of the admin package.
We name the file install.mysql.utf8.sql. Joomla reads this file automatically because it is referenced in the manifest. The file contains a CREATE TABLE statement with an IF NOT EXISTS check to prevent errors during re‑installation.
CREATE TABLE IF NOT EXISTS `#__example_items` (
    `id`          INT(11) NOT NULL AUTO_INCREMENT,
    `title`       VARCHAR(255) NOT NULL,
    `alias`       VARCHAR(255) NOT NULL DEFAULT '',
    `description` TEXT,
    `state`       TINYINT(1) NOT NULL DEFAULT 0,
    `created`     DATETIME NOT NULL,
    `created_by`  INT(11) NOT NULL DEFAULT 0,
    `ordering`    INT(11) NOT NULL DEFAULT 0,
    PRIMARY KEY (`id`),
    KEY `idx_state` (`state`)
) ENGINE=InnoDB DEFAULT CHARSET=utf8mb4;
The table uses the Joomla prefix placeholder #__ so that the installer replaces it with the actual prefix of the site. We also store the user ID that created each record, which ties into Joomla’s ACL system for permission checks.
All database interactions go through the DatabaseDriver class. This abstraction provides a fluent query builder that works across MySQL and PostgreSQL. Below is a model method that fetches published items for the frontend view.
namespace Example\Component\Example\Site\Model;

use Joomla\CMS\Factory;
use Joomla\CMS\MVC\Model\BaseDatabaseModel;

class ItemsModel extends BaseDatabaseModel
{
    public function getItems()
    {
        $db    = $this->getDatabase();
        $query = $db->getQuery(true)
            ->select('*')
            ->from($db->quoteName('#__example_items'))
            ->where($db->quoteName('state') . ' = 1')
            ->order($db->quoteName('ordering') . ' ASC');

        $db->setQuery($query);
        return $db->loadObjectList();
    }
}
The manifest references the SQL scripts inside the <install> and <uninstall> blocks. The uninstall script typically contains a single DROP TABLE IF EXISTS statement so that removing the component also removes its data.
The back‑end part of the component lets administrators manage items. Joomla supplies a set of base classes that make list and edit screens straightforward to implement.
Our list view uses a model that extends ListModel. The model builds a query that supports sorting and filtering, while the view renders the results in a standard Joomla table layout with checkboxes and action buttons.
namespace Example\Component\Example\Administrator\Model;

use Joomla\CMS\MVC\Model\ListModel;

class ItemsModel extends ListModel
{
    protected function getListQuery()
    {
        $db    = $this->getDatabase();
        $query = $db->getQuery(true)
            ->select('a.*')
            ->from($db->quoteName('#__example_items', 'a'));

        $orderCol  = $this->state->get('list.ordering', 'a.ordering');
        $orderDirn = $this->state->get('list.direction', 'ASC');
        $query->order($db->escape($orderCol) . ' ' . $db->escape($orderDirn));

        return $query;
    }
}
Joomla reads an XML file to build the edit form. The file lives in admin/forms/item.xml and defines each field, its type, validation rules, and label.
<form>
    <fieldset name="basic">
        <field name="title" type="text"
               label="JGLOBAL_TITLE" required="true" />
        <field name="alias" type="text"
               label="JFIELD_ALIAS" />
        <field name="description" type="editor"
               label="JGLOBAL_DESCRIPTION"
               filter="safehtml" />
        <field name="state" type="list"
               label="JSTATUS" default="1">
            <option value="1">JPUBLISHED</option>
            <option value="0">JUNPUBLISHED</option>
        </field>
    </fieldset>
</form>
In the view’s display method we create a toolbar using ToolbarHelper. The helper adds standard buttons that map to controller tasks such as save, apply, and cancel.
namespace Example\Component\Example\Administrator\View\Item;

use Joomla\CMS\MVC\View\HtmlView as BaseHtmlView;
use Joomla\CMS\Toolbar\ToolbarHelper;

class HtmlView extends BaseHtmlView
{
    public function display($tpl = null)
    {
        $this->item = $this->get('Item');
        $this->form = $this->get('Form');

        ToolbarHelper::title('Edit Item');
        ToolbarHelper::apply('item.apply');
        ToolbarHelper::save('item.save');
        ToolbarHelper::cancel('item.cancel');

        parent::display($tpl);
    }
}
We define the component’s access rules in access.xml. Joomla checks these rules before executing controller actions, ensuring that only authorized users can create, edit, or delete items. The ACL integrates with Joomla’s global permission system, so Super Administrators automatically inherit full access.
The front‑end part displays items to visitors. We register a menu item type, set up a router for clean URLs, and create a view that pulls data from the model.
Menu item types are declared in the component’s XML metadata. When an administrator creates a new menu item, Joomla reads this metadata and presents the available views as options. For our component, we register a “List Items” view so that administrators can link any menu position to our item listing.
The router translates between human‑readable URLs and Joomla’s internal query parameters. In Joomla 4/5, we implement a router service that handles both building and parsing URL segments.
namespace Example\Component\Example\Site\Service;

use Joomla\CMS\Component\Router\RouterView;
use Joomla\CMS\Component\Router\Rules\MenuRules;
use Joomla\CMS\Component\Router\Rules\NomenuRules;
use Joomla\CMS\Component\Router\Rules\StandardRules;

class Router extends RouterView
{
    public function __construct($app = null, $menu = null)
    {
        parent::__construct($app, $menu);

        $items = new RouterViewConfiguration('items');
        $this->registerView($items);

        $item = new RouterViewConfiguration('item');
        $item->setKey('id')->setParent($items);
        $this->registerView($item);

        $this->attachRule(new MenuRules($this));
        $this->attachRule(new StandardRules($this));
        $this->attachRule(new NomenuRules($this));
    }
}
The frontend controller loads the appropriate view. The view pulls data from the model and passes it to a layout file stored in the tmpl directory. Making sure our URLs are clean is important for search engines — our Joomla SEO-friendly URLs guide covers the router configuration in more detail.
We place the default layout in tmpl/items/default.php. Joomla automatically looks for an override in the active template’s html/com_example/items folder. This gives site designers full control over the HTML without touching the component code. See our guide on Joomla template overrides to learn how to customize the output for any template.
<?php defined('_JEXEC') or die; ?>
<div class="com-example-items">
    <?php foreach ($this->items as $item) : ?>
        <article class="item">
            <h2>
                <a href="<?php echo JRoute::_('index.php?option=com_example&view=item&id=' . $item->id); ?>">
                    <?php echo $this->escape($item->title); ?>
                </a>
            </h2>
            <div class="description">
                <?php echo $item->description; ?>
            </div>
        </article>
    <?php endforeach; ?>
</div>When the component is ready we bundle it into a ZIP file, create an update server, run a testing checklist, and optionally submit the package to the Joomla Extensions Directory.
All component files — PHP classes, XML manifests, language files, media assets — must follow the folder structure defined in the manifest. We compress the root folder into a ZIP archive that can be uploaded through the Joomla installer. The manifest’s method="upgrade" attribute ensures that reinstalling the ZIP updates existing files without deleting user data.
The update server XML tells Joomla where to look for newer versions. We host a small XML file on our server that lists each release with its version number, download URL, and minimum Joomla version. Once we add the update server URL to the manifest, Joomla will check for updates automatically and show a notification in the admin panel.
<updates>
    <update>
        <name>Example Component</name>
        <version>1.1.0</version>
        <tag>stable</tag>
        <downloadurl type="full">
            https://example.com/downloads/com_example-1.1.0.zip
        </downloadurl>
        <targetplatform name="joomla" version="4.[0123456789]" />
    </update>
</updates>
Before distributing the component, we run through a testing checklist:
To submit to the Joomla Extensions Directory, we create an account, upload the ZIP, and fill out the required metadata including a description, category, and screenshots. The JED team reviews the package for coding standards and security before listing it publicly.
For a broader overview of Joomla and its ecosystem, see our Joomla 4 tutorial. The official source code is available on the Joomla CMS GitHub repository, which is an excellent reference when studying how core components are structured.
Joomla 4 requires PHP 7.4 or newer, while Joomla 5 moves the minimum to PHP 8.1. We recommend developing against the latest stable PHP release that matches the Joomla version you intend to support, so your component benefits from current language features and security patches.
Yes. The MVC pattern remains the same at a conceptual level, but you need to replace deprecated classes such as JModel and JView with their namespaced equivalents, update the XML manifest to reference a service provider, and adjust the routing to use the newer router service classes.
Time varies with complexity. A simple CRUD component with a list view and an edit form can be assembled in a few hours. A feature‑rich extension with custom field types, API endpoints, and multi‑language support may take several days or even weeks of planning, coding, and testing.
A component is a full‑page application that handles a specific type of content and occupies the main content area of the page. A module is a lightweight block that displays data in a fixed template position, such as a sidebar login form or a footer navigation list. Components have their own admin screens and database tables, while modules typically rely on existing data sources.
Understanding the MVC pattern is essential because Joomla’s entire extension architecture is built around it. The framework expects your code to separate data handling (model), output (view), and user actions (controller). Without this knowledge, we would end up fighting the framework instead of working with it, which makes maintenance and upgrades significantly harder.