Physical Address
304 North Cardinal St.
Dorchester Center, MA 02124
Physical Address
304 North Cardinal St.
Dorchester Center, MA 02124
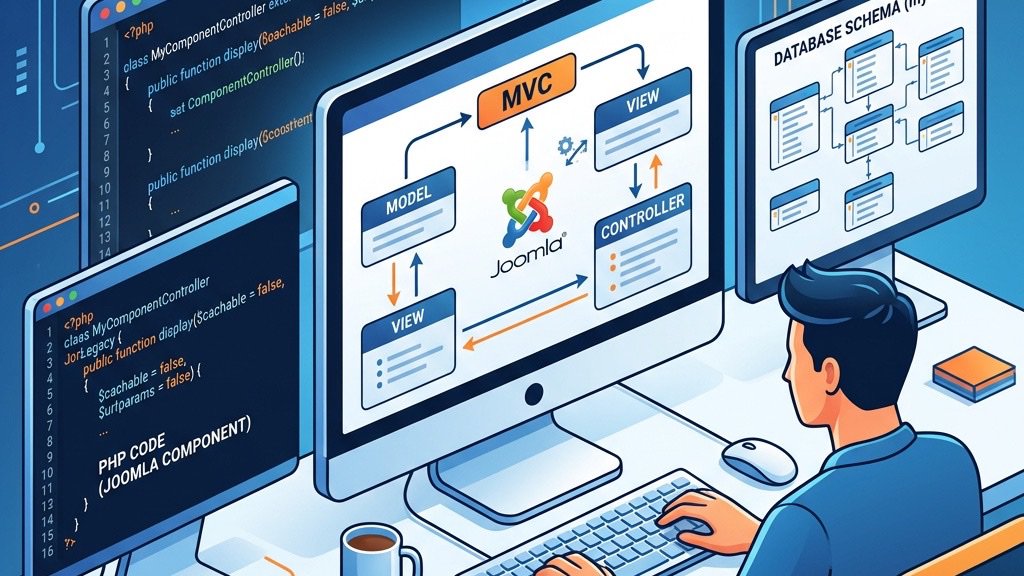
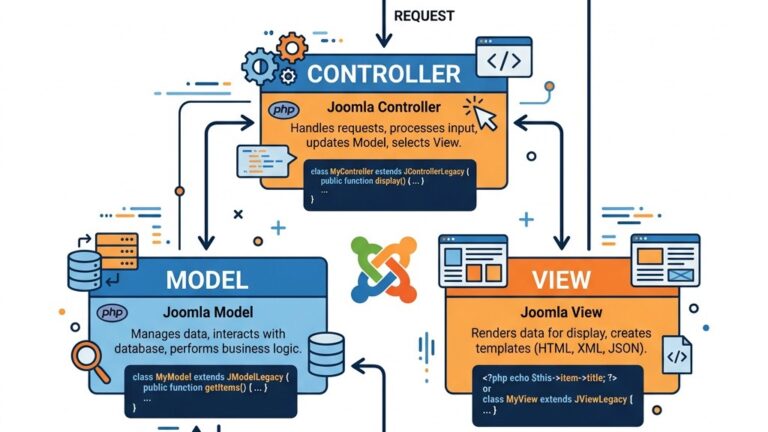
When we start a new project we often begin with the MVC skeleton that Joomla provides, but the real value of joomla custom component development appears once we move past the basics. In this guide we walk through a set of techniques that most tutorials skip, showing how to make our components more modular, performant, and maintainable. The sections assume you already understand the standard MVC flow, manifest files, and basic CRUD operations, so we can focus on the features that differentiate a production‑ready extension from a learning exercise.
Joomla 5 introduces a more explicit service container. By registering our own service provider we can inject helpers, factories, or third‑party libraries directly into controllers, models, and views. This reduces the need for global Factory::get calls and makes unit testing straightforward.
Create a file src/Service/Provider.php inside the component namespace:
<?php
declare(strict_types=1);

namespace Joomla\Component\Mycomponent\Site\Service;

use Joomla\CMS\Application\CMSApplicationInterface;
use Joomla\DI\Container;
use Joomla\DI\ServiceProviderInterface;

class Provider implements ServiceProviderInterface
{
    public function register(Container $container)
    {
        // Register a simple logger that can be swapped in tests
        $container->set(
            'mycomponent.logger',
            fn (CMSApplicationInterface $app) => new \MyComponent\Logger($app->get('log'))
        );

        // Register a repository that talks to a custom table
        $container->set(
            'mycomponent.repository',
            fn (Container $c) => new \MyComponent\Repository\ItemRepository(
                $c->get('mycomponent.logger')
            )
        );
    }
}Add the provider to src/Extension/Component.php:
<?php
declare(strict_types=1);

namespace Joomla\Component\Mycomponent\Site\Extension;

use Joomla\CMS\Extension\SiteApplication;
use Joomla\DI\Container;
use Joomla\Component\Mycomponent\Site\Service\Provider as MyProvider;

class Component extends SiteApplication
{
    public function __construct(Container $container)
    {
        $container->registerServiceProvider(new MyProvider());
        parent::__construct($container);
    }
}<?php
declare(strict_types=1);
namespace Joomla\Component\Mycomponent\Site\Controller;
use Joomla\CMS\MVC\Controller\BaseController;
use Joomla\DI\Container;
class ItemController extends BaseController
{
protected Container $container;
public function __construct(Container $container, array $config = [])
{
$this->container = $container;
parent::__construct($config);
}
public function save()
{
$repository = $this->container->get('mycomponent.repository');
$data = $this->input->post->getArray();
$repository->save($data);
$this->setRedirect('index.php?option=com_mycomponent&view=items');
}
}By pulling the repository from the container we keep the controller thin and ready for automated tests. The same pattern works for models and views.
The default list view in the administrator area offers basic edit and delete actions. When dealing with large data sets we often need to apply a single operation to many rows – for example, publishing a selection or assigning a tag. Joomla already ships a batch framework, but we can extend it to support custom actions and UI elements.
In src/Administrator/Views/Items/tmpl/default.php we add a new button to the toolbar:
<?php
use Joomla\CMS\Toolbar\ToolbarHelper;

ToolbarHelper::custom('items.batch', 'checkbox', '', 'Batch', false);Create src/Administrator/Views/Items/tmpl/batch.php:
<?php
defined('_JEXEC') or die;

use Joomla\CMS\HTML\HTMLHelper;

echo HTMLHelper::_('bootstrap.startTabSet', 'batchTabs', ['active' => 'publish']);
echo HTMLHelper::_('bootstrap.addTab', 'batchTabs', 'publish', Text::_('COM_MYCOMPONENT_BATCH_PUBLISH'));

?>
<div class="control-group">
    <label class="control-label" for="batch-publish">
        <?php echo Text::_('COM_MYCOMPONENT_BATCH_PUBLISH_LABEL'); ?>
    </label>
    <div class="controls">
        <?php echo HTMLHelper::_('select.booleanlist', 'batch[publish]', '', 0); ?>
    </div>
</div>
<?php
echo HTMLHelper::_('bootstrap.endTab');
echo HTMLHelper::_('bootstrap.endTabSet');
?><?php
declare(strict_types=1);
namespace Joomla\Component\Mycomponent\Administrator\Controller;
use Joomla\CMS\MVC\Controller\AdminController;
use Joomla\CMS\Factory;
class ItemsController extends AdminController
{
public function batch()
{
$app = Factory::getApplication();
$cid = $app->input->post->get('cid', [], 'array');
$batch = $app->input->post->get('batch', [], 'array');
$model = $this->getModel();
foreach ($cid as $id) {
if (isset($batch['publish'])) {
$model->publish((int) $id, (int) $batch['publish']);
}
// Add more custom batch actions here
}
$this->setRedirect('index.php?option=com_mycomponent&view=items');
}
}The batch approach reduces the number of round‑trips and gives administrators a smoother workflow.
Modern Joomla sites often need to expose data to external systems. While Joomla’s core web services cover many cases, custom components can define their own endpoints that respect the same authentication and routing rules.
In src/Api/Router.php we extend the core router:
<?php
declare(strict_types=1);

namespace Joomla\Component\Mycomponent\Api;

use Joomla\CMS\Routing\ApiRouter;

class Router extends ApiRouter
{
    public function __construct()
    {
        $this->addRoute('GET', '/v1/items', 'ItemsController::list');
        $this->addRoute('POST', '/v1/items', 'ItemsController::create');
        $this->addRoute('GET', '/v1/items/{id}', 'ItemsController::get');
    }
}<?php
declare(strict_types=1);
namespace Joomla\Component\Mycomponent\Api\Controller;
use Joomla\CMS\MVC\Controller\BaseController;
use Joomla\CMS\Factory;
use Joomla\CMS\Response\JsonResponse;
class ItemsController extends BaseController
{
public function list()
{
$model = $this->getModel('Items');
$items = $model->getAll();
echo new JsonResponse($items);
}
public function create()
{
$data = Factory::getApplication()->input->json->getArray();
$model = $this->getModel('Items');
$id = $model->save($data);
echo new JsonResponse(['id' => $id], true);
}
public function get($id)
{
$model = $this->getModel('Items');
$item = $model->get($id);
echo new JsonResponse($item);
}
}Add the router to the component’s manifest.xml under the
<administration>
    <router type="api">src/Api/Router.php</router>
</administration>
Now the endpoints are reachable at https://example.com/api/index.php/v1/items. The same authentication mechanisms (API token, JWT, etc.) apply automatically.
Joomla’s plugin system is a natural place to decouple logic. By defining our own events we let other extensions react to component actions without hard‑coding dependencies.
In the model where an item is saved we trigger an event:
<?php
declare(strict_types=1);

namespace Joomla\Component\Mycomponent\Administrator\Model;

use Joomla\CMS\MVC\Model\AdminModel;
use Joomla\CMS\Event\DispatcherInterface;
use Joomla\CMS\Factory;

class ItemModel extends AdminModel
{
    protected DispatcherInterface $dispatcher;

    public function __construct(array $config = [])
    {
        $this->dispatcher = Factory::getApplication()->getDispatcher();
        parent::__construct($config);
    }

    public function save(array $data)
    {
        $result = parent::save($data);

        if ($result) {
            $this->dispatcher->trigger('onMyComponentAfterSave', [$this->getState()->get('item.id'), $data]);
        }

        return $result;
    }
}A simple system plugin can respond:
<?php
declare(strict_types=1);

namespace PlgSystemMycomponentlistener;

use Joomla\CMS\Plugin\CMSPlugin;
use Joomla\CMS\Factory;

class Mycomponentlistener extends CMSPlugin
{
    public function onMyComponentAfterSave(int $itemId, array $data)
    {
        // Example: write a log entry
        $logger = Factory::getApplication()->getLogger();
        $logger->info('Item saved', ['itemId' => $itemId, 'data' => $data]);
    }
}
Because the event name is namespaced (onMyComponent…) we avoid clashes with core events and make the intent clear.
When a component evolves, its database schema must change in a controlled way. Joomla’s update scripts can be turned into a migration system similar to other frameworks.
Place migration files under src/Administrator/Database/Migrations/. Each class implements a run() method.
<?php
declare(strict_types=1);

namespace Joomla\Component\Mycomponent\Administrator\Database\Migrations;

use Joomla\CMS\Factory;
use Joomla\Database\DatabaseDriver;

class Migration2024_01_AddTagColumn
{
    public function run(DatabaseDriver $db): void
    {
        $query = $db->getQuery(true)
                    ->alterTable('#__mycomponent_items')
                    ->addColumn('tag', 'VARCHAR(255) NOT NULL DEFAULT \'\'');
        $db->setQuery($query)->execute();
    }
}In src/Administrator/Helper/Updater.php we keep a record of applied migrations in a table #__mycomponent_migrations.
<?php
declare(strict_types=1);

namespace Joomla\Component\Mycomponent\Administrator\Helper;

use Joomla\CMS\Factory;
use Joomla\Database\DatabaseDriver;

class Updater
{
    protected DatabaseDriver $db;

    public function __construct()
    {
        $this->db = Factory::getDbo();
    }

    public function applyMigrations(): void
    {
        $migrations = [
            \Joomla\Component\Mycomponent\Administrator\Database\Migrations\Migration2024_01_AddTagColumn::class,
            // Add new migration classes here
        ];

        foreach ($migrations as $class) {
            $name = $class;
            $already = $this->db->setQuery(
                $this->db->getQuery(true)
                     ->select('COUNT(*)')
                     ->from('#__mycomponent_migrations')
                     ->where('name = ' . $this->db->quote($name))
            )->loadResult();

            if (!$already) {
                (new $class())->run($this->db);
                $this->db->insertObject('#__mycomponent_migrations', (object)['name' => $name]);
            }
        }
    }
}
Call applyMigrations() from the component’s install script or from a custom admin task. This approach guarantees that each migration runs once, even when the site is updated multiple times.
Core Joomla ACL works at the component, view, and item level, but many projects need finer control, such as restricting a specific field or a custom action. By extending the JTable class we can embed permission checks directly into the data layer.
<?php
declare(strict_types=1);

namespace Joomla\Component\Mycomponent\Administrator\Table;

use Joomla\CMS\Table\Table;
use Joomla\CMS\Factory;

class ItemTable extends Table
{
    public function store($updateNulls = false)
    {
        $user = Factory::getUser();

        // Example: only users with “core.edit.state” may change the “published” field
        if (isset($this->published) && !$user->authorise('core.edit.state', 'com_mycomponent')) {
            $this->published = $this->getOriginal('published');
        }

        return parent::store($updateNulls);
    }

    protected function getOriginal(string $field)
    {
        $original = $this->load($this->id);
        return $original->{$field} ?? null;
    }
}In the component’s access.xml we define a new rule:
<access>
    <section name="item">
        <rule name="core.edit.tag" title="COM_MYCOMPONENT_TAG_EDIT" description="COM_MYCOMPONENT_TAG_EDIT_DESC"/>
    </section>
</access>
Now the rule appears in the Permissions tab of the component’s options page, and we can test it in the table as shown above.
The default router maps URLs like index.php?option=com_mycomponent&view=item&id=5. For SEO‑friendly URLs we often need a more expressive pattern, e.g., /products/awesome-gadget. Joomla 5’s router can be extended to parse and build such URLs.
<?php
declare(strict_types=1);

namespace Joomla\Component\Mycomponent\Site\Router;

use Joomla\CMS\Routing\RouterBase;
use Joomla\CMS\Uri\Uri;

class Router extends RouterBase
{
    public function build(&$query)
    {
        $segments = [];

        if (!empty($query['view'])) {
            $segments[] = $query['view'];
            unset($query['view']);
        }

        if (!empty($query['id'])) {
            $item   = $this->getItem((int) $query['id']);
            $segments[] = $item->alias;
            unset($query['id']);
        }

        return $segments;
    }

    public function parse(&$segments)
    {
        $vars = [];

        // Assume first segment is the view
        $vars['view'] = array_shift($segments);

        // Second segment is the alias; we need to resolve it to an ID
        if (!empty($segments)) {
            $alias = array_shift($segments);
            $vars['id'] = $this->getIdFromAlias($alias);
        }

        return $vars;
    }

    protected function getItem(int $id)
    {
        $db   = $this->getDbo();
        $query = $db->getQuery(true)
                    ->select('*')
                    ->from('#__mycomponent_items')
                    ->where('id = ' . $db->quote($id));
        return $db->setQuery($query)->loadObject();
    }

    protected function getIdFromAlias(string $alias): int
    {
        $db   = $this->getDbo();
        $query = $db->getQuery(true)
                    ->select('id')
                    ->from('#__mycomponent_items')
                    ->where('alias = ' . $db->quote($alias));
        return (int) $db->setQuery($query)->loadResult();
    }
}Add the router to the component’s manifest:
<router type="site">src/Router/Router.php</router>Now the URL https://example.com/products/awesome-gadget resolves to the item view with the correct ID, and the router automatically builds the same structure when using JRoute::_().
Even a well‑structured component can become a bottleneck if we ignore caching, query efficiency, and asset loading. Below are a few tactics that go beyond the usual “enable cache” checklist.
Joomla’s database driver supports query caching when the cache handler is configured. Wrap heavy queries in a cache block:
<?php
$cache = Factory::getCache('com_mycomponent', '');
$items = $cache->get(function () use ($db) {
    $query = $db->getQuery(true)
                ->select('*')
                ->from('#__mycomponent_items')
                ->where('published = 1')
                ->order('created DESC');
    return $db->setQuery($query)->loadObjectList();
}, 'latest_items', 300); // 5‑minute cacheWhen a list view shows only a subset of fields, avoid joining large tables. Instead, fetch the extra data only when needed (e.g., in a modal dialog). Use the load() method of a table class on demand.
If the component ships JavaScript or CSS, load them only on the pages that need them. In the view’s display() method:
$document = Factory::getDocument();
if ($this->getName() === 'item') {
    $document->addStyleSheet(Uri::root() . 'media/com_mycomponent/css/item.css');
    $document->addScript(Uri::root() . 'media/com_mycomponent/js/item.js');
}When the component writes files (e.g., uploads), ensure the directory permissions are correct to avoid repeated chmod calls. See our guide on file permissions for details.
Regularly scan the component with the security scanner to catch potential performance‑related vulnerabilities such as unescaped queries.
For a deeper dive into overall site speed, check our article on Joomla performance.
A: Not necessarily. A single provider can register multiple services, and you can group related helpers under a sub‑namespace. The key is to keep the container configuration readable and to avoid over‑injecting into classes that do not need the services.
A: The checkbox only selects rows on the client side. Batch processing adds a server‑side step that iterates over the selected IDs and performs a defined action, such as publishing, moving to a category, or applying a tag. This reduces the number of HTTP requests and gives administrators a single point of control.
A: Yes. The API router inherits the same authentication plugins as the core. When a request includes a valid API token (or JWT), the user’s permissions are applied automatically. You can also add extra checks inside the controller if the endpoint requires a specific privilege.
A: Write unit tests that mock the DispatcherInterface. Trigger the event from the component and assert that the plugin’s listener method is called with the expected parameters. Because the event name is unique, you can isolate the test to just the component logic.
By integrating service providers, batch actions, custom API endpoints, event‑driven hooks, migration scripts, granular ACL, advanced routing, and performance tricks, we turn a simple Joomla component into a production‑grade module that scales and adapts. The techniques described here complement the basics covered in most tutorials and give us the tools to build extensions that meet the expectations of modern Joomla sites.
If you are new to any of the topics, consider reading our related guides on template overrides, admin panel, and SEO‑friendly URLs. For a step‑by‑step walk‑through of installing an extension, see our article on how to install a Joomla extension.
Happy coding, and may your components be both powerful and maintainable.