Physical Address
304 North Cardinal St.
Dorchester Center, MA 02124
Physical Address
304 North Cardinal St.
Dorchester Center, MA 02124

When we first set up a Joomla site — whether we are building from scratch as described in our What Is Joomla overview or migrating from another platform — the default template often feels generic. Our brand, however, has a distinct color palette, typography, and visual rhythm that we want visitors to recognize instantly. By customizing a Joomla template, we can replace the default headings, buttons, and background images with elements that echo our logo and marketing materials. This visual consistency builds trust and makes the site feel like an extension of our business rather than a detached, third‑party product. We can also upload a custom favicon and set a specific site‑wide background pattern to reinforce brand recall on every page. A quick way to verify the impact is to view the site on a mobile device and check that the brand colors remain vivid and legible.
Beyond looks, a well‑tuned template can guide users to the information they need faster. Simple adjustments—like enlarging the navigation menu, adjusting line spacing, or repositioning a call‑to‑action button—can reduce bounce rates and increase conversions. The best part is that Joomla’s built‑in tools let us make these changes from the admin area, so we don’t have to open a text editor or rewrite PHP files. This approach keeps the site stable while still giving us the flexibility to fine‑tune the experience. We can also enable Joomla’s built‑in “Responsive” toggle to ensure menus collapse gracefully on smaller screens. After each change, we should clear the Joomla cache (System → Clear Cache) to see the live result immediately.
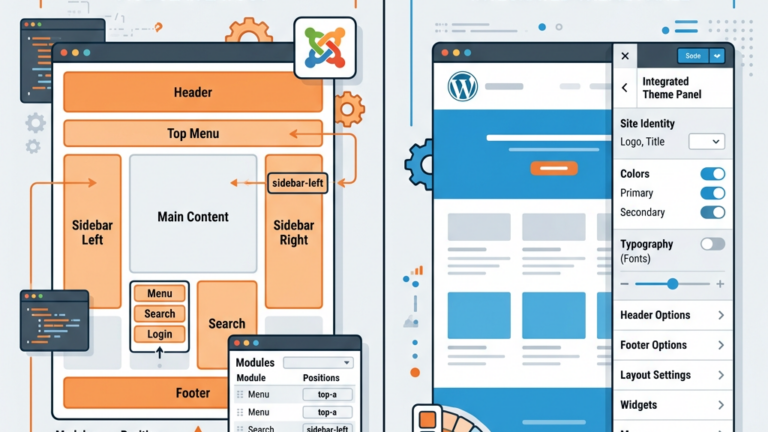
We start by logging into the Joomla Admin Panel. From the left‑hand menu we choose Extensions → Templates → Styles. Here we see a list of all installed templates, each with a “Default” badge if it’s the active one. Clicking the template name opens the style editor, where we can modify parameters such as logo image, site title, and layout presets. The interface is clean and organized, making it easy for us to locate the setting we need. If we have multiple style variations, we can duplicate an existing style and rename it to test new ideas without affecting the live version. The “Preview” button at the top of the editor lets us see a quick snapshot of the front end before saving.
Most modern Joomla templates ship with a set of predefined color schemes and font families. In the style editor we typically find tabs labeled Colors, Typography, and Layout. By selecting a new primary color, we instantly see the change reflected on the front end. The same goes for choosing a Google Font for headings or body text. If the template supports layout options, we can switch between a boxed or full‑width layout, adjust column widths, or enable a sticky header—all without writing a single line of CSS. We can also set a custom CSS class for the body tag under the “Advanced” tab, which gives us a hook for future styling. For multilingual sites, we should verify that the chosen fonts support all required character sets.
Cassiopeia, the default template for Joomla 4 (covered in our Joomla 4 Tutorial), offers a rich set of customization controls. Under the Advanced tab we can toggle the “Dark Mode” switch, set the container width, and even enable a “Back to Top” button. The Header section lets us upload a custom logo, set its size, and decide whether the site title appears beside it. By experimenting with these built‑in options we can achieve a polished look that feels uniquely ours while staying within the safe boundaries of the core template. The “Header” tab also includes an option to add a custom HTML snippet, which is handy for inserting a tracking pixel or a small announcement banner. When we enable “Sticky Header,” we should test its behavior on both desktop and mobile to ensure it does not obscure content.
A template framework is essentially a toolbox that sits between Joomla’s core and the visual layer. It supplies a library of pre‑built modules, grid systems, and styling options that we can mix and match. The framework handles the heavy lifting—generating the necessary CSS classes, managing responsive breakpoints, and providing a live preview—so we can focus on the design rather than the underlying code. This is especially helpful when we want to customize joomla template beyond what the default style editor offers. Frameworks often include a “Theme Preset” manager that lets us switch between multiple color palettes with a single click. They also expose a “Custom JavaScript” field for adding small interactive behaviors without editing core files.
There are several well‑maintained frameworks that target non‑developers. Helix3 and YOOtheme Pro are two of the most popular. Helix3 includes a drag‑and‑drop layout builder, a color palette manager, and a set of ready‑made page sections. YOOtheme Pro offers a visual editor where we can assemble rows, columns, and content blocks with a click. Both frameworks integrate tightly with Joomla’s admin area, so the changes appear instantly on the front end. Helix3 also provides a “Mega Menu” component that lets us create multi‑column navigation without custom code. YOOtheme Pro’s “Style Builder” includes a live device preview, making it simple to verify how a page looks on tablets and phones.
To start, we install the framework package through the Extensions → Manage → Install screen — the same process we cover in our guide on how to install a Joomla template. After activation, a new menu item appears under Extensions → Templates → Styles labeled with the framework name. Selecting it opens a dedicated configuration page where we can choose a base layout, upload a logo, and define a color scheme. Most frameworks also provide a “Live Preview” button that opens a modal window showing our site with the current settings applied. When we are satisfied, we click Save and the framework automatically generates the necessary CSS overrides behind the scenes. We should also enable the framework’s “Automatic CSS Minify” option to reduce page load time. If the framework supports a “Custom Fonts” upload, we can add brand‑specific typefaces that are not available on Google Fonts.
Even with powerful frameworks, we sometimes need a tiny tweak—like adding a subtle drop shadow to a button. Joomla lets us add a custom CSS file that loads after the main stylesheet, ensuring our rules take precedence. In the template style editor we look for a field called Custom CSS or Custom CSS File. We either paste our CSS directly into the textarea or upload a file named custom.css to the template’s css folder via the Media Manager. Because the file is separate from the core CSS, we can safely update the template later without losing our changes. A good practice is to comment each rule with a short note, for example / Add hover shadow to primary button /, so future editors understand the intent. For more on keeping pages fast, see our Joomla Image Optimization guide. We can also enable Joomla’s “Compress CSS” option in Global Configuration to keep the page size small.
When we need to target a specific element but are unsure of its class name, the browser’s inspector is a lifesaver. We right‑click the element on the front end and choose Inspect (or press F12). The developer tools highlight the HTML markup and show the associated CSS rules. By copying the selector—such as .site-header .nav-item.active—we can paste it into our custom CSS file and add the desired property, like color: #ff6600;. This workflow allows us to make precise visual adjustments without diving into the template’s PHP files. If the selector is too generic, we can add a data‑attribute in the template’s override file to create a more specific hook. After saving the custom CSS, we should refresh the page with a hard reload (Ctrl + F5) to bypass the browser cache.
Template overrides are a Joomla feature that lets us replace the default markup of a component, module, or layout with our own version. The override lives in a special folder inside our template, so Joomla loads it instead of the core file. This means we can change the HTML structure, add extra classes, or rearrange fields while still using the same underlying data. Overrides are a safe way to customize joomla template because they survive core updates. We can also add conditional PHP statements inside the override to display extra information only for logged‑in users. When we create an override, Joomla automatically creates a backup of the original file in the html folder, making it easy to revert if needed.
We can generate an override without leaving the admin area. From the Extensions → Templates → Templates screen we click the template name, then choose the Create Overrides tab. A list of components (e.g., com_content, com_contact) and modules (e.g., mod_login, mod_menu) appears. We tick the items we want to override and click Create. Joomla copies the original files into the template’s html folder. From there we can edit them using the built‑in editor or a third‑party IDE. The changes take effect immediately. After creating the override, we should enable the “Show Template Overrides” option in the developer toolbar to quickly spot which files are being used. If we need to override a layout that is used in multiple places, we can create a copy with a new name and assign it via the component’s menu parameters.
Article Layout – By overriding `com_content/article/default.php` we can add a featured image above the title or change the order of meta information.
Login Module – Overriding `mod_login/default.php` lets us replace the default form fields with custom placeholders and add a “Forgot password?” link.
Menu Rendering – The `mod_menu/default.php` override can be used to insert a custom wrapper around the menu items, which is handy when we want to apply a new CSS grid.
All of these adjustments can be performed using the visual editor in the template manager, so we never have to open a text editor unless we want to fine‑tune the markup. When editing the article override, we can insert a Joomla “Read More” button that respects the article’s intro text length. For the login module, we might also add a small social‑login block by inserting a Joomla plugin position.
Two of the most popular visual page builders for Joomla are SP Page Builder and Quix. Both integrate as extensions that appear in the Components menu. They provide drag‑and‑drop interfaces where we can assemble rows, columns, and content blocks such as text, images, sliders, and contact forms. The builders generate shortcodes that Joomla interprets on the fly, meaning we can design complex pages without touching a line of code. Both builders include a library of pre‑designed sections—like testimonials, pricing tables, and FAQs—that we can import with a single click. We should enable the “Responsive Options” panel to set column visibility per device, ensuring a clean layout on phones.
To create a new landing page, we go to Components → SP Page Builder → Add New Page. We select a blank layout, then drag a “Heading” element onto the canvas, type our title, and choose a font size from the dropdown. Next we add an “Image” element, upload a hero picture, and set the alignment. The builder also offers pre‑made templates that we can import and then customize to match our brand colors. When we publish the page, Joomla automatically routes a URL to it, and the page appears alongside our regular articles. The same workflow applies to Quix, which uses a similar block‑based editor. After publishing, we can assign the page to a menu item via the Joomla Menu Manager, giving it a friendly URL. If we need a contact form, both builders let us drop a “Form” block that connects to Joomla’s built‑in contact component.
A child template inherits all the files and settings of its parent while allowing us to store our modifications separately. If we ever need to go beyond visual tweaks and build a template from the ground up, our Joomla Template Development guide walks through that process in detail. By creating a child template—either manually or through the template manager—we ensure that any future updates to the parent won’t overwrite our custom CSS, overrides, or layout tweaks. The child template’s templateDetails.xml file points to the parent, and we only need to add the files we want to change. We should also copy the parent’s index.php into the child folder if we plan to adjust the overall page structure. When the parent releases a security patch, we can simply reinstall it and the child will continue to work without extra effort.
Before we start any customize joomla template project, we should create a complete backup of the site. Joomla offers several extensions that can export the database and files in one click. A reliable backup gives us confidence to experiment, knowing we can roll back if something goes wrong. For more details on backup strategies, see our guide on Joomla Backup Extensions. It’s a good idea to store the backup on a separate server or cloud storage to protect against host failures. We can also schedule automatic daily backups through extensions like Akeeba Backup to keep a recent restore point.
Working directly on a live site can be risky, especially when we modify layout or CSS. We recommend cloning the site to a staging environment—either on a subdomain or a local development server. After applying our changes, we can test across browsers and devices, verify that SEO metadata remains intact, and confirm that performance is not impacted. Once everything looks good, we push the updates to the production site. The Joomla caching system, described in Joomla Caching, can be cleared after deployment to ensure visitors see the latest version. We should also run a speed test with tools like GTmetrix on the staging site to catch any unexpected load‑time spikes. If we use a CDN, we need to purge its cache after the final deployment to avoid serving old assets.
By following the steps above, we can confidently customize Joomla template without writing a single line of PHP. Whether we rely on the built‑in style editor, a template framework, CSS overrides, or a visual page builder, Joomla provides a flexible ecosystem that respects both design goals and technical safety. For deeper dives into specific topics, you might explore the official documentation at Joomla Official Template Customization Docs or the community guide on JoomlaShack Override Guide. The Joomla Magazine is another great resource for staying up to date with template trends and community best practices.