Physical Address
304 North Cardinal St.
Dorchester Center, MA 02124
Physical Address
304 North Cardinal St.
Dorchester Center, MA 02124

Joomla module development begins with a single line of code, yet it can blossom into a full‑featured extension that powers a site like a well‑tuned engine. We guide you through every gear shift, from the first file to the final upload, so you can craft modules that feel as natural as a sunrise over a calm sea.
Key Takeaways
– Understand the distinct role of modules within the Joomla ecosystem.
– Follow a proven file‑structure template to keep your code clean and maintainable.
– Apply modern Joomla 5 techniques such as dependency injection and AJAX for dynamic content.
– Package, test, and distribute your module with confidence, using Joomla’s built‑in tools.

Image: Writing custom Joomla module code
Modules sit on the front‑end like decorative tiles, presenting information in a fixed position, while components act as the main rooms of a house, handling full page requests. Plugins, by contrast, are the hidden switches that react to events behind the scenes, altering behavior without a visual footprint. Recognizing these differences helps us decide whether a piece of functionality belongs in a module, a component, or a plugin, preventing wasted effort and tangled code.
We begin by mapping a feature to its most natural home. If the requirement is to display a list of recent articles in a sidebar, a module offers the quickest path because it can be attached to a position without altering the routing logic. Conversely, a feature that needs its own URL, such as a product catalog, belongs in a component where the MVC stack can manage routing, models, and views. Plugins excel when we need to modify core behavior—like adding a custom field to every article—because they hook into events without rendering visible output.
The decision tree also influences maintenance overhead. Modules stay isolated; updating a module rarely touches the core or other extensions. Components, with their richer set of files, demand careful version control and testing across multiple entry points. Plugins, while lightweight, can become a hidden source of bugs if they fire on too many events. By charting the role early, we avoid later refactoring that could break site stability.
A practical tip is to draft a short matrix that lists desired features, required URLs, and event hooks. If the matrix shows more than two URLs, a component is likely the better choice. If the feature only needs a visual block, a module wins. This simple contrast saves weeks of re‑engineering later.
A Joomla template defines module positions as placeholders, similar to a theater stage where actors (modules) wait for their cue. Positions such as sidebar are declared in the template’s XML file, and the rendering engine fills them with the output of each enabled module. By mapping our module to a specific position, we control where the content appears, ensuring a harmonious layout across devices. , bannerfooter, or
The XML declaration looks like . When the template loads, Joomla reads this list and builds an array of positions that can be referenced in echo $this->getBuffer('modules', 'sidebar');index.php using
We can also create custom positions for niche layouts. For example, a landing‑page template may define hero-left calls, we give designers the flexibility to rearrange content without touching PHP code. The result is a modular page where each block can be swapped, hidden, or duplicated with a few clicks in the administrator. and getBufferhero-right to host promotional modules side‑by‑side. By adding these positions to the XML and inserting the corresponding
A real‑world scenario involves an e‑commerce site that needs a “Deal of the Day†banner above the product list. By defining a deal position directly under the header, the marketing team can drop the banner module without developers editing the template. This contrast between static layout and dynamic content illustrates the power of positions.
Tip: Always test a new position on multiple devices. Some templates hide unused positions on mobile, which can unintentionally hide your module. Use the Joomla template preview tool to verify visibility before publishing.
We reach for a custom module when the out‑of‑the‑box options cannot display the exact data or interaction we need. If a site requires a weather widget that pulls data from an API, a promotional carousel with custom timing, or a user‑specific greeting, a module gives us the flexibility to embed that logic directly into a chosen position. Building a module also isolates the feature, making future updates easier and reducing the risk of breaking unrelated parts of the site.
A practical trigger is the need for a dynamic list that combines data from multiple tables. Suppose we want to show “Top 5 articles with the most comments†in the footer. No core module aggregates comments, so we write a custom module that joins #__content, sorts by comment count, and caches the result. This targeted approach avoids the overhead of a full component while delivering precise functionality. and #__comments
We also consider performance and reusability. A custom module can be packaged and reused across several sites, turning a one‑off solution into a reusable asset. By exposing parameters for API keys, refresh intervals, and CSS classes, we empower site owners to adapt the module without code changes. The net effect is a leaner site that loads only the needed markup, while the development effort stays contained within a single, well‑structured folder.
A warning: avoid over‑engineering. If a simple HTML block with a static image would suffice, a full‑blown module adds unnecessary complexity. Start with the simplest solution, then iterate only when the requirement outgrows it.
The manifest (mod_hello.xml) is the blueprint that tells Joomla how to install, uninstall, and update the module. It lists files, languages, media, and configuration parameters, acting like a contract between the developer and the CMS. By adhering to the XML schema, we ensure that Joomla can read the manifest without errors, and we can later add version numbers or dependencies with a single edit.
A typical manifest starts with . The client attribute tells Joomla whether the module runs on the front‑end or back‑end. Inside, we declare that list every PHP, XML, and asset file, and that point to language packs. Adding a
We also embed to expose parameters in the administrator UI. Each can define a type, default value, validation rule, and tooltip. By grouping fields into
Finally, we set and to control server‑side caching. A value of cachetime1 enables caching, while
A comparison with component manifests shows that modules use a leaner set of tags, reflecting their smaller footprint. While components need and
Tip: Keep the manifest tidy by ordering tags alphabetically. This makes future maintenance easier and helps reviewers spot missing entries quickly.
The entry point (mod_hello.php) encapsulates business logic, such as fetching records or processing input, keeping the entry point tidy. This separation mirrors the Model‑View‑Controller pattern, allowing us to test the helper in isolation and reuse its methods across multiple layouts. ) loads the helper class, creates a data array, and includes the layout file. The helper (helper.php
We start the entry point with defined('_JEXEC') or die; parameter. to protect against direct access. After requiring the helper, we instantiate it or call a static method, passing the layout$params to locate the appropriate view file, allowing administrators to select alternative layouts via the object that holds configuration values. The helper returns an array of objects that the layout will iterate over. Finally, we call JModuleHelper::getLayoutPath()
The helper class lives in helper.php. Inside, we can define multiple static methods: one for data retrieval, another for formatting, and a third for asset loading. By keeping methods static, we avoid unnecessary object instantiation, which reduces memory usage on high‑traffic sites. and follows a naming convention that matches the module name, e.g., class ModHelloHelper
To improve testability, we can inject the database driver or logger into the helper. In Joomla 5, the container can provide these services, letting us replace them with mocks during unit tests. This design pattern also makes the helper reusable in other extensions, such as a component that shares the same data‑fetching logic. The result is a clean entry point that merely coordinates, while the heavy lifting resides in a well‑structured helper.
A step‑by‑step guide for creating the helper:
1. Create helper.php inside the module folder.
2. Define class ModHelloHelper. with a public static function getItems($params)
3. Inside the method, obtain the database driver via JFactory::getDbo().
4. Build a query using the query builder, execute it, and return the result list.
Tip: Use JLog::add() inside the helper to record key actions. This provides visibility when troubleshooting without cluttering the front‑end.
Warning: Do not place HTML markup inside the helper. Mixing presentation with logic makes future redesigns painful. Keep the helper pure PHP.
Layout files live in the tmpl. folder and contain the HTML that the module renders. By default Joomla looks for htmlspecialcharsdefault.php, injecting data safely with , but we can supply alternative layouts such as compact.php or fullwidth.php to give site administrators styling options. The layout receives the $items array from the entry point, and we can loop through it with a simple foreach
We can also use Joomla’s JLayoutFile. This approach reduces duplication and makes it easier to apply a consistent design across multiple modules. system to break complex markup into reusable snippets. For example, a card layout for each item can be placed in $layout = new JLayoutFile('card', $basePath); echo $layout->render($item);layouts/card.php and called from the main layout with
When building responsive modules, we add CSS classes that adapt to screen size. The layout may include a A real‑world example: a news ticker module that scrolls headlines horizontally. The layout uses a Tip: Validate HTML with the W3C validator before committing the layout. Small markup errors can break the module’s rendering in certain browsers. Warning: Avoid inline styles; they hinder theme overrides. Use class names and let the template’s stylesheet dictate appearance. We start by creating a folder named The folder structure looks like this: We create the manifest with the required Once installed, we go to Extensions → Modules, filter by “Hello Worldâ€, and click the module name to open its settings. We assign it to the Step‑by‑step verification: 1. Open the site’s front‑end and view the source. 2. Locate the 3. Confirm the text matches the parameter value. Tip: Use the Joomla “Preview†button in the module manager to see changes instantly without clearing caches. Warning: Do not forget the Parameters let site editors customize the module without touching code. In the manifest we define fields such as We use Joomla’s In the layout, we conditionally render the date: By exposing these parameters, we give non‑technical editors the power to personalize the module, reducing the need for developer intervention. The same pattern can be extended to color pickers, image selectors, or even JSON configuration strings, making the module highly adaptable. A comparison with hard‑coded values: a static “Hello World†module would require code changes for each greeting, whereas parameter‑driven modules allow instant updates from the backend. This contrast highlights the efficiency gains of using Joomla’s form system. Tip: Group related fields into Warning: Never store raw HTML in a text parameter without sanitizing it. Use We can query the Joomla database using the The helper method might look like this: We also add a To protect against SQL injection, we rely on the query builder’s automatic quoting of identifiers and values. If we need to add a search term, we use A real‑world use case: a “Featured Products†module that joins the Tip: Enable Joomla’s query profiling during development ( Warning: Avoid using Image: Understanding the Joomla module file structure* For more on this topic, check out our Joomla template development. Joomla 5 embraces a dependency injection container, allowing us to request services such as the logger or the event dispatcher directly in our helper. By type‑hinting the constructor with the desired service, the container resolves it automatically, reducing the need for global factories. This approach improves testability, as we can replace the real service with a mock during unit tests. We register our helper as a service in Now the helper’s constructor receives a When writing unit tests, we create a mock container that supplies stub services. The mock logger records messages without writing to files, and the mock dispatcher does nothing, allowing us to focus on the data‑retrieval logic. This isolation speeds up test execution and yields clearer failure messages. By adopting dependency injection, we align our module with modern PHP practices, making future upgrades smoother and the codebase more maintainable. A comparison with legacy code: older modules often called Tip: Keep the service registration file small; only expose services that truly need injection. Over‑exposing can clutter the container and slow autowiring. Warning: Do not inject the entire Joomla application object unless absolutely necessary; it defeats the purpose of lightweight services. To make a module react without a full page reload, we register an AJAX endpoint using Joomla’s We start by adding a The script uses the Fetch API: On the PHP side, we create an entry point The helper method This technique works well for live feeds, voting widgets, or personalized greetings that change based on the logged‑in user. By leveraging Joomla’s built‑in AJAX dispatcher, we avoid writing custom controllers and keep the module’s footprint small. A step‑by‑step checklist for AJAX modules: 1. Add 2. Enqueue the script in the helper. 3. Create a PHP file that returns JSON ( 4. Register the module with the Tip: Use Warning: Never expose raw database rows in the JSON response; always format the data and escape HTML to prevent injection attacks. Caching stores the rendered HTML of a module for a defined period, reducing database hits and PHP execution time. We enable caching in the manifest with In the entry point we add We can fine‑tune caching by adding a To clear stale caches, we can call A comparison with full‑page caching: module caching works at a finer granularity, allowing only the module’s output to be cached while the rest of the page remains dynamic. This contrast is useful for sites that need a mix of static and dynamic sections. Tip: Use the Joomla “Cache Manager†to monitor cache hit rates for your module. High hit rates indicate that the caching strategy is effective. Warning: Do not cache sensitive user data in a static cache; always use For more on this topic, check out our Joomla extensions directory. The final step before distribution is to compress the module folder into a ZIP file that Joomla can read during installation. The ZIP must contain the manifest at the root, followed by all PHP, XML, and asset files, preserving the directory hierarchy. By testing the installation on a clean Joomla instance, we verify that all files are correctly referenced and that no hidden dependencies remain. We generate the ZIP using the command line: The archive should include Before publishing, we run the Joomla Extension Scanner to detect any deprecated APIs or missing language strings. This step catches issues that could cause warnings on newer Joomla releases. Once the scan passes, we upload the ZIP to a test site, enable the module, and verify that all parameters, assets, and caching behave as expected. If any errors appear, we adjust the manifest or code, rebuild the ZIP, and repeat the test cycle. This iterative process ensures that the final package is clean, well‑documented, and ready for the Joomla Extensions Directory. A comparison with manual file copying: the ZIP method guarantees that all files are placed in the correct directories, while manual copying can leave stray files that cause conflicts. Tip: Include a Warning: Do not embed absolute server paths in any file; they break when the extension is installed on a different host. Use Joomla’s We enable Joomla’s debug mode to capture warnings, notices, and backtraces, which appear in the administrator toolbar. Inside our helper we wrap database calls in try‑catch blocks, logging any exceptions with the A typical try‑catch block looks like this: We also add a custom error view that displays a friendly notice when For deeper inspection, we enable A comparison with silent failures: silently ignoring errors can leave the site looking broken without a clue, while proper logging gives us a trail to follow. Tip: Add a “Debug†toggle parameter to the module’s config; when enabled, the module outputs a Warning: Never output raw exception messages to the front‑end in production; they can reveal file paths or database details to attackers. Before submitting to the JED, we ensure the module complies with Joomla’s coding standards and includes a detailed README. The README should contain installation steps, configuration options, and screenshots that illustrate the module in action. After uploading the ZIP file and filling out the extension form, the JED team reviews the package, and once approved, the module becomes available to the global Joomla community. We also create a To increase visibility, we write a short blog post that links to the JED entry, includes a demo site URL, and highlights the module’s key benefits. We also share the announcement on Joomla forums and social media groups, inviting feedback and contributions. By following these steps, we turn a single piece of code into a community‑supported extension that can evolve over time. A comparison with private distribution: publishing on the JED provides automatic update notifications, while private sharing requires manual version checks. Tip: Use the Joomla “Extension Update†mechanism by adding an Warning: Do not embed proprietary third‑party libraries without proper licensing; Joomla’s GPL requires compatible licenses for all bundled code. For more on this topic, check out our Joomla 5 features. Q1: Can I use Joomla 5’s MVC pattern inside a module? A1: Yes, we can adopt the MVC approach by placing a model class in the Q2: How do I make a module multilingual? A2: We create language files ( Q3: Is it possible to load CSS and JavaScript only when the module is displayed? A3: Absolutely. We enqueue assets in the helper using Q4: What is the best way to secure user input in a module? A4: We sanitize all incoming data with Q5: Can a module interact with other extensions, such as a component? A5: Yes, a module can call component models or trigger events that the component listens to. By using the Joomla event dispatcher, we create a communication channel that respects the system’s architecture. — By following the steps outlined above, we transform a simple idea into a polished Joomla module that integrates seamlessly with any template, respects performance best practices, and stands ready for distribution. The journey from a blank folder to a published extension mirrors a craftsman shaping raw timber into a sturdy chair—each cut deliberate, each joint precise, each finish polished. Let us continue building, testing, and sharing our modules, enriching the Joomla ecosystem one line of code at a time. and use CSS Grid or Flexbox to arrange items. By exposing a grid_columns parameter, administrators can choose between one‑column, two‑column, or three‑column displays without editing code. The layout also respects Joomla’s module chrome, allowing the template to wrap the output with additional markup such as Building Your First Joomla 5 Module
Creating a Basic “Hello World†Module
mod_helloworld and placing the manifest, entry point, helper, and layout files inside. The helper returns a static array with a single object containing the text “Hello, World!â€. When we install the module through the Joomla administrator, the module appears in the list, ready to be assigned to a position. mod_helloworld/
│ mod_helloworld.xml
│ mod_helloworld.php
│ helper.php
│ index.html
└── tmpl/
default.php
index.html<extension> field. After zipping the folder, we navigate to Extensions → Manage → Install, upload the zip, and click Install. Joomla validates the XML, copies files to tag, list all files, and define a simple greeting<config> section that includes a /modules/mod_helloworld/, and registers the module in the database. position-7. This simple workflow demonstrates the full life cycle from folder creation to live output. position, set the <div class="mod-helloworld">greeting parameter to “Welcome to our siteâ€, and enable it. The front‑end now displays the greeting inside a <div class="mod-helloworld"> element. defined('_JEXEC') or die; line in every PHP file. Omitting it opens a security hole that allows direct script access. Adding Module Parameters
greeting and passes them to the layout, enabling dynamic content that adapts to the administrator’s choices. (text) and $params->get('greeting')show_date (boolean), which appear in the module’s configuration screen. The entry point reads these values via JForm that explains the impact of toggling the option. system to validate input. For instance, the descriptiongreeting field can have filter="string" and maxlength="100" attributes, ensuring that excessively long strings are trimmed before they reach the layout. The show_date field uses a radio button with values 1 and 0, and we can add a <?php if ($params->get('show_date')): ?>
<p class="mod-helloworld-date"><?php echo JHtml::_('date', 'now', 'Y-m-d'); ?></p>
<?php endif; ?><fieldset> tags to keep the admin UI tidy. For example, place all display options under a “Presentation†fieldset. JFilterInput::clean() before outputting to avoid XSS. Accessing the Joomla Database from a Module
JDatabaseDriver class, which provides a fluent interface for building SQL statements. By injecting the database object into the helper, we keep the entry point free of SQL, and we can retrieve articles, users, or custom tables with a single method call. The result set is then transformed into objects that the layout can render safely. public static function getItems($params)
{
$db = JFactory::getDbo();
$query = $db->getQuery(true)
->select($db->quoteName(['id', 'title', 'introtext']))
->from($db->quoteName('#__content'))
->where($db->quoteName('state') . ' = 1')
->order('created DESC')
->setLimit((int) $params->get('limit', 5));
$db->setQuery($query);
return $db->loadObjectList();
}limit to enforce this cap, preventing the module from pulling an unbounded number of rows that could degrade performance. parameter to the manifest, allowing administrators to control how many items appear. The query uses setLimit$db->quote('%' . $search . '%') to escape special characters. This disciplined approach ensures that the module remains secure even when handling user‑generated input. #__products, and returns a list of product objects. table with published = 1#__categories to display items that belong to a specific category. The helper builds a join query, filters by $app->set('debug', 1);) to see the exact SQL generated. This helps fine‑tune performance. SELECT <em> in production modules; explicitly list needed columns to reduce bandwidth and memory usage. 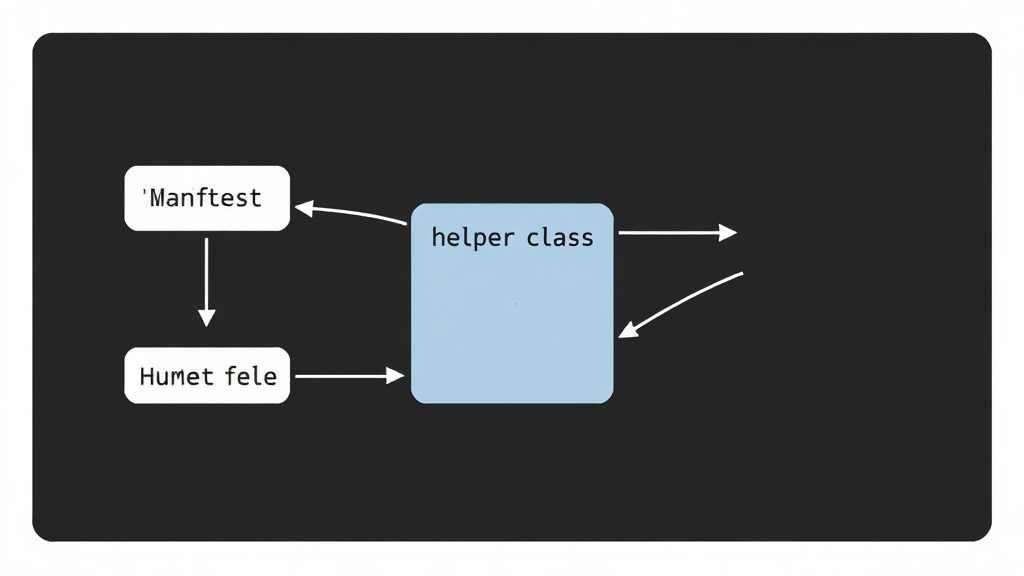
Advanced Module Development Techniques
Using Dependency Injection in Joomla 5
services/provider.php: $container->registerServiceProvider(
new JoomlaDIServiceProvider(
[
ModHelloHelper::class => function ($c) {
return new ModHelloHelper(
$c->get(JoomlaCMSLogLog::class),
$c->get(JoomlaCMSEventDispatcherInterface::class)
);
}
]
)
);Log. This pattern decouples the helper from static factories and makes the code easier to reason about. instance and a $this->dispatcher->trigger('onModHelloPrepare', [$params]);DispatcherInterface. Inside the helper we can call $this->logger->info('Fetching items'); and JFactory::getLogger() directly, which ties the class to a global state. The DI approach replaces that with a clean, injectable contract. AJAX Requests and Dynamic Module Content
ajax, and the PHP handler returns JSON data that the front‑end script injects into the DOM. This pattern creates a lively user experience, similar to a magician pulling new tricks from a hidden hat. task. The JavaScript code sends a request to index.php?option=com_ajax&module=mod_dynamic&format=jsonscript.js folder and enqueue it in the helper: file in the module’s mediaJHtml::_('script', 'mod_dynamic/script.js', ['relative' => true, 'version' => 'auto']);document.addEventListener('DOMContentLoaded', function () {
fetch('index.php?option=com_ajax&module=mod_dynamic&format=json&action=fetch')
.then(response => response.json())
.then(data => {
const container = document.getElementById('mod-dynamic');
container.innerHTML = data.html;
})
.catch(err => console.error('AJAX error:', err));
});mod_dynamic.php. We also verify the Joomla token to prevent CSRF attacks: that checks the JsonResponseaction parameter and returns a JSession::checkToken('get') or jexit('Invalid Token');fetchData() can query the database, build an HTML fragment, and return it as part of the JSON payload. By separating the AJAX logic from the regular layout, we keep the module’s core rendering path lightweight while still offering interactive features. script.js to the media folder. JsonResponse). com_ajax tag. component via the manifest’s <ajax>JCache::getInstance('callback') inside the AJAX handler to cache expensive queries, reducing server load on frequent calls. Module Caching and Performance
<cache>1</cache> parameter. When the cache expires, Joomla regenerates the output, ensuring that fresh data appears while still benefiting from the speed of cached pages. and control the lifetime via the cachetimeJModuleHelper::getLayoutPath() table under a key that includes the module ID and parameters. with the #__cache$module object that contains caching information. Joomla automatically checks $module->cache and $module->cachemode to decide whether to serve a cached version. If caching is active, the module’s output is stored in the cachemode so that each visitor receives a unique cached fragment. field to the manifest, allowing administrators to choose between cachemode="user"static (same for all users) and user (different per user). For a module that displays a personalized greeting, we set $cache->clean('_module', ['group' => 'mod_helloworld']); from a custom admin button. This ensures that after a content update, the module immediately reflects the change without waiting for the timeout. By combining manifest settings with selective cache clearing, we achieve a balance between speed and freshness. cachemode="user" for personalized content to avoid leaking information across sessions. Packaging, Testing, and Distribution
Creating an Installable ZIP Package
cd /path/to/modules
zip -r mod_helloworld.zip mod_helloworldmod_helloworld.xml that outlines installation steps, configuration options, and licensing information. , README.txtmod_helloworld.php, helper.php, the tmpl folder, and any media assets. We also add a manifest_cache folder inside the zip to store temporary files during installation; Joomla will clean it automatically. JPATH_ROOT constants instead. Debugging and Error Handling
Log class and returning a graceful fallback message. This disciplined error handling prevents the entire page from crashing when a single module encounters an issue. try {
$items = ModAdvancedHelper::getItems($params);
} catch (Exception $e) {
Log::add('Module error: ' . $e->getMessage(), Log::ERROR, 'mod_advanced');
$items = [];
}$items is empty, such as “No recent articles found.†This keeps the front‑end tidy while informing administrators that the data source returned no results. error_reporting(E_ALL); file during development. Combined with Xdebug, we can step through the helper’s methods, inspect variable values, and verify that the dependency injection container supplies the expected services. Once the module is stable, we revert to the production error level to avoid exposing sensitive information. in the configuration.php<pre> block with the raw data array for quick inspection. Publishing on the Joomla Extensions Directory
CHANGELOG.txt file to the package. that records each version’s modifications, bug fixes, and new features. This transparency helps users decide whether to upgrade and gives them confidence that the module is actively maintained. We choose a GPL‑2.0 license, which is the default for Joomla extensions, and we add a LICENSE.txt<updateservers> block in the manifest; this lets users receive updates directly from your server. FAQ
models. The entry point then calls the model to fetch data and passes it to the view for rendering, keeping concerns separate. folder and a view class in views
en-GB.mod_hello.ini folder and reference language constants in the layout. Joomla automatically loads the appropriate file based on the site’s current language. , languagefr-FR.mod_hello.ini) in the
JHtml::_('stylesheet', ...). Joomla adds them to the document head only if the module is rendered on the page. and JHtml::_('script', ...)
JFilterInput::clean() and escape output with htmlspecialchars`. For database queries we rely on prepared statements via the query builder to prevent SQL injection.