When we compare the three most popular open‑source CMSs, a few patterns emerge. WordPress is often praised for its sheer number of blogging plugins, while Drupal shines in complex data structures. Joomla sits in the middle, offering a balance of flexibility and built‑in content management.
Content management – Joomla’s article manager lets us handle drafts, revisions, and publishing dates without extra extensions.
Access control – The ACL system gives us granular user permissions, something that WordPress can only achieve with additional plugins.
Extension ecosystem – Joomla’s extension directory includes many free and commercial tools for SEO, comments, and social sharing.
Because the core already supports categories, tags, and featured articles, we can launch a functional blog with fewer add‑ons than on the other platforms.
Extensibility and Community Support
Joomla’s architecture is built on a modular MVC pattern, which means we can replace or extend any part of the system without touching the core. The community maintains a vibrant forum, a dedicated Discord channel, and a marketplace of extensions that are regularly updated. When we encounter a niche requirement—say, a custom content type for podcasts—we can either find an existing plugin or develop a small component that plugs into the same event system that powers the core. This extensibility reduces the risk of vendor lock‑in and keeps our site adaptable as our needs evolve.
Built‑in Content Management, Categories, ACL
Joomla’s content management framework is organized around categories, tags, and access control lists (ACL). When we create a blog category, we can assign it a module position for sidebar widgets, set SEF URLs, and decide which user groups may edit or publish. The ACL interface lives under Users > Groups and Users > Access Levels, allowing us to define roles such as author, editor, and publisher without touching code.
Practical Tips for Category Setup
Use descriptive aliases – An alias like `travel-europe` is easier for readers and search engines than a numeric ID.
Enable “Show Title” – In the category parameters, turn on the title display so the heading matches the breadcrumb trail.
Assign a default image – Many templates allow a category thumbnail; set one that reflects the theme (e.g., a world map for Travel).
Managing Tags Effectively
Tags are optional but powerful for cross‑referencing. We should limit the tag list to 10‑15 high‑value terms per article to avoid dilution. A good practice is to maintain a master tag list in Content > Tags and periodically prune unused tags. This keeps the tag cloud tidy and improves internal linking.
Joomla 5 Improvements for Content Creators
Joomla 5, released after Joomla 4, adds several quality‑of‑life updates that benefit bloggers:
Improved editor integration – The default TinyMCE editor now includes a live preview button, making it easier to see how intro text and full article sections will appear.
Responsive design defaults – New template scaffolding automatically adjusts the blog layout for mobile devices, reducing the need for custom CSS.
Enhanced security – Core updates include stricter joomla security checks for file uploads, which protects our joomla hosting environment from malicious scripts.
These changes mean that the blog setup process in the Joomla CMS feels more straightforward, while still giving us the power to customize every element of the site. Whether we are writing our first Joomla articles or migrating from an older version, Joomla 5 makes the transition smoother than ever.
Practical Configuration for Joomla 5
Enable the live preview: In System > Global Configuration > Text Filters, set the editor to “TinyMCE – Live Preview”.
Set default image sizes: In the template’s CSS, add `.article-image { max-width: 100%; height: auto; }` to ensure images scale correctly on phones.
Activate security hardening: Under System > Global Configuration > Server, turn on “File Upload Scanning” and schedule weekly scans via the built‑in scheduler.
A clear hierarchy helps both readers and search engines. We usually start with a top‑level blog category such as Travel or Tech. Under each, we add subcategories for more specific topics (e.g., Travel → Europe). Tags are optional but useful for cross‑referencing articles that belong to multiple themes.
Example hierarchy
Blog
│─ Travel
│   ├─ Europe
│   └─ Asia
│─ Technology
│   ├─ Gadgets
│   └─ Software
Tips for a Scalable Hierarchy
Limit depth: Keep the hierarchy to two or three levels; deeper trees become hard to navigate.
Use breadcrumb trails: Enable breadcrumbs in the template settings so readers can jump back to parent categories.
Consistent naming: Adopt a naming convention (e.g., singular nouns) to avoid duplicate categories.
User Roles and Permissions for Multi‑Author Blogs
For a blog with several contributors, we define the following roles:
Role
Permissions (ACL)
Author
Create, edit own articles; submit for review
Editor
Edit any article; publish within assigned categories
Publisher
Publish, unpublish, delete any article
These permissions are set in Users > Groups and linked to Access Levels that correspond to each blog category.
Step‑by‑Step Permission Setup
Create groups – Go to Users > Groups, click New, and name the group “Blog Author”.
Assign permissions – Open System > Global Configuration > Permissions, select “Blog Author”, and enable “Create”, “Edit Own”, and “Edit State”.
Map to access levels – In Users > Access Levels, create a level called “Blog Contributors” and include the three groups.
Apply to categories – Edit each blog category, set Access to “Blog Contributors”.
These steps ensure that each contributor sees only the sections they are allowed to edit, reducing accidental overwrites.
URL Structure and SEF URLs
Search‑engine‑friendly URLs improve visibility. Joomla’s SEF URLs feature rewrites links like `index.php?option=com_content&view=article&id=42` into clean paths such as `/blog/technology/gadgets/awesome‑new‑phone`.
To enable SEF URLs:
Open System > Global Configuration.
Set SEO Settings → Search Engine Friendly URLs to Yes.
Enable Use URL Rewriting and rename `htaccess.txt` to `.htaccess`.
A typical `.htaccess` snippet for Joomla looks like this:
## Begin - Joomla! core SEF Section
RewriteEngine On
RewriteBase /
RewriteCond %{REQUEST_FILENAME} !-f
RewriteCond %{REQUEST_FILENAME} !-d
RewriteRule .* index.php [L]
## End - Joomla! core SEF Section
With this configuration, our blog layout URLs remain tidy and descriptive.
Advanced URL Tweaking
Remove the “category” segment: Edit `components/com_content/router.php` to skip the category alias.
Add language prefixes: If we run a multilingual site, enable “Multilingual Associations” and Joomla Joomla will prepend `/en/` or `/fr/`.
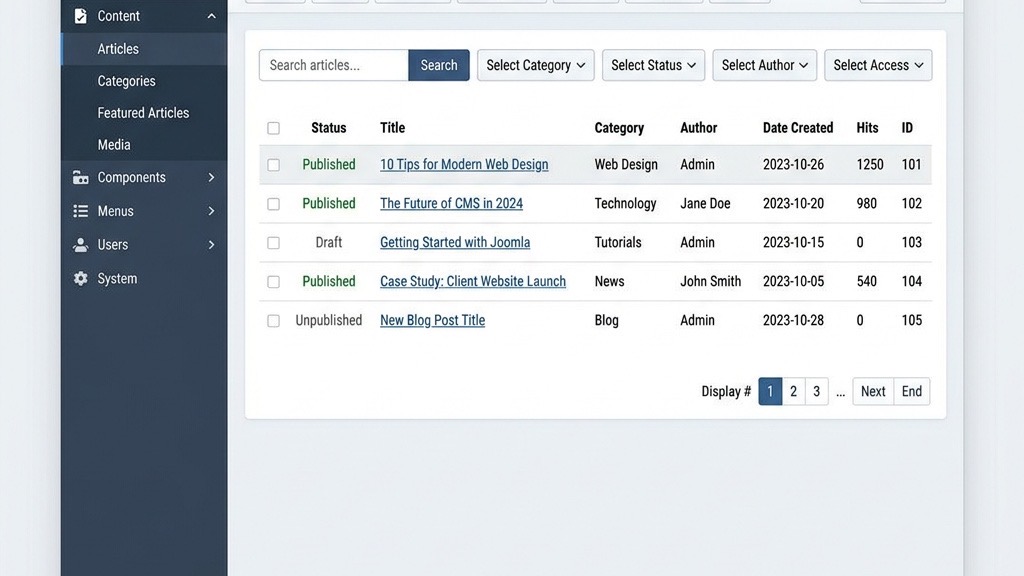
Creating Blog Categories and Articles
Step‑by‑Step: Creating Categories in Joomla Admin
Navigate to Content > Categories.
Click New.
Fill in Title (e.g., Travel), Alias, and Description.
Choose a Parent Category if this is a subcategory.
Set Access to the appropriate user group (e.g., Public).
Save & Close.
Repeat the process for each blog category and sub‑category you need.
Practical Tips for Category Creation
Use SEO‑friendly aliases: Replace spaces with hyphens and avoid special characters.
Add a meta description: In the category parameters, fill out the “Meta Description” field to give search engines context.
Assign a default image: Some templates let you set a header image per category; this can be a banner that appears on the category blog page.
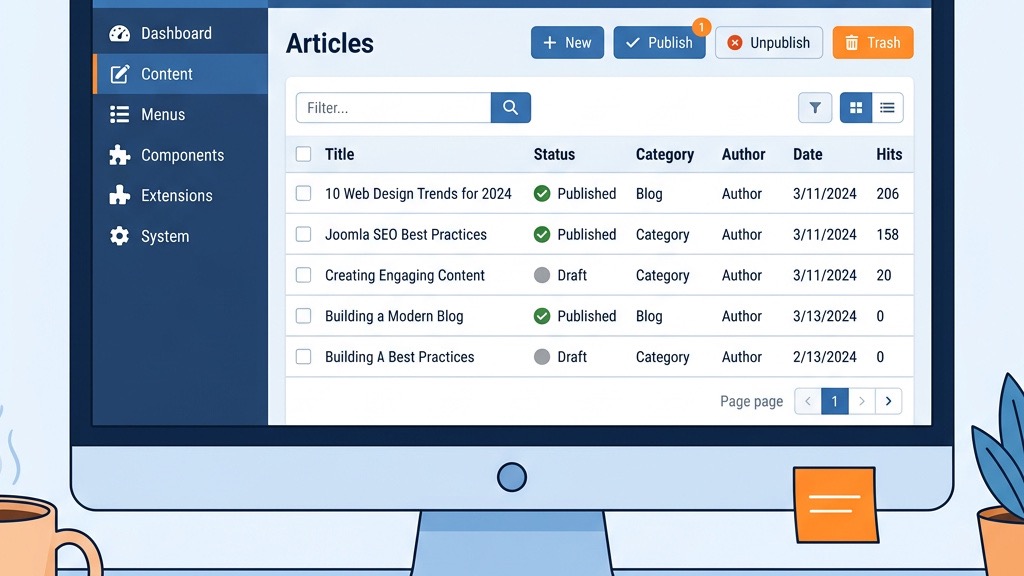
Writing and Formatting Articles with TinyMCE / JCE
When we add a new article:
Go to Content > Articles > Add New Article.
Enter the Title, then type the intro text in the top editor pane.
Use the Insert Media button to embed images, videos, or audio.
Switch to the Full Article tab for the body content.
Apply formatting (headings, lists, tables) using the toolbar.
Both TinyMCE and JCE support responsive design options, allowing us to set image width to `100%` for mobile friendliness.
Step‑by‑Step Media Insertion
Click the Image icon, browse to Content > Media, and select `europe.jpg`.
In the image properties, set Alignment to “None”, Width to `100%`, and enable Lazy Load by adding `loading=”lazy”` in the advanced tab.
Add a Caption that includes a keyword, e.g., “European skyline at sunset – travel photography”.
Featured Articles, Intro Text vs Full Text
Joomla lets us mark an article as featured in the Publishing tab. Featured articles appear at the top of a category blog layout.
The intro text is displayed on the blog overview page, while the full article is shown after the reader clicks “Read more.” This separation helps us control page length and improves load speed.
Best Practices for Intro Text
Keep it under 150 words: This ensures the snippet fits nicely on mobile screens.
Include a call‑to‑action: End with “Read more to discover our top 10 tips.”
Add a thumbnail: Use the “Images and Links” tab to set an intro image that appears beside the snippet.
Media Management and Image Insertion
All media files are stored under Content > Media. To insert an image:
Use consistent naming: `2024-03-travel-europe-01.jpg`.
Set proper permissions: Ensure the `media` folder is writable by the web server but not publicly executable.
Scheduling and Publishing Workflow
Joomla’s publishing options allow us to schedule posts in advance.
In the Publishing tab, set Start Publishing to a future date and time.
Optionally set Finish Publishing to automatically unpublish after a campaign ends.
We can also enable Version History (under System > Global Configuration > Content) to keep a record of changes, which is useful for editorial review.
Configuring the Blog Layout in Joomla
Category Blog Menu Item Type
The Category Blog menu item is the backbone of our blog front‑end. To create it:
Go to Menus > Main Menu > Add New Menu Item.
Choose Menu Item Type → Articles → Category Blog.
Select the Category you want to display (e.g., Travel).
Set Display Settings such as Number of Leading Articles, Intro Articles, and Columns.
Additional Display Options
Show Author: Turn on to display the writer’s name under each title.
Show Date: Choose “Created” or “Modified” to give readers context.
Show Hits: Enable to display view counts, which can boost credibility.
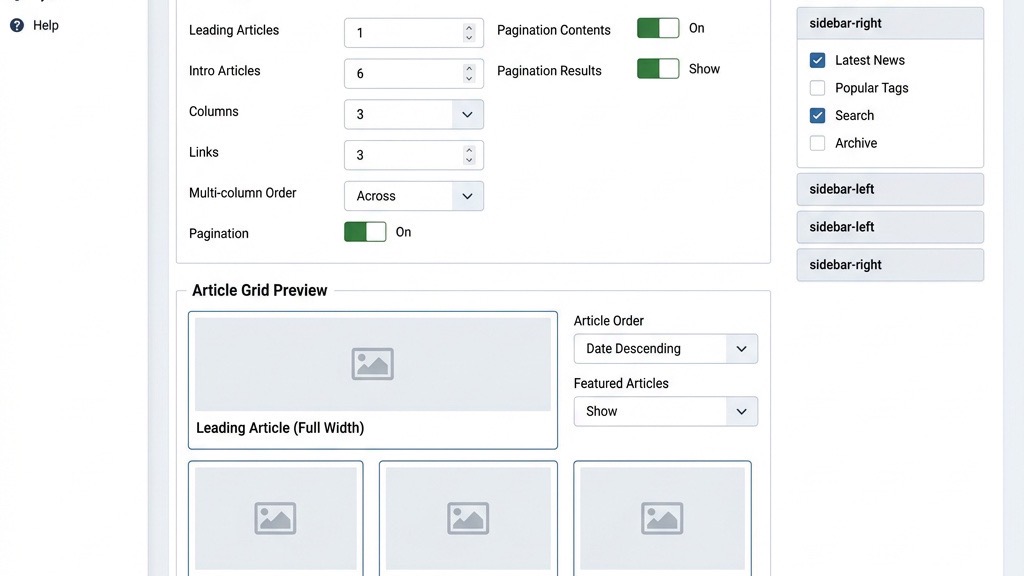
Layout Options: Columns, Leading Articles, Intro Articles
Leading Articles: Full‑width items that draw attention.
Intro Articles: Grid or list items that show only the intro text.
Columns: Determines how many items appear side‑by‑side on larger screens.
A typical configuration might be:
Setting
Value
Leading Articles
1
Intro Articles
6
Columns
3
Pagination
Show 10 per page
These values can be adjusted per menu item to create a varied blog layout across the site.
Responsive Tweaks
Set “Bootstrap Grid”: In the menu item’s Advanced Options, choose a 12‑column grid and set Column Width to `4` for three columns on desktop, which collapses to `12` on mobile.
Enable “Show Read More”: This adds a button that triggers a smooth scroll to the full article.
Module Positions for Sidebar Widgets
Joomla templates define module positions such as `sidebar-left` or `sidebar-right`. We can assign modules like Latest Articles, Tag Cloud, or Social Sharing to these positions:
Go to Extensions > Modules.
Click New, select the module type (e.g., Latest Articles).
Choose the Position (e.g., `sidebar-right`).
Set Menu Assignment to the blog pages.
Practical Module Configuration
Latest Articles: Limit to 5 items, order by “Most Recent”, and enable “Show Intro Text”.
Tag Cloud: Set Minimum Font Size to `12px` and Maximum Font Size to `24px` for visual balance.
Social Sharing: Choose “Icon Only” style to keep the sidebar compact.
Template Overrides for Blog Appearance
If the default look does not match our brand, we create a template override:
In Extensions > Templates > Templates, select our active joomla template.
Click Create Overrides, then choose com_content > category.
Edit the generated `category.php` file in `templates/your_template/html/com_content/category/`.
Within the override, we can add custom HTML, CSS classes, or even integrate structured data markup:
These small changes give the blog a distinctive visual identity without affecting core functionality.
Adding Blog Features with Extensions
Comment Systems (Komento, JComments Alternatives)
A commenting system encourages reader interaction. Two popular choices are Komento and JComments. After installing the extension via Extensions > Manage > Install, we configure it:
Enable on specific categories (e.g., Technology).
Set moderation rules to prevent spam.
Choose a style that matches our joomla template.
Step‑by‑Step Comment Setup
Install Komento from the Joomla Extension Directory.
Go to Components > Komento > Settings.
Under General, enable “Auto‑publish” for trusted users and “Moderate” for guests.
In Categories, tick the boxes for Travel and Technology.
Save and test by adding a comment on a test article.
Social Sharing Buttons
Social media drives traffic. Extensions like AddThis or Joomla Social Share add a button bar to each article. Configuration steps:
Install the extension.
In Extensions > Plugins, enable Social Share – Content.
Choose which networks to display (Facebook, Twitter, LinkedIn).
Position the bar via the module position `article-bottom`.
Customizing Button Appearance
Select icon style: “Rounded” or “Square” to match the site’s aesthetic.
Add share count: Enable “Show Share Count” to display how many times an article has been shared.
Set default tweet text: Use placeholders like `{title}` to auto‑populate the tweet.
Related Articles Modules
To keep visitors on the site, we display related articles based on tags or categories. The Related Articles module works out of the box:
Set Source to “Same Category” or “Same Tags.”
Define Number of items (e.g., 5).
Assign the module to `sidebar-left`.
Fine‑Tuning Related Content
Weight by popularity: In the module settings, enable “Order by Hits” to surface well‑read articles.
Exclude certain categories: Use the “Exclude Categories” field to keep unrelated posts out of the list.
Add thumbnail images: Enable “Show Image” and set a default image size of `150×150` pixels.
Newsletter / Subscription Integration
Collecting email addresses helps us build a mailing list. Extensions such as AcyMailing or Joomla! Newsletter integrate directly with the article manager. Typical setup:
Create a subscription form module.
Place it in the `footer` position.
Connect the form to a mailing list in the extension’s backend.
Best Practices for Subscription Forms
Use a clear call‑to‑action: “Subscribe for weekly travel tips”.
Add a privacy notice: Include a link to the privacy policy to comply with regulations.
Enable double‑opt‑in: This reduces spam complaints and improves list quality.
Performance Optimization Plugins
A fast blog keeps readers engaged. We can install lightweight caching extensions such as Cache Cleaner or JotCache.
Install JotCache via Extensions > Manage.
In Components > JotCache, enable “Page Cache” for the blog menu items.
Set the cache lifetime to 15 minutes for fresh content while reducing server load.
Practical Tips
Exclude dynamic modules: In the cache settings, add `mod_latestnews` to the exclusion list if it pulls live data.
Combine CSS/JS: Use the “Combine Files” option to reduce HTTP requests.
Optimizing Your Joomla Blog for SEO
SEF URLs and URL Rewriting
We already enabled SEF URLs in the earlier section. To fine‑tune them, we can add custom routing rules in `components/com_content/router.php`. A simple rule to remove the “category” segment:
This code shortens URLs while preserving readability.
Testing URL Changes
Use Google Search Console’ URL Inspection tool to verify that the new URLs are indexed.
Run a site crawl with Screaming Frog to detect any 404 errors after changes.
Meta Titles, Descriptions per Article
In the Publishing tab of each article, we fill out Meta Description and Meta Keywords. Joomla also allows us to set a Meta Title that overrides the page title. For bulk editing, the SEO Simple extension can import CSV files with these fields.
Example Meta Configuration
Meta Title: “Top 10 European Destinations – Travel Blog”.
Meta Description: “Discover the most breathtaking cities in Europe with our expert travel guide, complete with tips, itineraries, and photo inspiration.”
These fields appear in the HTML `
` section and influence click‑through rates from search results.
Open Graph and Structured Data
To improve social sharing, we add Open Graph tags in the template override:
These snippets help search engines understand the content and improve click‑through rates.
Validation Checklist
Use Facebook Sharing Debugger to verify Open Graph tags.
Run Google’s Rich Results Test to ensure JSON‑LD is correctly parsed.
XML Sitemaps with OSMap
An XML sitemap tells crawlers which pages exist. The OSMap component generates one automatically:
Install OSMap via Extensions > Manage.
In Components > OSMap, create a new sitemap.
Include Categories and Articles you want indexed.
Set the Frequency and Priority for each node.
After saving, we submit the sitemap URL (e.g., `https://example.com/sitemap.xml`) to Google Search Console.
Advanced Sitemap Settings
Exclude “Featured” articles if we have a separate “Featured” page.
Add a news sitemap for timely travel updates, using the “News” plugin within OSMap.
Image Optimization and Lazy Loading
Large images slow down page load. We compress images before uploading, using tools like TinyPNG. In the article editor, we add the `loading=”lazy”` attribute (as shown earlier). Additionally, we can enable WebP support in the htaccess file:
These internal links improve dwell time and signal relevance to search engines.
Conclusion
By following the steps outlined above, we can launch a professional joomla blog that rivals any other platform in terms of performance, flexibility, and search‑engine visibility. From the initial blog setup in the admin panel to fine‑tuning SEF URLs, adding commenting systems, and publishing structured data, every piece works together to create a cohesive publishing experience. Joomla’s built‑in content management, powerful ACL, and thriving ecosystem of joomla extensions give us the tools we need to grow a multi‑author site, engage readers, and maintain strong joomla seo health. With careful planning of categories, user roles, and module positions, the final blog layout feels polished, responsive, and ready for future expansion.
FAQ
1. Is Joomla good for blogging?
Yes, Joomla provides a solid foundation for blogging. Its native article manager, hierarchical categories, and flexible ACL make it easy to organize content and control who can publish. The Category Blog menu item gives us a ready‑made blog front‑end, while extensions add comments, social sharing, and SEO features. By using the built‑in tools, we can keep the site lightweight and still enjoy the richness of a full‑featured CMS.
2. How do I create a blog page in Joomla?
Go to Menus > Main Menu > Add New Menu Item.
Choose Menu Item Type → Articles → Category Blog.
Select the Category that will hold your blog posts.
Save the menu item and view the page on the front end.
During configuration we can also enable breadcrumbs, set a custom page heading, and assign a module position for a sidebar that displays recent posts or a tag cloud.
3. What are the best Joomla blog extensions?
Popular choices include:
Komento or JComments for commenting.
AddThis or Joomla Social Share for social sharing buttons.
OSMap for XML sitemaps.
AcyMailing for newsletter subscriptions.
SEO Simple for bulk meta data management.
These extensions integrate smoothly with the core and help us extend the blog’s functionality without sacrificing performance. Each extension offers a free tier, and many have premium add‑ons for advanced analytics or custom styling.
4. Can Joomla handle a multi‑author blog?
Absolutely. By configuring user groups and access levels in Users > Groups, we can assign roles such as author, editor, and publisher. Each role receives the appropriate permissions to create, edit, or publish articles within specific blog categories. The ACL system ensures that contributors only see the sections they are allowed to edit, which reduces accidental overwrites and simplifies editorial workflows.
5. How do I add comments to my Joomla blog?
Install a commenting extension (e.g., Komento). After installation:
Enable the plugin under Extensions > Plugins.
Set the plugin to appear on the desired menu items or categories.
Configure moderation, notification, and display options.
The comment form will then appear below each joomla article, allowing readers to leave feedback. We can also enable social login to simplify the commenting process and reduce spam.
Marcus has been covering the Joomla ecosystem since 2012. With over a decade of hands-on experience building and optimizing Joomla sites for enterprise clients, he leads our editorial team with a focus on accuracy, depth, and practical advice that readers can implement immediately.