Physical Address
304 North Cardinal St.
Dorchester Center, MA 02124
Physical Address
304 North Cardinal St.
Dorchester Center, MA 02124

Joomla extensions are add‑ons that broaden the core platform with new features, designs, and integrations. By installing a component, module, plugin, or template, we can tailor a site to specific business needs, improve user experience, and keep the site up‑to‑date with modern standards. Understanding how to install joomla extension is essential for any site administrator who wants to keep the site flexible and secure. Once we have installed Joomla, the next step is adding extensions. In this guide we walk through every method, from uploading a ZIP file to using the built‑in “Install from Web” feature, and we cover troubleshooting tips for common errors.

Components are the main building blocks that handle large sections of a site, such as a shopping cart or a blog engine. Modules sit in specific positions on a page and display small blocks of content, like recent articles or login forms. Plugins react to events triggered by the core or other extensions, allowing us to modify behavior without altering core code. Templates control the visual layout and styling, giving the site a unique appearance. Each type plays a distinct role, and together they form the modular architecture that makes Joomla adaptable.
When we add a new component, we can introduce entire workflows that were not present in the core installation. Modules let us place dynamic content in sidebars, footers, or custom positions, improving site navigation and engagement. Plugins enable us to connect with external services, such as payment gateways or social media APIs, by listening to system events. Templates give us control over responsive design, typography, and branding without touching HTML files. By combining these pieces, we can build a site that meets precise requirements while keeping the core clean and maintainable.
The official Joomla Extensions Directory (JED) hosts thousands of vetted extensions (see our best Joomla extensions list for top picks), each reviewed for security and compatibility. The directory is available at extensions.joomla.org. Third‑party marketplaces also offer premium extensions, but we should verify the developer’s reputation and check user reviews before downloading. Many developers provide direct download links on their own sites, and the Joomla developer portal maintains a list of approved publishers, often bundled as a ZIP file ready for installation. When selecting an extension, we should confirm that it supports the Joomla version we run—whether Joomla 4 or the newer Joomla 5—to avoid compatibility warnings during installation.

We begin by obtaining the ZIP file that contains the extension’s code. The file is usually available on the developer’s website or the JED page for the extension. Before downloading, we verify that the package matches our Joomla version, as Joomla 5 introduces a new namespace structure for some extensions. After the download completes, we store the ZIP file in a secure location on our local machine.
From the Joomla admin panel we go to System > Manage > Extensions. This area, known as the Extension Manager, provides options for installing, discovering, and managing extensions. We ensure we are logged in with a user account that has Super User permissions, because only such accounts can install new packages. The interface displays tabs for “Install,” “Discover,” and “Update,” each serving a different purpose in the installation workflow.
Within the “Install” tab we select the Upload Package File option. We click the “Choose File” button, locate the previously downloaded ZIP file, and then press “Upload & Install.” Joomla validates the package structure, extracts the files, and runs any installation scripts included by the developer. If the process succeeds, a green message appears confirming that the extension has been installed, and the new component, module, plugin, or template appears in the appropriate list.
After installation we move to the configuration screen for the new extension. For components we may need to set up database tables or API keys; for modules we assign a position and set visibility options. Plugins often require us to enable them on the “Plugins” manager and select the events they should listen to. Finally, we clear the site cache (see our Joomla backup guide before making changes) and test the new functionality on the front end to confirm that everything works as expected.
The “Install from Web” feature must be active in the Extension Manager before we can browse the JED directly from the backend. We go to System > Global Configuration > Server and locate the “Install from Web” toggle, turning it on if it is disabled. This setting allows Joomla to fetch extension packages directly from the JED repository, eliminating the need for manual downloads. Once enabled, the “Install from Web” tab appears alongside the “Upload Package File” option.
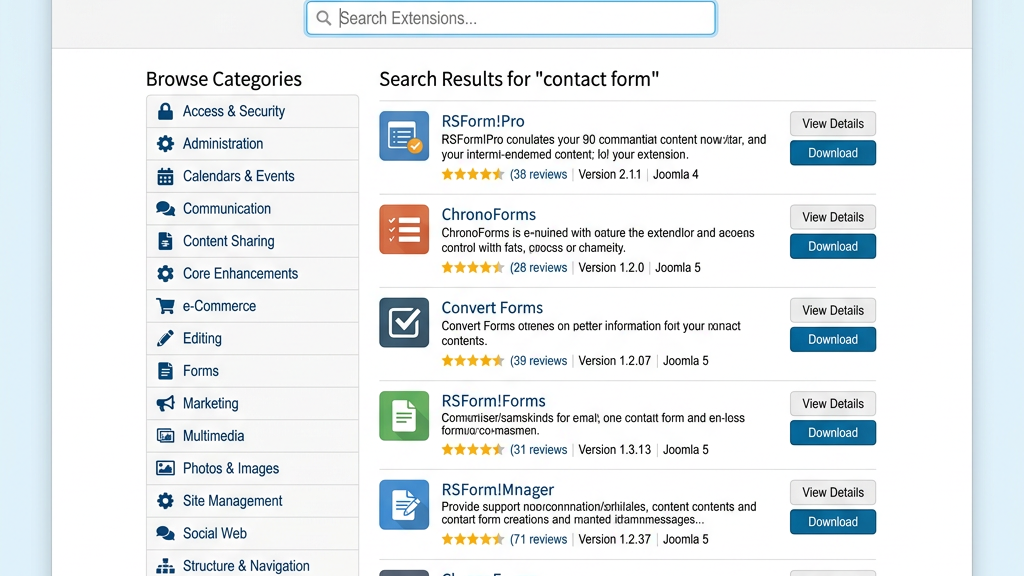
In the “Install from Web” tab we can search by keyword, filter by category, or sort by rating and popularity. The interface shows a thumbnail, brief description, and compatibility information for each extension. We can click an item to view detailed documentation, screenshots, and user reviews. This step helps us ensure that the extension meets our functional needs and supports Joomla 4 or Joomla 5, depending on our site version.
When we have identified a suitable extension, we click the “Install” button next to its listing. Joomla automatically downloads the ZIP package, verifies its integrity, and runs the installation routine without leaving the admin panel. The process completes with a confirmation message and the new extension appears in the corresponding manager list. This one‑click method simplifies how to install joomla extension for administrators who prefer a fully integrated workflow.
URL installation is useful when the extension is hosted on a remote server that provides a direct download link, such as a private repository or a vendor’s CDN. It also helps when we need to install the same extension on multiple sites without repeatedly uploading the same file. By providing the URL, Joomla fetches the package directly, saving time and reducing the risk of file corruption during manual uploads.
In the Extension Manager’s “Install” tab we select the Install from URL option. We paste the full HTTPS link to the ZIP file into the input field and click “Install.” Joomla validates the URL, checks that the file is a proper ZIP archive, and then proceeds with the installation steps automatically. If the URL requires authentication, we must ensure the link includes the necessary credentials or that the server allows anonymous access.
After the URL installation finishes, Joomla displays a success message and lists the new extension in the appropriate manager. We verify that the version number matches the one advertised on the vendor’s site and that the extension is marked as compatible with our Joomla version. A quick test on the front end confirms that the extension functions correctly. If any errors appear, we consult the installation log for details and repeat the process if necessary.
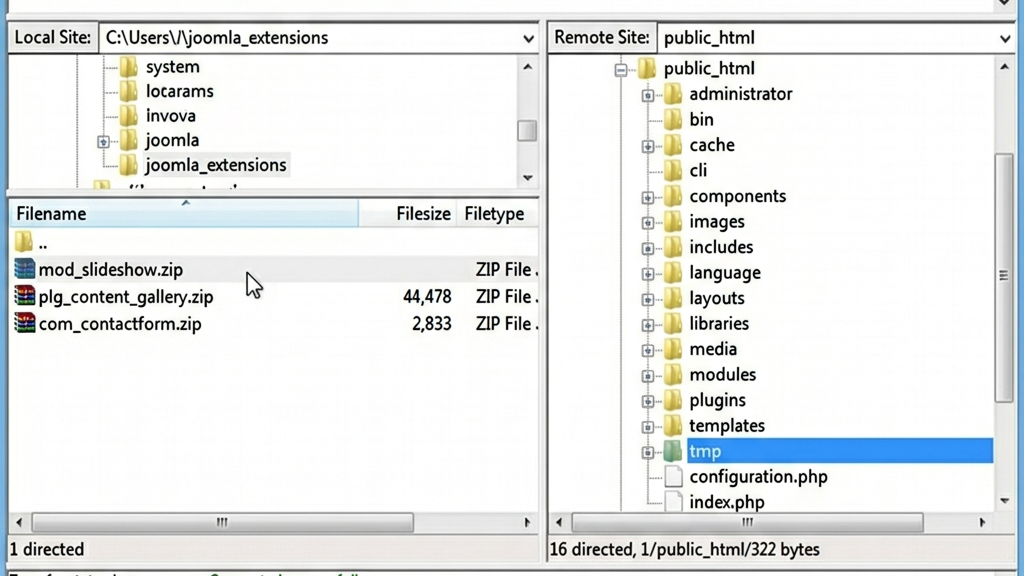
When the server restricts direct uploads or the file size exceeds PHP limits, we can place the extension files on the server using FTP or the hosting control panel’s file manager. We connect to the site’s root directory, go to /tmp, and upload the ZIP file there. For large packages we may need to split the file or adjust the FTP client’s transfer mode to binary to preserve data integrity.
Once the ZIP file resides in the /tmp folder, we return to the Extension Manager and choose the Install from Folder option. We enter the path to the uploaded file, such as /tmp/extension_name.zip, and click “Install.” Joomla reads the archive from the specified directory, extracts it, and runs the installation script just as it would for an uploaded package. This method bypasses PHP upload size restrictions while still using the built‑in installer.
If we have already extracted the extension files into a folder under /administrator/components (or the appropriate location for modules, plugins, or templates), we can use the Discover tab to register the extension. We click “Discover,” then “Scan for New Extensions,” and Joomla lists any unregistered folders. Selecting the desired entry and clicking “Install” registers the extension in the system. This approach is handy for developers who manually copy files via FTP and need Joomla to recognize them without re‑zipping.

When the ZIP file exceeds the PHP `upload_max_filesize` setting, Joomla aborts the installation with a “Maximum upload file size exceeded” warning. We resolve this by editing the server’s php.ini file, increasing `upload_max_filesize` and `post_max_size` to values larger than the package, then restarting the web server. Alternatively, we can use the FTP method described earlier to avoid the upload limit entirely.
The generic “Extension installation failed” message may appear if the package is corrupted, missing required files, or contains syntax errors. We first verify the integrity of the ZIP by opening it locally and confirming that the manifest XML file is present. If the manifest is valid, we check the server error log for PHP fatal errors that occurred during the installation script. Re‑downloading the package from a trusted source often resolves the issue.
Joomla checks the `
File and folder permissions that are too restrictive can prevent Joomla from writing files during installation, resulting in “Permission denied” errors. We ensure that the /tmp directory and the target extension folders have permissions set to 755 (the Joomla permissions guide covers this in detail) for directories and 644 for files, and that the web server user owns these paths. If the hosting environment uses SELinux, we may need to adjust security contexts to allow write access for the PHP process.
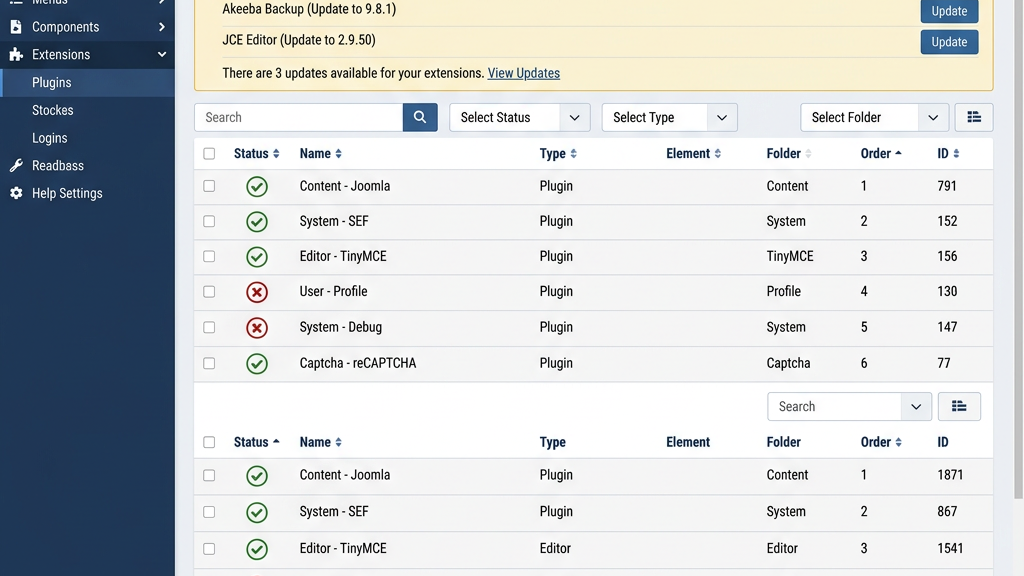
After installation we often need to control when an extension is active. In the Extension Manager we locate the component, module, or plugin and toggle its status using the green checkmark or red “X” icon. Disabling a plugin stops it from reacting to events, while keeping its files intact for future use. This approach lets us test new functionality without permanently removing the extension.
Keeping extensions up‑to‑date reduces security risks and adds new features. Joomla’s “Update” tab shows available updates for installed extensions, pulling information from the JED or the developer’s update server. We select the extensions we wish to upgrade and click “Update.” For manual updates, we repeat the upload package process with the newer ZIP file, and Joomla will overwrite the old files while preserving configuration data.
When an extension is no longer needed, we uninstall it to free resources and avoid potential conflicts. In the Extension Manager we select the extension and click the “Uninstall” button, confirming the action when prompted. Joomla removes the files and database entries associated with the extension, but we should back up the site first in case the extension stored critical data. After uninstalling, we clear the cache to ensure no remnants remain in the system.
Installing an extension in Joomla 5 follows the same steps as in Joomla 4, but we must verify that the extension’s manifest specifies `
Standard Joomla security requires Super User or Manager permissions to install extensions via the admin panel. However, if we have FTP access, we can manually place the extension files in the correct directories and then use the Discover feature to register them. This indirect method still demands sufficient file‑system rights, so it is not a workaround for a completely locked‑down site.
Joomla extensions are packaged as ZIP archives containing a manifest XML file and the code for components, modules, plugins, or templates. The ZIP format allows Joomla’s installer to extract the files in a single step and verify the package integrity. Some developers also provide TAR.GZ files, but Joomla’s core installer expects ZIP, so we must convert them if necessary.
The “unable to find install package” error typically occurs when the path entered in the “Install from Folder” field is incorrect or the ZIP file is missing from the specified directory. We double‑check that the file exists in /tmp or the target folder and that the path is spelled exactly, including case sensitivity. If the file is present, we verify that the web server user has read permissions for the folder and file.
Third‑party extensions can be safe when they come from reputable developers, have recent updates, and are listed in the Joomla Extensions Directory with positive user reviews. We should always test new extensions on a staging site before applying them to a production environment. Additionally, reviewing the extension’s code for malicious functions and ensuring it respects Joomla’s security best practices helps protect the site.