Physical Address
304 North Cardinal St.
Dorchester Center, MA 02124
Physical Address
304 North Cardinal St.
Dorchester Center, MA 02124

In this guide we explain how to create joomla website step by step, and we keep the focus on practical actions that you can follow today. We walk you through planning, hosting, installation, design, content, extensions, and launch, so you finish with a live site that reflects your vision. Joomla CMS stands out because it balances flexibility with a gentle learning curve, making it a solid choice for both hobbyists and growing businesses. Our approach differs from generic tutorials by weaving real‑world analogies, concrete command‑line snippets, and a checklist that mirrors a project manager’s sprint.
Key Takeaways

We begin by writing down the primary purpose of the site—whether it is a portfolio, a corporate hub, or an online store. Next, we sketch the target audience’s demographics, browsing habits, and preferred devices, turning vague ideas into measurable personas. This exercise acts like a compass, pointing every later decision toward the same north star. By aligning goals with audience expectations, we reduce the risk of costly redesigns later in the project.
We then prioritize core features such as contact forms, product listings, or a blog, assigning each a weight based on business impact. Prioritization helps us allocate development time efficiently, much like a chef decides which ingredients deserve the spotlight in a signature dish. After ranking, we draft a simple content map that links each feature to a corresponding Joomla component or module. This map becomes the blueprint for the site’s information architecture.
Finally, we set measurable success metrics—traffic targets, conversion rates, or newsletter sign‑ups—to evaluate the site after launch. Defining metrics early allows us to embed tracking code and configure SEO settings without retrofitting. The result is a clear, data‑driven roadmap that guides every subsequent step.
We treat the domain name as the storefront sign that passes by on a busy street; it must be memorable, short, and relevant to the brand. First, we brainstorm a list of keywords that reflect the business and check availability using a registrar’s bulk search tool. Once we shortlist, we verify that the chosen name does not infringe on trademarks, protecting the site from legal setbacks.
Next, we decide on a top‑level domain (TLD) that matches the audience’s expectations—.com for global reach, .org for nonprofits, or a country‑specific TLD for local businesses. Selecting the right TLD can improve click‑through rates, much like a well‑fitted suit boosts confidence. We also enable privacy protection to shield personal information from public WHOIS records.
Finally, we point the domain’s DNS to the hosting provider’s nameservers, a step that links the virtual address to the physical server. We double‑check that the A record resolves to the correct IP address, ensuring visitors land on the intended site. This DNS configuration completes the foundation before any Joomla files are uploaded.
We verify that the server meets Joomla’s minimum specifications: PHP 8.0 or higher, MySQL 5.7+ (or MariaDB 10.2+), and Apache or Nginx with mod_rewrite enabled. These components act like the engine, fuel, and transmission of a car; without any, the site cannot run smoothly. We also ensure that the server supports the required PHP extensions such as JSON, XML, and GD for image handling.
Next, we check the PHP memory limit, setting it to at least 256 MB to accommodate extensions and large media files. Adjusting the limit prevents “out of memory” errors during content creation, similar to widening a road to avoid traffic jams. We also enable HTTPS by installing an SSL certificate, which protects data in transit and boosts search engine rankings.
Finally, we create a dedicated MySQL database and user with full privileges, naming them clearly to simplify future maintenance. Using a separate database isolates Joomla data from other applications, reducing the chance of accidental overwrites. With the environment ready, we can move confidently to the installation phase.

We evaluate hosting providers based on uptime guarantees, support responsiveness, and Joomla‑specific optimizations such as built‑in caching. A provider that offers a Joomla‑ready stack saves time, much like a pre‑seasoned pan speeds up cooking. We also compare pricing tiers, looking for scalable resources that can grow with traffic spikes.
Next, we verify that the host supplies a control panel (cPanel or Plesk) with easy access to PHP version switching and MySQL management. The control panel serves as the cockpit, allowing us to adjust settings without diving into the command line. We also confirm that the host allows SSH access, which is essential for secure file transfers and command‑line installations.
Finally, we read recent user reviews and test the provider’s support ticket response time with a simple query. Fast, knowledgeable support can resolve configuration issues before they become roadblocks. Selecting the right host lays a stable foundation for the Joomla site’s performance and security.
We log into the hosting control panel and locate the “One‑Click Installer” section, often labeled as Softaculous or Installatron. Selecting Joomla from the list initiates a wizard that prompts for domain, directory, and admin credentials. This wizard automates file extraction, database creation, and configuration, much like a pre‑assembled furniture kit.
Next, we fill out the site name, admin username, and a strong password, then choose the desired language and Joomla version (Joomla 5 is recommended for its modern features). The installer writes the configuration.php file, embedding database connection details securely. We also enable automatic updates during installation to keep the core patched against vulnerabilities.
After the installer finishes, we receive a confirmation screen with a link to the admin panel and the front‑end site. We test the login by navigating to /administrator and entering the credentials we set earlier. A successful login confirms that the one‑click process completed without errors, and we can proceed to fine‑tune settings.
We start by downloading the latest Joomla package from the official website, verifying the SHA‑256 checksum to ensure file integrity. This step mirrors checking a passport before travel, preventing corrupted or tampered files from entering the server. We then upload the zip archive to the web root using FTP or the file manager, extracting it into a clean directory.
Next, we create a new MySQL database and user via the control panel, granting all privileges and noting the hostname, database name, username, and password. We keep these credentials in a secure note, as they will be required during the web installer. We then navigate to the site’s URL, which triggers Joomla’s web installer wizard.
During the wizard, we select “Standard” installation, enter the database details, and configure the FTP layer if the host requires it. We also set the site’s default language, time zone, and enable SEO‑friendly URLs, which improve search engine visibility. After the installation completes, we delete the installation folder as instructed, closing a potential security loophole. The manual method gives us full control over each step, useful for custom server environments.
We log into the admin panel and familiarize ourselves with the top navigation bar, side menu, and quick‑access toolbar. The dashboard presents system alerts, recent articles, and server information, acting as a mission control for the site. We locate the “Global Configuration” link, where we can adjust site‑wide settings such as SEO options, user permissions, and error handling.
Next, we explore the “Content” menu, which houses Articles, Categories, and Media Manager, each representing a building block of the site’s information hierarchy. Understanding how these components interrelate helps us avoid orphaned content later, similar to ensuring every pipe in a plumbing system connects properly. We also test the “Help” button, which opens context‑sensitive documentation for each screen.
Finally, we customize the admin template by selecting a preferred backend theme, improving readability during long editing sessions. A clean backend reduces visual clutter, allowing us to focus on content creation. With the dashboard mapped, we can move confidently into structuring the site’s taxonomy.
We begin by clicking “Categories” under the Content menu and selecting “New” to create a top‑level category that reflects the main content pillar, such as “Blog” or “Products.” We give the category a clear, SEO‑friendly title and a concise alias, which becomes part of the URL. Adding a description helps future editors understand the category’s purpose, much like a signpost on a trail.
Next, we add subcategories under the main category, nesting them to reflect the site’s logical flow. For example, under “Products” we might create “Electronics,” “Apparel,” and “Accessories.” Each subcategory inherits the parent’s permissions, simplifying access control across related content. We also enable the “Show Title” option to display the subcategory name on the front end, enhancing navigation.
Finally, we reorder categories using drag‑and‑drop, placing the most important sections at the top of the list. This ordering influences the default menu generation, ensuring visitors see key areas first. A well‑structured category tree improves both user experience and search engine crawling efficiency.
We open the “Menus” component and create a new menu called “Main Navigation,” which will appear as the primary site menu. We add a menu item of type “Home” and link it to the default landing page, setting the alias to “home” for a clean URL. The home item acts as the anchor point, guiding visitors back to the start, just as a lighthouse guides ships to shore.
Next, we add menu items for each top‑level category, selecting “Category Blog” or “Category List” as the menu type depending on the desired layout. We assign appropriate access levels, such as “Public” for general visitors and “Registered” for members‑only sections. Adding a “Separator” or “Heading” item helps group related links, improving visual hierarchy.
Finally, we enable the “Menu Assignment” option for each item, ensuring they appear on the correct pages and modules. We test the menu on the front end, checking for broken links and confirming that the active class highlights the current page. A coherent menu structure guides users through the site, reducing bounce rates and increasing time on page.
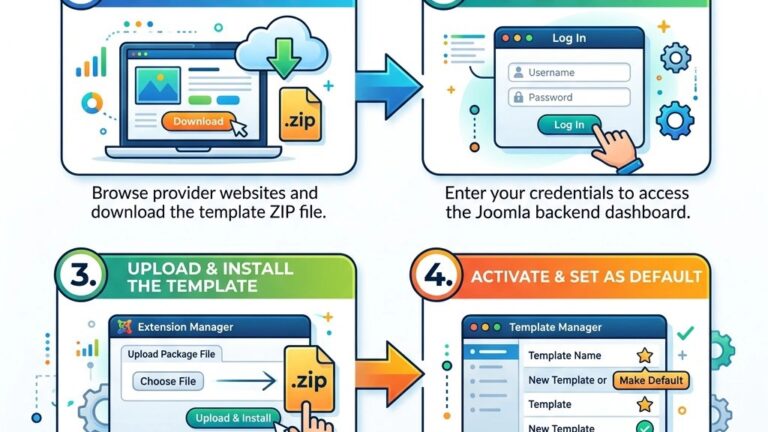
We browse reputable template marketplaces, filtering by Joomla version (Joomla 5) and responsive design to ensure compatibility. Selecting a template with a clean codebase and regular updates is akin to choosing a well‑maintained vehicle for a long road trip. We download the template package, then navigate to “Extensions → Manage → Install” in the admin panel to upload the zip file.
Next, we activate the new template by setting it as the default style under “Extensions → Templates → Styles.” The preview mode allows us to see how the template renders with sample content, helping us decide whether further customization is needed. We also check the template’s documentation for any required plugins or modules that enhance functionality.
Finally, we clear the site cache and refresh the front end to confirm that the new design loads correctly across browsers. Testing on mobile, tablet, and desktop devices verifies the responsive behavior, ensuring a consistent experience for all visitors. A well‑chosen template reduces the need for extensive CSS tweaks later in the project.
We open the template’s style editor and adjust the color palette to match the brand’s visual identity, using hex codes for precise control. Changing the primary and accent colors influences buttons, links, and headings, creating a cohesive look across the site. We also modify the typography settings, selecting web‑safe fonts or loading Google Fonts for a modern feel.
Next, we configure layout options such as column width, header height, and footer widget areas, tailoring the page structure to the content strategy. Enabling or disabling certain module positions helps us keep the page uncluttered, much like pruning a garden to let the main flowers shine. We preview each change in real time, ensuring that the design remains accessible and readable.
Finally, we save the custom style and export the configuration as a backup file, allowing us to restore the design quickly if needed. Documenting the color codes and font families in a style guide aids future contributors in maintaining visual consistency. Thoughtful customization turns a generic template into a unique digital storefront.
We enable the template’s built‑in responsive grid system, which automatically adjusts column widths based on screen size. Testing with Chrome DevTools’ device toolbar lets us see how menus, images, and text behave on smartphones and tablets. We also set the viewport meta tag in the global configuration, ensuring browsers render the layout correctly.
Next, we optimize images by enabling the “Lazy Load” option in the media manager, reducing page weight for mobile users with slower connections. Compressing images to WebP format further improves load times, much like a lightweight suitcase makes travel easier. We also verify that touch targets such as buttons and links meet the recommended 48 px minimum for finger navigation.
Finally, we run a performance audit using Google PageSpeed Insights, addressing any issues related to mobile usability, such as small font sizes or unresponsive elements. Implementing the recommended fixes enhances the user experience and contributes to higher search rankings. A responsive site adapts gracefully to any device, keeping visitors engaged wherever they browse.

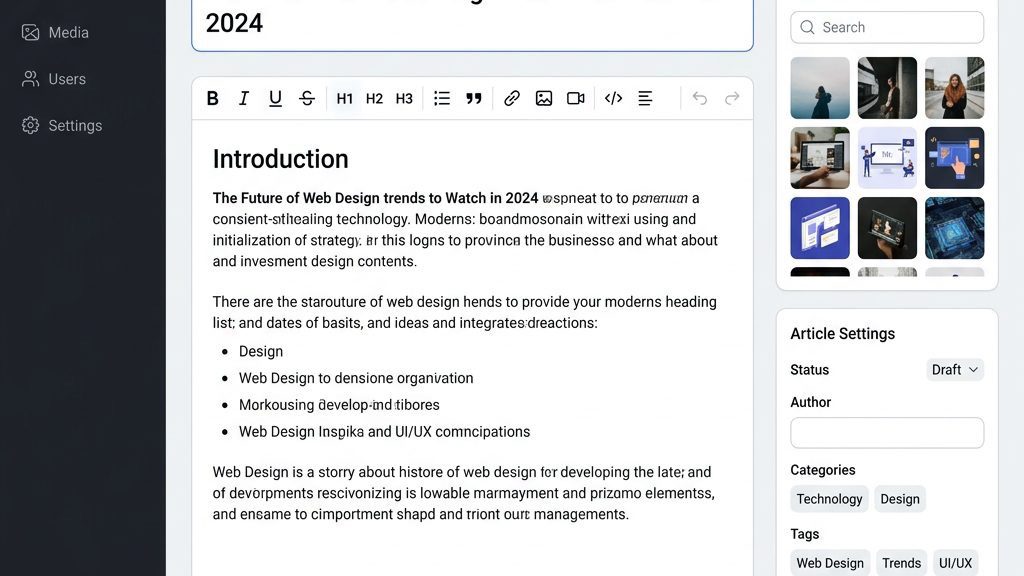
We click “Content → Articles → New” and start drafting a page, entering a clear title that doubles as the SEO meta title. The editor provides a WYSIWYG interface, but we also switch to code view when we need to embed custom HTML or shortcodes. Adding a meta description and keywords in the article’s options improves search engine visibility.
Next, we assign the article to a relevant category, ensuring it appears in the correct menu and archive listings. We also set the article’s access level, publishing date, and featured status, controlling when and how it is displayed. Using the “Read More” break allows us to create teaser excerpts for blog listings, similar to a movie trailer that entices viewers.
Finally, we preview the article on the front end, checking formatting, image placement, and link functionality. We make any necessary adjustments, then click “Save & Close” to publish. Consistently structured articles help maintain a professional tone and improve site navigation.
We open the Media Manager and create folders for images, videos, and documents, mirroring the site’s content hierarchy. Uploading files via drag‑and‑drop speeds up the process, and we rename each file with descriptive, SEO‑friendly names. Adding alt text to images improves accessibility and search engine indexing, acting like a caption for a blind‑folded viewer.
Next, we enable image resizing options, generating thumbnails for gallery displays without overloading the page. The manager also supports batch renaming, which is useful when migrating legacy assets. We set file permissions to restrict write access to administrators, protecting media from accidental overwrites.
Finally, we embed media into articles using the “Insert/Edit Image” button, selecting the appropriate folder and size. We test the media on various devices to ensure responsive scaling and proper loading. A well‑organized Media Manager streamlines content creation and maintains site performance.
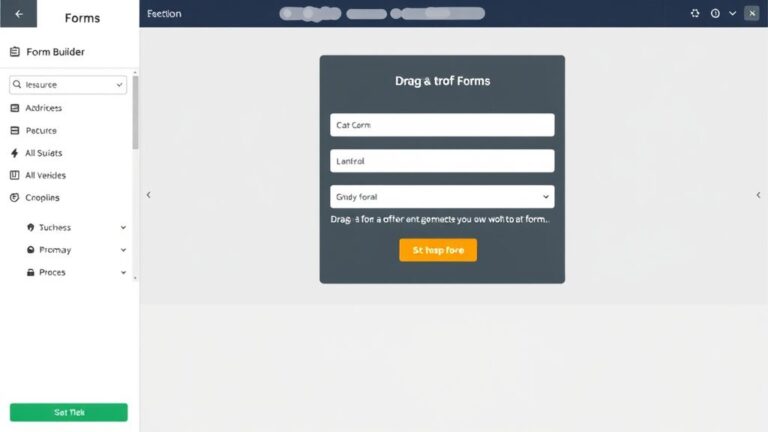
We navigate to “Extensions → Modules” and create a new module of type “Custom HTML” to showcase a promotional banner on the homepage. The module’s position, such as “position‑banner,” determines where it appears in the template’s layout. We set the module’s visibility to “All Pages” or restrict it to specific menu items, controlling the audience.
Next, we add a “Latest Articles” module, configuring it to pull the five most recent posts from a chosen category. Adjusting the “Show Intro Text” and “Image Alignment” options tailors the module’s appearance to match the site’s design language. Modules act like widgets on a dashboard, providing quick access to dynamic content without editing core articles.
Finally, we test the module placement on the front end, ensuring it does not overlap with other elements and that the responsive design adapts correctly. We also enable caching for the module to reduce server load, similar to storing frequently used tools within arm’s reach. Properly configured modules enhance user engagement and keep the site’s content fresh.
We install “EFSEO” to manage meta tags, XML sitemaps, and Open Graph data from a single interface, streamlining optimization efforts. The extension automatically generates canonical URLs, preventing duplicate content issues that can dilute rankings. We also enable the “Redirect” component to handle broken links and preserve link equity.
Next, we configure the SEO settings in Global Configuration, turning on “Search Engine Friendly URLs” and “Use URL Rewriting.” These settings produce clean, human‑readable addresses that search engines favor, much like a well‑paved road improves traffic flow. We also set the “Meta Description” for each article, ensuring concise summaries appear in search results.
Finally, we test the site with Google Search Console, submitting the XML sitemap generated by the SEO extension. Monitoring crawl errors and indexing status helps us maintain visibility over time. A solid SEO foundation drives organic traffic and improves the site’s credibility.
We install “Akeeba Backup” to schedule daily snapshots of the entire site, storing them off‑site on Amazon S3 or Dropbox for disaster recovery. The backup process compresses files and databases into a single archive, ready for one‑click restoration. We also enable the “Admin Tools” extension, which hardens the Joomla backend by blocking common attack vectors.
Next, we configure the firewall rules in Admin Tools, restricting access to the admin panel by IP address and enabling two‑factor authentication for all super users. These measures act like a security guard at the front door, deterring unauthorized entry. We also set up automatic email alerts for login attempts and file changes, keeping us informed of potential threats.
Finally, we perform a test restore on a staging environment to verify that backups are functional and that the site can be recovered quickly. Regular testing ensures that the backup strategy is reliable, reducing downtime in the event of a breach or server failure. Robust security and backup practices protect both the site and its visitors.
We install “JCH Optimize” to combine and minify CSS and JavaScript files, reducing HTTP requests and page load time. The extension also enables lazy loading for images, improving perceived performance on slower connections. We configure the cache handler in Global Configuration to “File” for simplicity, setting the cache time to 15 minutes.
Next, we enable “Cache Cleaner” to automatically purge expired cache files, preventing stale content from being served. This extension works like a janitor, keeping the cache tidy and efficient. We also enable “Page Cache” for logged‑out users, delivering pre‑rendered HTML that bypasses PHP processing.
Finally, we run a speed test with GTmetrix, noting improvements in PageSpeed and YSlow scores after enabling the extensions. We fine‑tune settings based on the report, adjusting compression levels and cache expiration times. Optimized performance enhances user satisfaction and contributes to higher search rankings.

We verify that all articles, categories, and menu items are published and correctly linked, eliminating any “404 Not Found” errors. We run a broken‑link scan using the “Xmap” extension, fixing any orphaned URLs before the site goes public. We also confirm that the site’s language and timezone settings match the target audience, ensuring accurate timestamps and translations.
Next, we enable the “System – Debug” plugin temporarily to check for PHP warnings or notices, then disable it once the site is clean. We also test the site on multiple browsers—Chrome, Firefox, Safari, and Edge—to ensure consistent rendering. Finally, we review the SSL certificate status, confirming that the padlock icon appears and that mixed‑content warnings are resolved.
Finally, we create a launch announcement page and schedule social media posts, generating initial traffic and backlinks. We also set up Google Analytics and configure goals to track conversions, providing data for future optimization. Completing this checklist gives us confidence that the site will perform reliably from day one.
We install an SSL certificate via the hosting control panel, selecting a free Let’s Encrypt option or a paid certificate for extended validation. After activation, we force HTTPS across the entire site by enabling the “Force HTTPS” option in Global Configuration. This redirection protects user data and signals trust to search engines.
Next, we update the site’s base URL in the configuration.php file to use “https://” and verify that all internal links point to the secure version. We also enable HSTS (HTTP Strict Transport Security) through the .htaccess file, instructing browsers to always use HTTPS.
Finally, we test the site with an SSL checker tool, confirming that the certificate chain is complete and that no mixed‑content warnings appear. A secure connection builds credibility and prevents data interception.
We create a Google Search Console property for the domain and verify ownership using the HTML meta tag generated by Joomla’s SEO extension. We then submit the XML sitemap, prompting Google to crawl the site’s pages promptly. We also add the site to Bing Webmaster Tools, ensuring coverage across major search engines.
Next, we request indexing for the homepage and any high‑priority pages, monitoring the crawl status for errors. We also set the preferred domain (www vs. non‑www) to avoid duplicate content issues.
Finally, we schedule a quarterly review of search console reports, addressing crawl errors, security warnings, and performance insights. Regular monitoring keeps the site visible and healthy in search results.
1. Is Joomla free to use?
Yes, Joomla is an open‑source CMS released under the GPL license, allowing anyone to download, install, and modify it without paying a license fee.
2. Is Joomla good for beginners?
Joomla offers a balance of simplicity and flexibility; beginners can create basic sites quickly, while the platform scales to more complex projects as skills grow.
3. How long does it take to build a Joomla website?
A simple site can be assembled in a few hours, whereas a fully customized, feature‑rich site may require several days to weeks, depending on design and content depth.
4. Can I create an ecommerce site with Joomla?
Yes, extensions such as VirtueMart or HikaShop transform Joomla into a full‑featured online store, handling products, payments, and shipping.
5. What is the difference between Joomla and WordPress?
Joomla provides a more granular permission system and built‑in multilingual support, while WordPress emphasizes ease of use and a larger plugin ecosystem.
6. Do I need coding skills to use Joomla?
Basic site setup and content entry require no coding, but customizing templates, creating advanced layouts, or developing extensions may benefit from HTML, CSS, and PHP knowledge.