Physical Address
304 North Cardinal St.
Dorchester Center, MA 02124
Physical Address
304 North Cardinal St.
Dorchester Center, MA 02124
We often hear people compare Joomla templates with WordPress themes, but the two systems handle layout in distinct ways. In Joomla, a template controls the entire front‑end markup, while WordPress themes are built on a hierarchy of PHP files that can be overridden individually. Our experience shows that Joomla’s template framework encourages a single point of control for responsive design, which can simplify maintenance. Understanding this difference helps us decide whether a Joomla template fits our project better than a WordPress theme.
We also notice that Joomla templates are tightly coupled with the admin dashboard’s layout options. The administrator template, such as Cassiopeia in Joomla 4, governs the back‑end appearance, whereas WordPress themes rarely affect the admin area. We recommend checking the official Joomla template documentation for version-specific details. This separation lets us customize the site’s public face without altering the backend workflow. When we plan a redesign, we keep this separation in mind to avoid unexpected changes.
Finally, the way extensions interact with templates varies between the platforms. Joomla’s extension manager can assign modules, menus, and overrides directly to a template style, while WordPress relies on plugins that may need additional configuration. Knowing this helps us anticipate the steps required to make a new template work with our existing extensions. It also explains why the phrase “how to install joomla template” often appears alongside “extension manager” in tutorials.
We start by looking at free Joomla templates, which are a good way to test a design before committing resources. Many developers release a basic version that includes the essential CSS, JavaScript, and layout files packaged in a ZIP archive. These free options are often listed on the Joomla Extensions Directory, and they usually support the latest Joomla 4.x and 5.x releases. Trying a free template lets us verify compatibility and assess the quality of the code.
Premium templates, on the other hand, typically come with additional features such as built‑in page builders, multiple layout variations, and dedicated support. They may also include a child template that lets us override specific parts without touching the core files. When we purchase a premium template, we often receive a quickstart package that contains demo content, which can speed up the initial setup. The extra documentation that accompanies premium products frequently explains how to change the default template and assign it to particular menu items.
We also consider the licensing model before making a purchase. Some premium templates require a yearly renewal for updates, while others provide a one‑time fee with lifetime support. Knowing the terms helps us plan for future Joomla version upgrades, especially when moving from Joomla 4 to Joomla 5. By weighing the pros and cons, we decide whether a free or premium template best matches our project timeline and budget.
We usually start our search on reputable marketplaces that specialize in Joomla extensions. Sites such as JoomlArt, ThemeForest, and RocketTheme host a curated selection of templates that have been reviewed for security and compatibility. These vendors often label their products with the Joomla version they support, making it easy to spot a Joomla 4 template install or a Joomla 5 template install. We also check user reviews and ratings to gauge the community’s experience.
Another reliable source is the official Joomla Extensions Directory, where developers submit their templates for public use. The directory includes a filter for “Free” and “Paid” options, and each entry lists the compatible Joomla versions, required PHP version, and a brief description of the template framework. We appreciate that the directory also provides a direct link to the download page, which simplifies the “upload template joomla” step.
We sometimes explore niche forums and GitHub repositories for community‑driven templates. These projects can be especially useful when we need a lightweight design or a specific feature set not found in commercial products. Before using a community template, we verify that the repository includes a recent commit and clear installation instructions. This due diligence reduces the risk of encountering errors during the Joomla template installation process.
We always begin by confirming that the template we intend to use matches our Joomla version. A template built for Joomla 4.x may not work correctly on Joomla 5.x because of changes in the core layout and template framework. The template documentation usually states the compatible versions, and we double‑check this information before downloading the ZIP archive. If the template supports both versions, we look for a separate package or a unified installer that detects the version automatically.
We also verify the PHP version required by the template. Modern Joomla templates often rely on PHP 7.4 or higher, and using an older PHP version can cause fatal errors during the installation. Our hosting control panel, such as cPanel, lets us view the current PHP configuration and switch to a newer version if needed. Ensuring the environment meets the template’s requirements helps us avoid the “Package Upload Failed” error later on.
Finally, we make note of any required Joomla extensions that the template may depend on, such as a specific template framework or a set of overrides. Some premium templates bundle these dependencies, while others expect us to install them separately via the extension manager. By reviewing the requirements list, we can prepare the site for a smooth Joomla template installation.
We never skip the backup step, especially when we are about to change the site’s appearance. Using a tool like Akeeba Backup, we create a full snapshot of the site, including the database and all files. This backup can be stored on the server or downloaded to a local machine for extra safety. Having a recent backup gives us confidence to experiment with new templates without fearing data loss.
We also recommend testing the backup restoration process on a staging environment. By cloning the site to a subdomain or a local server, we can verify that the backup works and that the site returns to its previous state after a template change. This practice is especially useful when we plan to install a Joomla 5 template install on a site that is still running Joomla 4.x. The staging test helps us identify any compatibility issues before they affect live visitors.
In addition to a full backup, we sometimes export the current template’s style settings. Joomla’s template manager allows us to export a JSON file that contains custom CSS, module positions, and other configuration details. Saving this file lets us quickly reapply our customizations if the new template does not meet our expectations. Keeping these exports organized in a version‑controlled folder makes future updates easier.
We usually receive Joomla templates as a ZIP archive that contains all the necessary files for the installation. The archive typically includes a manifest XML file, which tells Joomla how to place the template files and register them with the system. Inside the ZIP, we also find the site template folder, the administrator template folder, and optional assets such as images and documentation. Recognizing this structure helps us when we need to upload the template manually via FTP.
When we extract the ZIP locally, we can verify that the package does not contain any unexpected files, such as PHP scripts that could pose a security risk. A clean package should only contain the template’s CSS, JavaScript, PHP layout files, and the manifest. If we notice extra files, we either contact the developer for clarification or choose a different template. This precaution reduces the chance of introducing vulnerabilities during the Joomla template installation.
We also note that some templates provide a “quickstart package” in addition to the regular ZIP file. The quickstart includes demo content, sample modules, and a pre‑configured template style, which can be helpful for learning how the template works. However, for a production site we usually prefer the standard ZIP archive to avoid importing unnecessary demo data. Understanding the difference between these package types guides us in selecting the right file for our workflow.
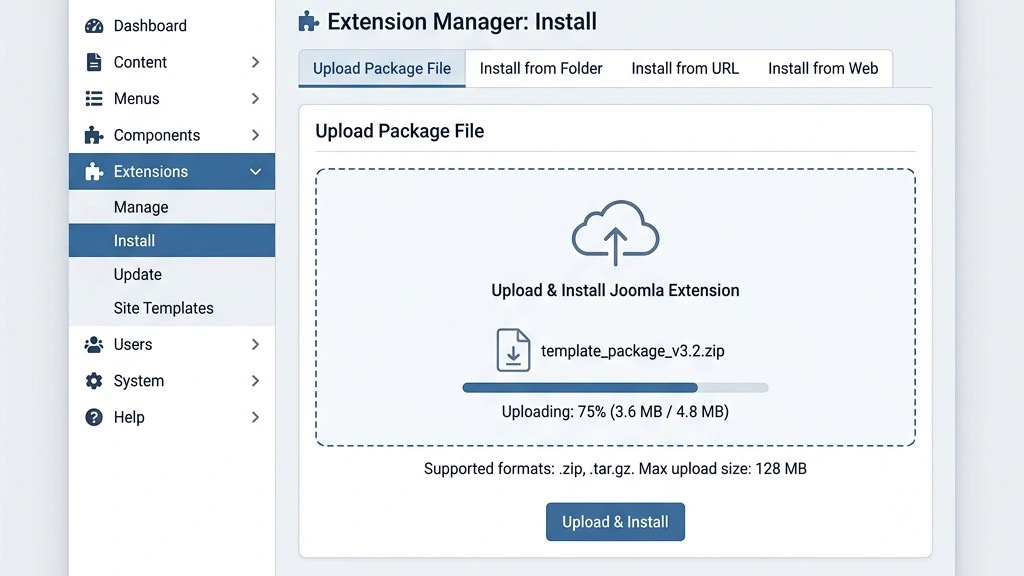
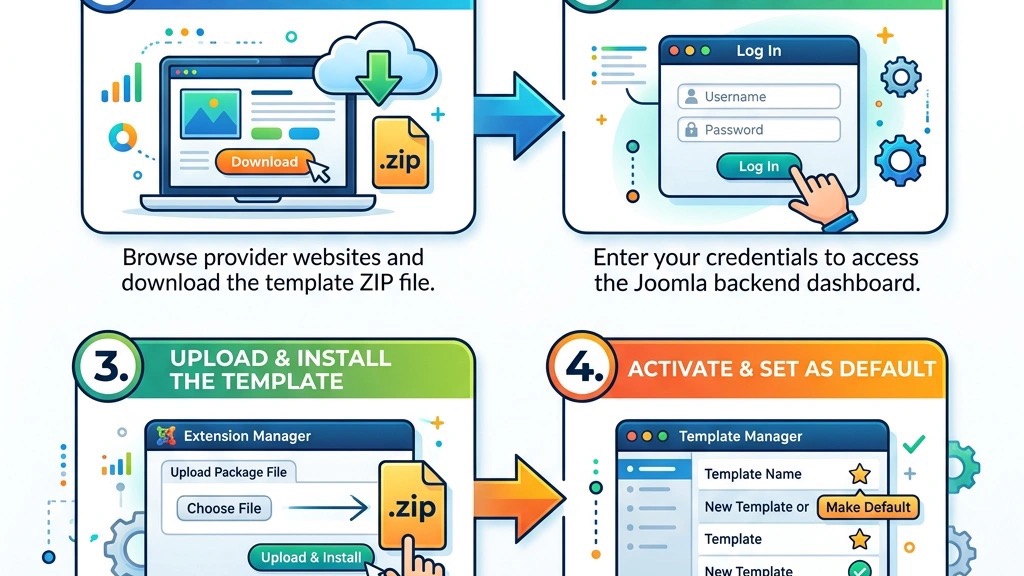
We start by logging into the Joomla admin dashboard and navigating to the extension manager. The path is typically System → Manage → Install, though in Joomla 5 the menu may be labeled Extensions → Install. Once we are on the install page, we see several tabs that let us upload a package, install from a URL, or discover new extensions. This central hub is where we will perform the “how to install joomla template” process using the built‑in tools.
We make sure we are in the Upload Package File tab, which allows us to select a local ZIP archive from our computer. The interface provides a simple file chooser button, and we can drag and drop the file if our browser supports it. Before uploading, we double‑check that the file we selected is the correct template archive and not a module or component. This careful selection prevents accidental installation of the wrong type of extension.
After the file is chosen, we click the Upload & Install button. Joomla then validates the manifest file and extracts the contents into the appropriate folders. If the upload succeeds, a green success message appears, confirming that the template has been registered. This step completes the core of the “install joomla template” workflow, and we can move on to activating the new design.
We often encounter the need to upload the template package from a remote location, especially when the provider supplies a direct download URL. In such cases, we switch to the Install from URL tab in the extension manager. Here we paste the URL that points to the ZIP archive, making sure the link ends with “.zip”. Joomla will fetch the file, verify its integrity, and then proceed with the installation automatically.
If the URL is valid and the server has permission to retrieve external files, the installation proceeds without manual file handling. However, some hosting environments block outbound connections, causing the process to fail. When that happens, we fall back to the manual upload method described earlier. Understanding both approaches gives us flexibility in handling different hosting configurations.
After the package is uploaded, we watch for any warning messages that may indicate missing dependencies or version mismatches. The extension manager will list any required extensions that need to be installed first. By addressing these warnings before proceeding, we reduce the likelihood of encountering errors later when we try to set the template as default.
We verify the installation by opening the template manager, which is found under Extensions → Templates → Styles. The newly installed template appears in the list, usually with a name that matches the package’s manifest. We can click on the template name to view its details, such as the author, version, and supported Joomla versions. This confirmation step reassures us that the “how to install joomla template” process completed correctly.
If the template includes multiple styles—such as a default style and a mobile‑optimized style—we can edit each one to adjust parameters like logo, color scheme, and custom CSS. The template manager also lets us preview the front‑end appearance before making the style the default. This preview feature helps us catch any layout issues early, saving time on later adjustments.
Finally, we clear the site cache and, if needed, the browser cache to ensure the new template loads fresh assets. In Joomla 5, the cache settings are located under System → Clear Cache, and we can purge both the site and administrator caches. After clearing, we visit the front‑end to see the new design in action, confirming that the template is working as expected.
We usually obtain the direct download URL from the template provider’s product page. The link is often labeled “Download ZIP” and points to a file ending with “.zip”. In some cases, the provider may hide the URL behind a button that triggers a JavaScript download; we can right‑click the button and select “Copy link address” to capture the URL. Having the exact URL is essential for the “install joomla template” step that uses the extension manager’s URL field.
We also verify that the URL is served over HTTPS to avoid mixed‑content warnings. Secure connections protect the integrity of the package during transfer, which is especially important when the template contains custom PHP code. If the URL redirects to a different domain, we follow the redirect in a browser to ensure it ends with a ZIP file before copying it into the extension manager.
Sometimes the provider offers a “quickstart package” that includes demo data. If we only need the template files, we look for a separate link labeled “Template Only” or “Core Files”. Using the correct link prevents us from accidentally importing unwanted sample content into our live site. This careful selection keeps the installation process clean and focused.
We paste the copied URL into the Install from URL field of the extension manager and click Install. Joomla then downloads the ZIP archive to a temporary folder, extracts it, and registers the template. During this process, we watch the progress bar and any messages that appear at the bottom of the screen. A successful installation displays a green confirmation that includes the template name and version.
If the installation fails, Joomla usually provides an error code such as “Package not found” or “Invalid manifest”. In those cases, we double‑check the URL for typos and ensure that the server can reach the remote host. Some hosting providers block outbound HTTP requests, so we may need to temporarily enable the firewall rule or switch to a manual upload method. Understanding these potential roadblocks helps us troubleshoot quickly.
After the URL installation succeeds, we go to the template manager to verify that the new style appears in the list. We can then edit the style to set parameters like the site logo, color palette, and responsive options. This step completes the “how to install joomla template” workflow using a direct URL, which can be faster than uploading a file from our computer.
We prefer the URL method when the template is hosted on a reliable CDN or when we are working on a server with limited file‑transfer capabilities. The URL approach eliminates the need to download the file locally and then re‑upload it, reducing the number of steps. It also ensures that we are installing the latest version directly from the provider’s server, which can be useful for quick updates.
Conversely, we use the manual upload method when the hosting environment restricts outbound connections or when the template is stored on a private repository. In those situations, downloading the ZIP to our workstation and then uploading it via the extension manager guarantees that the file reaches the server. This method also allows us to inspect the archive before installation, adding an extra layer of security.
Both methods ultimately achieve the same result—registering a new template with Joomla—but the choice depends on the server configuration and our workflow preferences. By knowing the pros and cons of each approach, we can select the most efficient path for any given project.
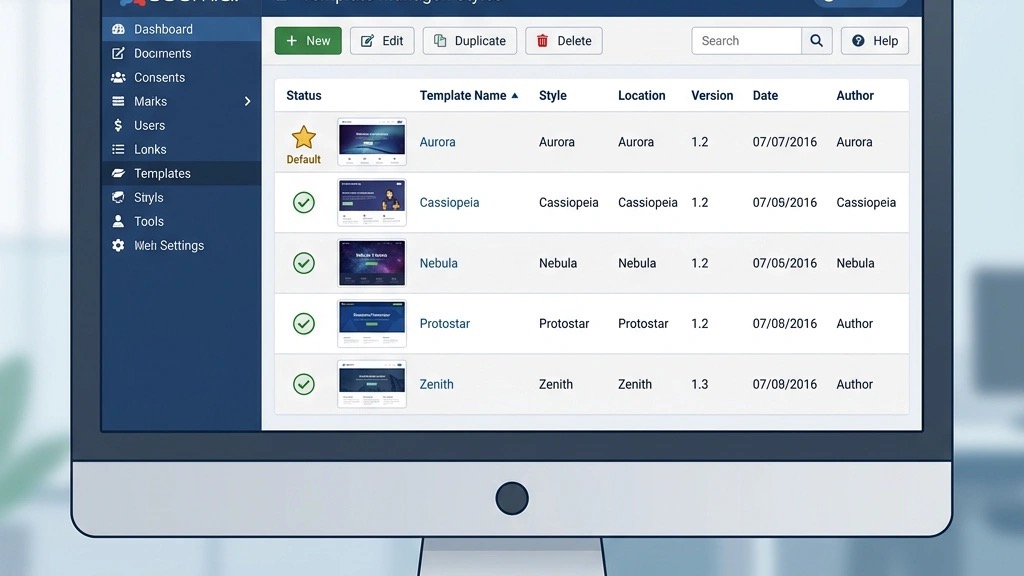
We open the Joomla admin dashboard and head to Extensions → Templates → Styles. In Joomla 4, the interface shows a grid of installed template styles, while Joomla 5 introduces a slightly refreshed layout with filter options for site and administrator templates. We locate the newly installed template in the list, which is usually sorted alphabetically or by installation date. Selecting the style opens a configuration page where we can adjust parameters before making it the default.
If we need to change the administrator template, we switch the view to “Administrator” using the toggle at the top of the page. This view displays the back‑end template, such as Atum in Joomla 5, allowing us to customize the login screen and control panel appearance. Changing the administrator template is optional but can provide a cohesive visual experience across the site’s front‑end and back‑end.
We also take a moment to review the template’s built‑in options, such as responsive layout settings, typography choices, and custom CSS fields. Adjusting these settings now saves us from editing files later. Once we are satisfied with the configuration, we proceed to set the style as the default for the front‑end.
We click the star icon next to the template style we want to use as the default. In Joomla 4 and 5, the star turns gold to indicate the active front‑end template. This action instantly updates the site’s appearance for visitors, though we may need to clear caches to see the changes immediately. We verify the change by opening a new browser tab and navigating to the home page.
If the template offers multiple styles—such as a light and dark version—we can create additional styles by duplicating the existing one and then customizing each copy. This flexibility lets us switch between designs without reinstalling the template. We also ensure that the default style is assigned to the “All Pages” menu item, which guarantees that every page uses the same layout unless we create specific overrides.
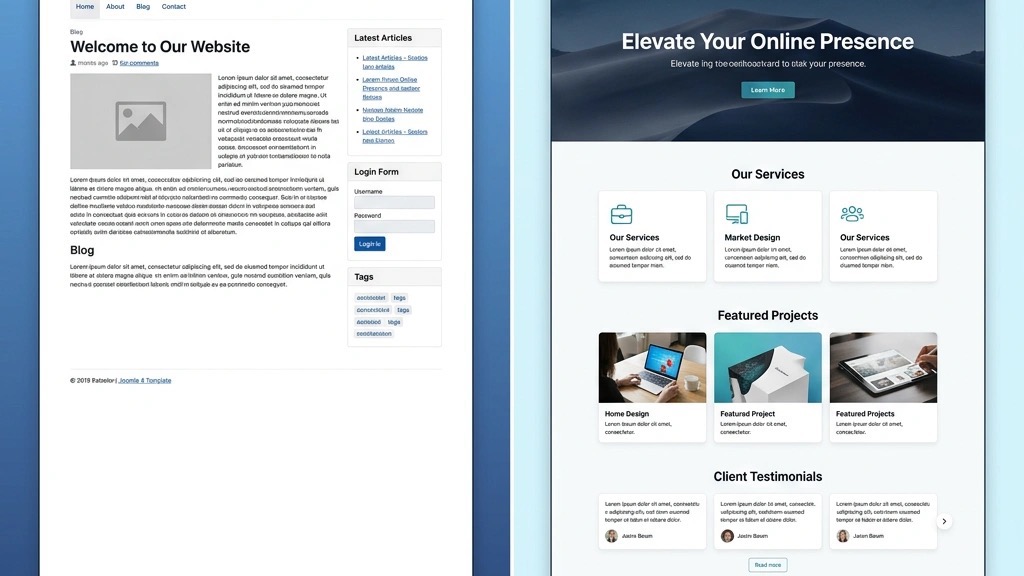
After setting the default, we check the front‑end on different devices to confirm that the responsive design works as intended. Modern Joomla templates include built‑in breakpoints for tablets and smartphones, and we can adjust these settings in the template manager if needed. This final verification step completes the “how to install joomla template” process and confirms that the site looks exactly as we envisioned.
We sometimes need a different layout for particular sections of the site, such as a landing page or a blog archive. To achieve this, we go back to the template manager and click the Menu Assignment tab for the style we want to apply. Here we can select individual menu items, allowing the template to be used only for those pages while the default template remains active elsewhere.
We assign the new style to the desired menu items and save the changes. Joomla then renders those pages using the selected template, while all other pages continue to use the default. This feature is useful when we want to showcase a unique design for a promotional page without affecting the rest of the site. It also demonstrates the flexibility of Joomla’s template system compared to other platforms.
After assigning the template to specific menus, we test each page to ensure the correct layout appears. If we notice any missing modules or layout glitches, we return to the template’s module positions and adjust the assignments accordingly. This iterative process helps us fine‑tune the site’s appearance across all sections.

We turn to FTP when the extension manager cannot process the package, perhaps due to file‑size limits or server restrictions. FTP also gives us direct control over where the template files are placed, which can be helpful for complex installations that require custom folder structures. In such cases, we use an FTP client like FileZilla to transfer the files to the server.
Before we begin, we verify that we have the correct credentials for the server’s FTP account and that the connection is secured with SFTP if possible. We also ensure that the destination directories—/templates/ for site templates and /administrator/templates/ for admin templates—are writable. This preparation prevents permission errors that could interrupt the manual installation.
We typically use FTP for templates that come with a separate “site” and “administrator” folder, or when we need to install a child template that must reside alongside its parent. By uploading the files manually, we can also inspect the directory structure and confirm that the manifest XML file is in the correct location.
We open FileZilla and connect to the server using the provided hostname, username, and password. In the local pane, we go to the extracted template folder and locate the /templates/ directory. We drag the entire template folder—often named after the template—into the remote /templates/ directory. FileZilla then transfers all files, preserving the original hierarchy.
If the template includes an administrator component, we repeat the process for the /administrator/templates/ directory, uploading the corresponding folder. We watch the transfer queue to ensure that every file completes without errors. Any failed transfers are re‑attempted until the entire package is present on the server.
After the upload finishes, we log back into the Joomla admin dashboard and go to the template manager. The newly uploaded template should appear in the list, even though we did not use the extension manager to install it. This visibility indicates that Joomla has recognized the files and is ready for us to activate the template.
We click the Discover button in the template manager, which scans the templates/ directory for any new folders that contain a valid manifest file. Joomla then lists the discovered templates, and we select the one we just uploaded. By clicking Install, Joomla registers the template in the system, creating a new style entry that we can configure.
If the discovery process does not find the template, we double‑check that the manifest XML file is named correctly (typically templateDetails.xml) and placed at the root of the template folder. We also verify that the XML file contains the required tags, such as
Once the template is installed via discovery, we proceed to set it as the default and assign it to menu items, following the steps outlined earlier. This manual approach gives us full control over the installation and can be a reliable fallback when the standard upload method fails.
We often see the “Package Upload Failed” message when the uploaded ZIP exceeds the server’s maximum upload size. To resolve this, we increase the upload_max_filesize and post_max_size directives in the php.ini file, or we ask our hosting provider to adjust them. After updating the limits, we restart the web server and retry the upload.
Another common cause is an incomplete or corrupted ZIP archive. We re‑download the template from the original source and verify the file size matches the provider’s description. If the archive still fails, we extract it locally to confirm that the manifest XML is present and not damaged. A clean archive typically resolves the upload issue.
We also check the file permissions on the /tmp/ directory, which Joomla uses as a temporary staging area during installation. If the directory is not writable, Joomla cannot move the uploaded file for extraction. Setting the permissions to 755 or 775, depending on the server configuration, usually fixes the problem. Once the permissions are corrected, the “Package Upload Failed” error disappears.
We sometimes encounter a situation where the template appears in the template manager but does not affect the front‑end appearance. The most frequent reason is that the default style was not changed. We go to the template manager, locate the new style, and click the star icon to set it as the default for the site. After clearing the cache, the new design becomes visible.
Another possibility is that the template’s CSS files are not being loaded due to a missing index.php reference or an incorrect path in the manifest. We inspect the template’s templateDetails.xml file to ensure the
We also verify that the template’s module positions are assigned correctly. If the template expects certain modules to be placed in specific positions, and those positions are empty, the layout may appear broken or blank. By publishing modules to the appropriate positions in the module manager, we restore the intended appearance.
A white screen, or “blank page,” often indicates a PHP fatal error triggered by the new template. We enable Joomla’s error reporting in the Global Configuration under the System tab, setting it to “Maximum.” This setting displays the error message on the screen, allowing us to identify the problematic line of code.
Common causes include incompatibility with the current Joomla version, especially if the template was built for Joomla 4 and we are running Joomla 5. In such cases, we check the template’s documentation for an updated version or contact the developer for a fix. If the error is related to a missing class or function, we may need to install a required library or framework via the extension manager.
If the error persists, we revert to the previous template by accessing the database directly (using phpMyAdmin or a similar tool) and updating the template_style table’s home column. This action restores the site’s front‑end while we troubleshoot the new template. After fixing the issue, we repeat the activation process, confirming that the white screen no longer appears.
We follow the same steps as in Joomla 4: use the extension manager to upload the ZIP file, or install from a URL, then set the new style as default in the template manager. Joomla 5 introduces a refreshed interface, but the underlying process remains unchanged.
Yes, we can upload several template packages one after another using the extension manager. Each template will appear as a separate style in the template manager, and we can switch between them or assign them to specific menu items as needed.
We go to Extensions → Templates → Styles, select the style we want to remove, and click the trash icon. Joomla will delete the template files from the server and remove the style entry, leaving the default template intact.
No, installing a template does not affect articles, categories, or other content stored in the database. The template only changes the presentation layer, so our existing content remains unchanged.
A template provides only the layout files and styling, while a quickstart package includes demo content, sample modules, and pre‑configured settings. Installing a quickstart package can give us a fully populated site for testing, but we usually replace the demo content with our own after the initial setup.