Physical Address
304 North Cardinal St.
Dorchester Center, MA 02124
Physical Address
304 North Cardinal St.
Dorchester Center, MA 02124
how to use joomla is the question that brings many newcomers to the world of open‑source content management. We’ll walk you through the basics, from the moment you land on the admin panel at site.com/administrator to the final tweaks that make your site shine. Our guide is designed for beginners, yet it contains enough depth to keep seasoned users interested. Think of Joomla as a well‑tuned orchestra, where each instrument—templates, modules, plugins—plays its part in harmony.
The first step is to open your browser and type site.com/administrator. After entering your credentials, the dashboard greets you like a sunrise over a new horizon. The admin panel is divided into a top navigation bar, a side menu, and a central workspace where modules appear. We recommend bookmarking the URL for quick returns, just as a sailor keeps a compass at hand.
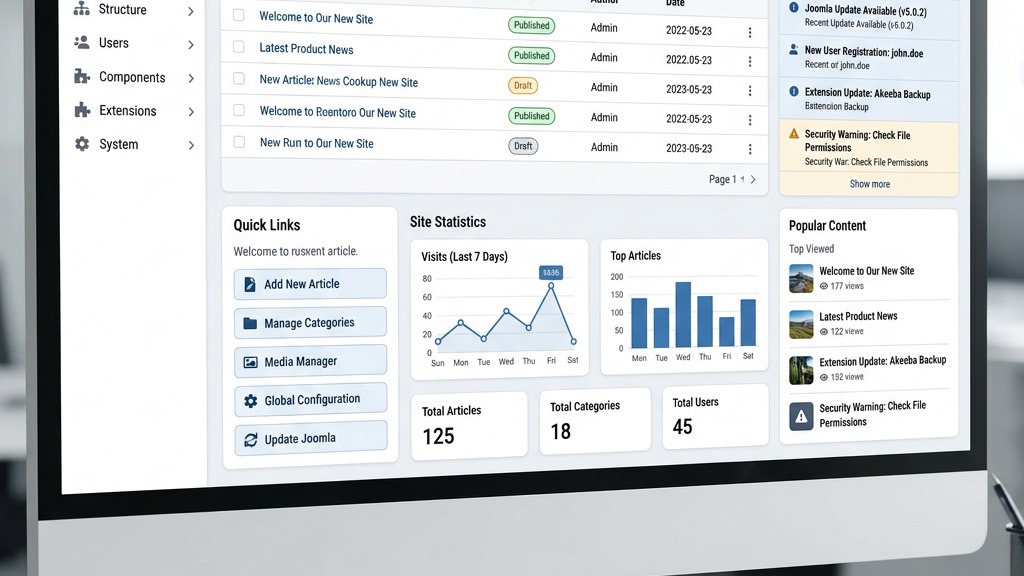
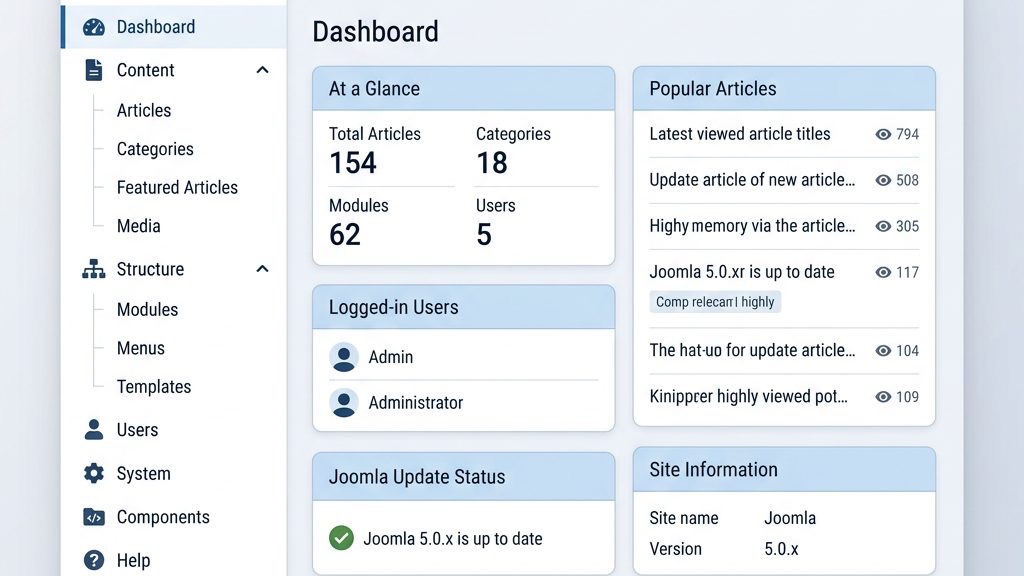
Inside the dashboard, you’ll notice the Control Panel widget, which displays system messages, recent activity, and shortcuts. This widget acts like a cockpit instrument panel, giving you an at‑a‑glance view of the site’s health. From here, you can jump to any major area—content, extensions, or global configuration—by clicking the corresponding tile.
To personalize the workspace, click the User Settings icon in the top right corner. Here you can adjust the language, editor, and toolbar layout. Think of it as arranging the furniture in a living room; a comfortable setup makes the work feel less like a chore and more like a hobby.
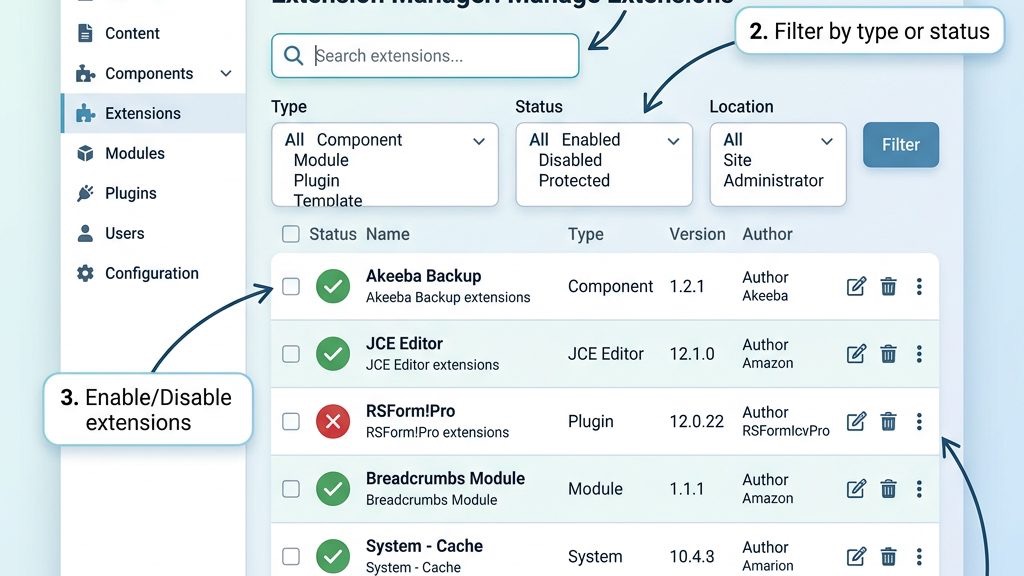
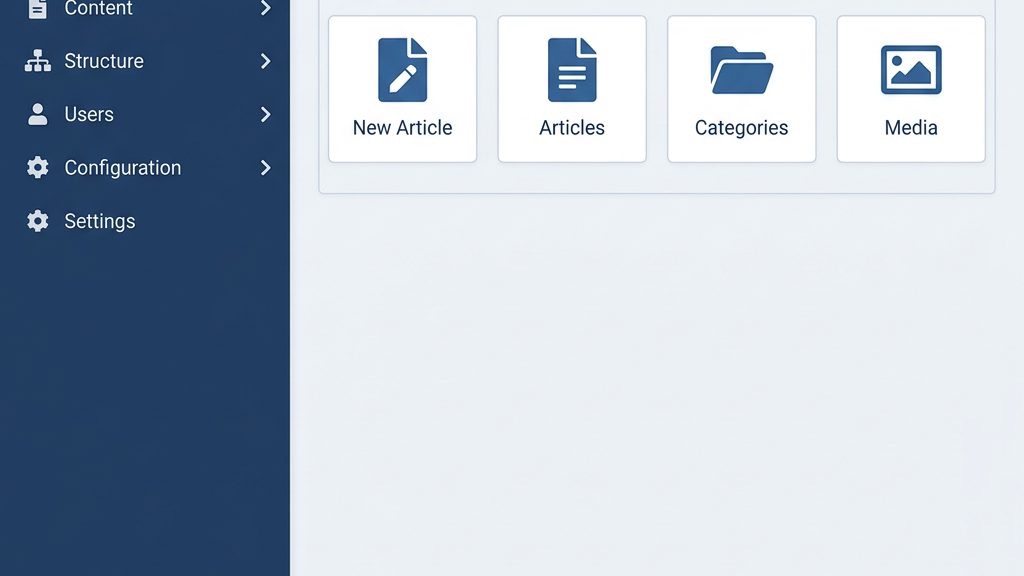
The left‑hand side menu is the backbone of the backend navigation. Each entry—Content, Menus, Components, Extensions, System, Users, Help—opens a submenu with more specific options. Clicking Content reveals links to Articles, Categories, Featured Articles, and Media. This hierarchy resembles a tree, where each branch leads to a finer leaf of functionality.
We can customize the menu by dragging items into a preferred order, much like arranging books on a shelf for easier access. If you find the default layout cluttered, use the Hide/Show toggle to collapse sections you rarely use. This streamlining reduces visual noise and helps you focus on the task at hand.
The Toolbar at the top of each page provides quick actions such as New, Edit, Publish, Trash, and Options. These buttons are analogous to the controls on a remote,, allowing you to command the site without digging through menus. Remember to save your changes frequently; the system prompts you with a subtle reminder, acting as a safety net.
Widgets on the Control Panel give you a snapshot of site statistics, recent articles, and system alerts. The Quick Icons widget aggregates shortcuts to frequently used tasks like Global Configuration, Clear Cache, and Check for Updates. Clicking an icon is like pressing a button on a machine that instantly starts the process.
The Popular Articles widget lists the most viewed pieces, helping you gauge audience interest. You can click any title to edit it directly, which speeds up content tweaking. This feature works like a radar, highlighting the areas that draw the most attention.
Finally, the System Information widget displays server details, PHP version, and Joomla version—currently Joomla 5. Keeping an eye on these details is essential for troubleshooting, much as a mechanic checks the engine’s health before a long drive.
To begin, navigate to Content → Articles → Add New Article. The editor opens with a clean canvas, ready for your words. Enter a compelling title, then fill the main body using the built‑in editor, which supports HTML, Markdown, and visual formatting. Think of the editor as a painter’s palette, offering brushes of different sizes and colors.
Below the content area, you’ll find the Publishing tab where you can set the article’s status (Published, Unpublished, Archived) and schedule future publishing dates. This tab also lets you assign the article to a category, which works like a filing cabinet, keeping related pieces together. Use the Featured toggle if you want the article to appear in a highlighted area on the front page.
The Images & Links tab allows you to attach a featured image, set alt text, and embed links. Adding a descriptive alt text is akin to giving a blind person a verbal cue; it improves accessibility and SEO. Once you’re satisfied, click Save & Close to store the article and return to the list view.
Categories act as containers that group articles under logical headings, such as News, Blog, or Products. To create a category, go to Content → Categories → Add New Category. Provide a name, description, and optionally a parent category to build a hierarchy—much like a family tree where each branch represents a sub‑category.
When you assign an article to a category, the site’s URL often reflects that structure, improving readability for users and search engines. For example, an article in the Blog category might have a URL like site.com/blog/your-article. This tidy arrangement is comparable to a well‑organized bookshelf where each genre has its own shelf.
Categories also have their own Permissions settings, allowing you to control who can view or edit content within them. Adjust these settings under the Permissions tab, granting rights to specific user groups. This granular control is similar to giving different keys to different rooms in a house.
The Media Manager is your digital storage room for images, videos, PDFs, and other assets. Access it via Content → Media. The interface displays a folder tree, enabling you to organize files into directories like images, documents, or uploads. Think of it as a pantry where each shelf holds a specific type of ingredient.
To upload a file, click the Upload button, drag the file into the drop zone, or select it from your computer. Once uploaded, you can rename, move, or delete the file using the toolbar icons. Remember to set proper alt text for images, which serves as a textual description for screen readers and search engines.
When inserting media into an article, use the Insert/Edit Image button in the editor. A dialog appears, letting you choose the file from the Media Manager, set alignment, and add a caption. This process is like placing a decorative piece on a wall—positioning matters for the overall aesthetic.
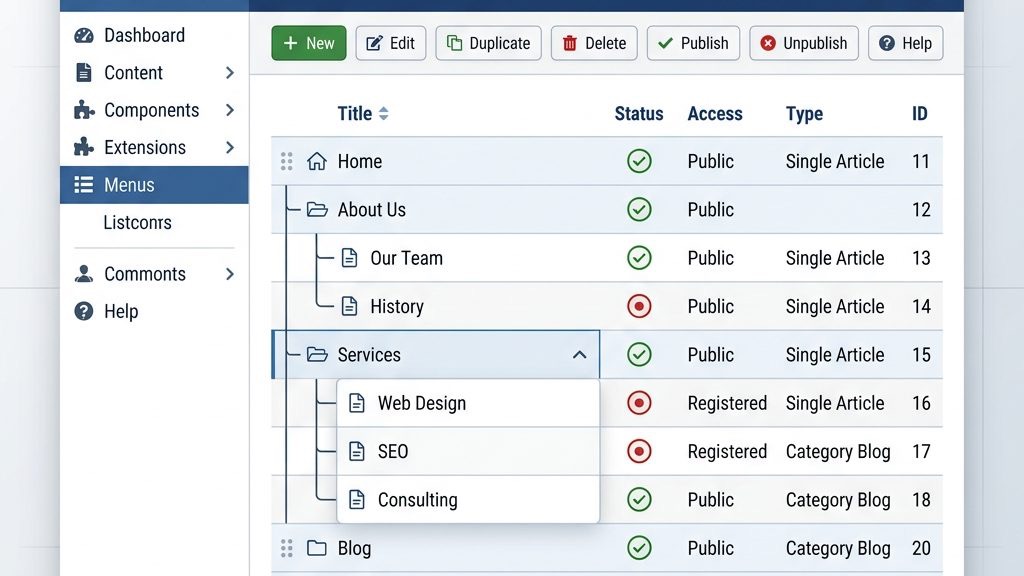
Menus are the road maps that guide visitors through your site. To create a new menu, go to Menus → Manage → Add New Menu. Give it a title such as Main Menu, a unique Menu Type (e.g., main), and a description. This step is comparable to laying down the main highway that connects all major destinations.
After creating the menu, you’ll need to add menu items that point to specific pages or components. Click Menus → Main Menu → Add New Menu Item. Choose a Menu Item Type like Single Article, Category Blog, or External URL, then select the target content. Each menu item behaves like a signpost, directing traffic to the right location.
Arrange the menu items by dragging them into the desired order. You can also create sub‑menus by nesting items, forming a dropdown structure similar to a tree with branches. This hierarchy helps users find information quickly, reducing bounce rates.
Modules are the building blocks that display content in specific positions on the frontend. To show your newly created menu, you must publish a Menu Module. Navigate to Extensions → Modules → New, then select Menu as the type. Choose the menu you just built from the dropdown list.
Assign the module to a position defined by your template, such as topmenu or sidebar. Positions act like slots on a board, determining where the module appears on the page. Adjust the Module Assignment settings to control on which pages the menu shows—perhaps only on the homepage and article pages.
Fine‑tune the module’s appearance using the Advanced tab, where you can set a custom CSS class, enable or disable show title, and adjust the menu style (list, dropdown, or accordion). These options let you craft a navigation experience that feels as smooth as a well‑paved road.
Access levels determine which user groups can see particular menu items. In the Menu Item editor, locate the Access dropdown. Options include Public, Guest, Registered, and any custom groups you’ve created. Setting a menu item to Registered is like placing a private door that only members can open.
You can also create custom Access Levels under Users → Access Levels. For instance, a Premium level could grant exclusive navigation links to paying members. This flexibility mirrors a club membership system, where different tiers enjoy distinct privileges.
After configuring access, test the menu by logging in as different user types. Ensure that the appropriate items appear or hide as intended. This verification step is akin to a dress rehearsal before the main performance.
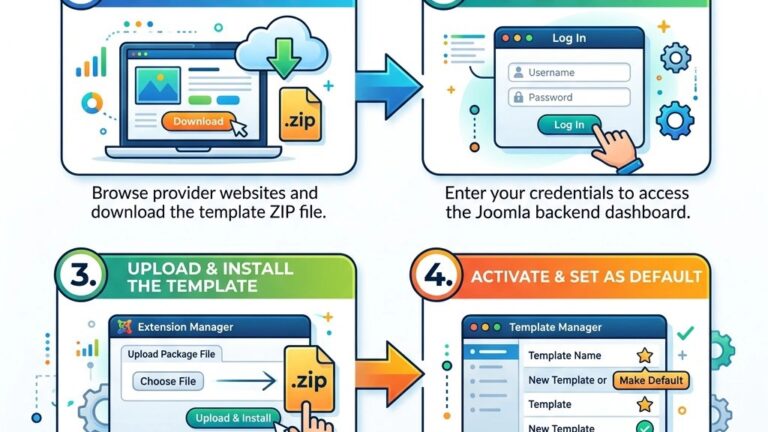
Templates dictate the visual layout and styling of your site’s frontend. To explore available templates, go to Extensions → Templates → Styles. Here you’ll see a list of installed templates, each with a preview thumbnail. Choose a template that matches your brand’s personality—perhaps a sleek modern design or a classic newspaper look.
If you need a fresh start, download a Joomla 5‑compatible template from the Joomla Extensions Directory or a third‑party marketplace. Install it via Extensions → Manage → Install, then select the uploaded package. The installation process is similar to fitting a new skin onto a body, instantly changing the appearance.
Once installed, click the template’s name to open the Template Style editor. Here you can set the Site Layout, Color Scheme, and Typography. Many templates offer preset styles that you can switch with a single click, like swapping out a set of curtains for a new view.
Advanced customization may require editing the template’s HTML overrides or CSS files. Access these files through Extensions → Templates → Templates, then click Edit next to your chosen template. The file manager displays folders such as html, css, js, and images.
To change the header logo, locate the header.php or logo.png file within the html folder. Replace the existing image with your own, ensuring the file name matches or updating the reference in the code. This process is akin to painting a new mural on a familiar wall.
If you want to adjust spacing or colors, edit the template.css file in the css folder. Add custom rules like .site-header { background:#004080; } to give the header a distinct hue. Remember to clear the cache after making changes, so the new styles appear instantly.
Template overrides allow you to modify the output of components, modules, and plugins without altering core files. To create an override, go to Extensions → Templates → Templates, select your template, and click Create Overrides. Choose the component you wish to customize, such as com_content for articles.
The system generates a copy of the component’s view files inside your template’s html folder. You can now edit these files safely, knowing that future updates to Joomla or the component won’t overwrite your changes. This technique is comparable to building a custom façade over an existing structure.
After saving your overrides, visit the frontend to see the changes in action. If something looks off, use the browser’s developer tools to inspect the HTML and CSS, making fine adjustments as needed. This iterative process is like sculpting a statue—each chisel stroke refines the final shape.
User management begins at Users → Manage → New. Fill in the required fields: Name, Login Name, Password, and Email. Assign the user to a User Group such as Registered, Manager, or Super Administrator. Think of user groups as different ranks in an organization, each with its own responsibilities.
You can also enable Two‑Factor Authentication (2FA) for added security. Choose a method like Google Authenticator and follow the setup wizard. This extra layer acts like a lock on a treasure chest, protecting sensitive data from unauthorized access.
After creating the account, send a welcome email using the Send Mail button. The email can contain login details and a link to the admin panel (site.com/administrator). This welcome gesture is similar to handing over a key to a new employee.
Access levels define which groups can view certain content or menu items. To create a new access level, navigate to Users → Access Levels → New. Give it a name—perhaps Premium Members—and select the groups that belong to it. This setup is akin to issuing VIP passes that grant entry to exclusive areas.
Assign the new access level to articles, modules, or menu items via their respective Access dropdowns. For example, a premium article can be set to Premium Members only, ensuring that only those with the appropriate group can read it. This granular control mirrors a gated community where only residents may enter.
Test the permissions by logging in as a user from each group. Verify that the content appears or hides as intended. This testing stage is like a quality‑control inspection before a product launch.
User groups can be nested, allowing you to inherit permissions from parent groups. To edit a group, go to Users → Groups → Edit. Here you can set Permissions for actions such as Create, Delete, Edit, and Configure across core components like com_content, com_modules, and com_plugins.
For instance, granting the Editor group the Edit permission on com_content lets them modify articles without accessing system settings. This delegation is comparable to giving a sous‑chef the ability to prepare dishes but not to change the restaurant’s menu.
Be cautious when assigning the Super Administrator group; members have unrestricted access to every part of the site. Treat this role like a master key—only a few trusted individuals should possess it. Regularly review group memberships to maintain a secure environment.
The Joomla Extensions Directory (JED) is a treasure trove of components, modules, plugins, and templates. Use the search bar to look for keywords like SEO, gallery, or contact form. Each extension page displays a rating, compatibility information, and a brief description—much like a product catalog.
Before installing, check that the extension is compatible with Joomla 5. Compatibility details appear under the Version tab. Installing an outdated extension is akin to trying to fit a square peg into a round hole; it may cause errors or security vulnerabilities.
Read user reviews and support forums to gauge reliability. Extensions with active developers and frequent updates are generally safer choices. Think of this research as reading a restaurant’s reviews before making a reservation.
To install, download the extension package (usually a ZIP file) from the developer’s site. In the Joomla backend, go to Extensions → Manage → Install. Drag the ZIP file into the upload area or click Browse to select it. The system will unpack and install the extension automatically.
After installation, a confirmation message appears, and the new extension shows up under its respective category—Components, Modules, or Plugins. If the extension requires additional setup, a Setup Wizard may launch automatically. This guided process is similar to assembling furniture with step‑by‑step instructions.
If you encounter an error, check the System → Global Configuration → Server settings for file permissions, or consult the extension’s documentation. Often, a simple adjustment to the PHP version or memory limit resolves the issue.
Each extension comes with its own Options page where you can fine‑tune behavior. Access it via Extensions → Plugins (for plugins) or Components (for components). For example, a SEO plugin may let you set meta‑title templates, canonical URLs, and sitemap generation.
Save your changes and click Apply to see immediate effects. Some extensions also provide a Help tab with detailed explanations of each setting. Treat this configuration stage like calibrating a musical instrument—small adjustments produce a harmonious result.
Remember to clear the site’s cache after major changes, ensuring that visitors see the updated content. This step is comparable to wiping a foggy windshield for a clear view.
The Global Configuration panel, found under System → Global Configuration, is the control center for site‑wide settings. Here you can set the Site Name, Offline Message, Default Language, and Error Reporting level. Think of it as the command bridge where you set the ship’s course.
Under the Server tab, configure PHP Settings, Database, and Session Handler. Adjust the Cache Settings to improve performance—enable Conservative Caching for a balance between speed and freshness. This configuration acts like a thermostat, maintaining optimal temperature for site responsiveness.
The SEO Settings tab allows you to enable Search Engine Friendly URLs, URL Rewrites, and Meta Description defaults. Turn on Use URL Rewriting and rename the htaccess.txt file to .htaccess for cleaner URLs. This process is similar to polishing a gemstone, making it shine brighter for search engines.
Caching stores rendered pages and data in temporary files, reducing server load. Enable System Cache in the System tab of Global Configuration, selecting Cache Handler as File or Redis if available. This technique is akin to pre‑cooking meals for quick service during rush hour.
Set the Cache Time to a reasonable interval—perhaps 15 minutes for a news site. For high‑traffic sites, consider enabling Page Cache for the entire site, which serves static HTML snapshots to visitors. This approach resembles a fast‑track lane on a highway, allowing traffic to flow smoothly.
Regularly purge the cache via System → Clear Cache to ensure that updates appear promptly. Think of cache clearing as sweeping the floor after a busy day, keeping the environment tidy.
Security is a cornerstone of any Joomla site. Start by changing the default admin username to something unique, reducing the risk of automated attacks. Use a strong, random password and enable Two‑Factor Authentication for all privileged accounts.
Update Joomla core and all extensions promptly; the Extension Updates view lists available patches. Enable Automatic Updates for minor releases if you prefer a hands‑off approach. This habit is comparable to regular car maintenance—preventing breakdowns before they happen.
Finally, configure Permissions carefully, granting only the necessary rights to each User Group. Disable the Installer for non‑administrators to prevent unauthorized uploads. These safeguards act like a security fence around a valuable garden.
Yes, Joomla offers a friendly admin panel with clear menus and helpful tooltips. While the learning curve is slightly steeper than some drag‑and‑drop builders, the extensive documentation and community support make it approachable. Think of it as learning to ride a bicycle with training wheels that you can later remove.
Absolutely. Joomla powers millions of websites worldwide, from small blogs to large corporate portals. Its flexibility, especially with extensions and templates, keeps it relevant in a rapidly changing web environment. Many developers appreciate its balance between control and convenience.
Joomla follows a MVC (Model‑View‑Controller) architecture, separating data, presentation, and business logic. The backend (admin panel) lets you manage content, users, and settings, while the frontend renders the site for visitors. Extensions plug into this framework, adding new capabilities without altering the core.
Some users find the initial setup and configuration more complex than simpler platforms. The abundance of options can be overwhelming for absolute beginners. Additionally, certain advanced features may require custom coding or third‑party extensions, which can increase maintenance effort.
Enable Search Engine Friendly URLs, configure meta titles and descriptions in the Article Manager, and use an SEO‑focused extension for advanced settings. Ensure that your template is responsive and that images have descriptive alt text. Regularly submit an XML sitemap to search engines.
A component is a major functional unit, like a mini‑application (e.g., com_content for articles). A module displays small blocks of content in specific template positions, such as a login form. A plugin runs behind the scenes, extending core functionality (e.g., authentication or content filtering). Together they form the modular architecture of Joomla.
In conclusion, mastering how to use Joomla is a rewarding journey that blends creativity with technical precision. By following the steps outlined—from dashboard navigation to fine‑tuning extensions—you’ll build a site that is both functional and visually appealing. Remember to keep your global configuration up‑to‑date, manage users and permissions wisely, and use the rich library of extensions to expand your site’s capabilities. With practice, the Joomla platform will feel as natural as a well‑known road, guiding you toward successful web projects.