Installation
Installation is done as with any standard Joomla extension following these steps:
- Download all files to your PC
- Use the standard Joomla Extension Manager to install the files.
The Reading List package contains several extensions:
| com_jxtc_readinglist_j25.zip | The main component provides the main content display and handles internal management features. |
| mod_jxtc_readinglist_j25.zip | Provides a Category filter menu and links to social features. |
| mod_jxtc_readinglistinfo_j25.zip | Provides a short message about your reading list status. |
| plg_jxtc_readinglist_j25.zip | Joomla content plugin, enables Reading List features on Joomla! content articles. |
| plg_jxtc_readinglistk2_j25.zip | K2 content plugin, enables Reading List features on K2 content items. |
| plg_jxtc_readinglistjs_j25.zip | JomSocial plugin enables Reading lists on JomSocial profiles. |
Note that the component is required to be installed for the module and plugins to work. The component and corresponding plugins installation is required.
Enabling Reading List on your site
The configuration of Reading List is very simple, however some steps are necessary to fine-tune its functionality according to your needs. We start by first creating
a menu entry for the component, then enabling the content plugins:
Making a Reading List menu entry
The Reading List view can be accessed by creating a menu option on your website.
Use the standard Joomla Menu Manager to edit and add a menu option then click on the "Select" button in the
Menu Item Type field and click on "Content Reading List" option from the "JoomlaXTC Reading List" section shown in the pop-up window.
Set all menu options as desired. Once the menu option is saved, a user can navigate your website and click on it to see their personal Reading List.

Enabling the Plugins
The content plugins must be enabled first by going to the
Extensions / Plug-In manager menu option and clicking on the plugin status icon to enable them. Once enabled, content articles will display a button to enable addition or removal of the article into the Reading List. It is preferred to have only one active content plugin at a time, you might find some data conflict if you choose to enable both at the same time.
The plugins have a few settings you can adjust as needed:
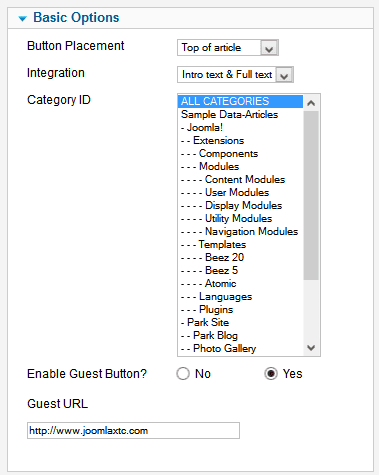
| Button Placement | Select Top of article to display the button at the top of the article text, Bottom of article to display the button at the bottom of the article text, or Tag Only to place the button anywhere in the content by embedding this custom tag: {readinglist} in it. |
| Category ID | Select the content categories where the plugin should be active. |
| Enable Guest Button? | Reading List features are mostly used by registered users at the site however you may want to show guest users a custom button to entice them with your services. |
| Guest URL | This parameter sets the url where the Guest button will direct your guest users. Some suggestions are: An article inviting users to register, the Login page, and more. | |
Using the Reading List
Once installed and configured, users can start using the Reading List. Since the content selection is a personal choice, users must be logged in first for the Reading List buttons to appear on the content articles, otherwise the Guest button will be shown if enabled.
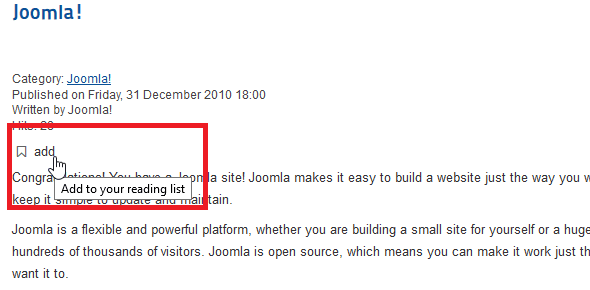
When navigation the site, a small icon will appear along with the content article. Clicking on the
Add button will include the article in the user's Reading List. Articles already in the Reading List can be removed in the same manner.
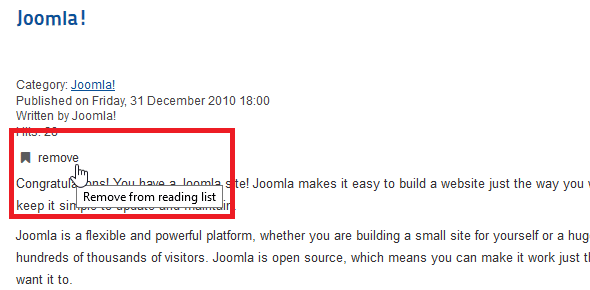
If
Guest button is enabled, it will be show to all non-registered users, but this time clicking the button will take them to the button's destination URL. We invite you to customize the wording and appearance of the button to suit your needs.

Viewing the Reading List
After adding a few articles to the Reading List, the user can select the menu option to view his/her reading list:
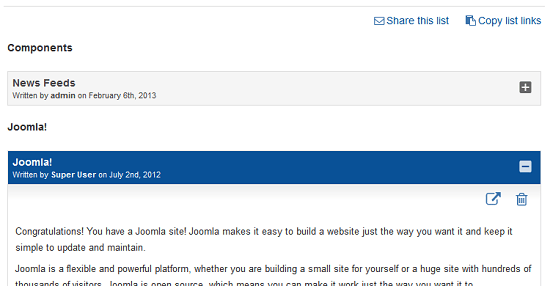
Selected articles are organized by category, and it's a matter of clicking in the title to view the article text and content inside a smooth slide display.
There are two action icons at the top-right of every article:
 | Jump to the original article page. |
 | Remove the article from the Reading List. |
Enabling the module
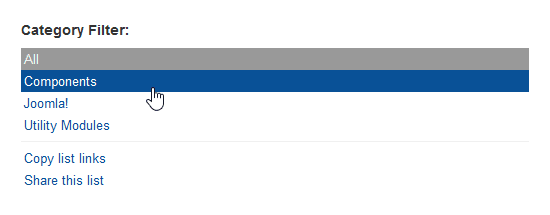
In the image above, you can notice the Reading List module being shown at the left. When enabled, the module can serve as a control panel for the Reading List view. Clicking on a category name in the module will change the view to display only the articles from that category. It can also display the two sharing options for the Reading List articles.
To enable the module, first install it and follow these steps:
- Install the module.
- Go to Extensions / Module manager menu option.
- Publish the module.
- Configure the Basic options as needed.
- On Module Assignment field, choose "Only the pages selected" and select the Reading List menu option below.

Once that you activate the module, it will be show on your site like this:
Enabling the information module
The information module provides a short message indicating the state of the user's reading list along with a link to the reading list component.
To enable the module, first install it and follow these steps:
- Install the module.
- Go to Extensions / Module manager menu option.
- Publish the module.
- On Module Assignment field, choose "Only the pages selected" and select the Reading List menu option below.
This module does not have parameters to modify, once you publish it will looks like this one:

Sharing the Reading List
There are two ways to share a Reading list:
 Copy list links
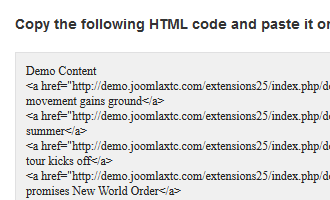
 option can be used to paste the actual links of article pages in social networks, forums and more. Just click on the "Copy List Links" and a pop-up window will be shown where you can copy the HTML code for the articles shown in the list to be pasted elsewhere.
Share this list option allows users to email a secure link of the Reading list to their friends, they in turn can visit the site to see what's on their friend's Reading list. Friends can also keep visiting the Reading List for future content updates.
These features can be enabled or disabled by the Administrator by editing the component and/or module parameters as follows:
For the component:
- Go to the Administration area in the backend
- Select the Components / Reading List menu option.
- Once in the component, click on the Options icon in the top right corner.
- Change the options as desired and save the changes.
For the module:
- Go to Extensions / Module manager menu option.
- Click on the Reading List module.
- Configure the Basic options as needed and save the changes.
Customizing the list
The Reading List elements follow the standard Joomla templating rules and more. This makes custom layout and styling very simple by just adding template override files to any of the Reading List extensions, including the plugins! Although Joomla offers guidance on how to make template overrides
in their wiki, we have a little recap here:
Component
The component has two views:
readinglist and
share, the first is used to display a user's own view of his/her list contents, and the second is used for visiting friends looking at a user's list. To change the layout, you can copy the contents of the
tmpl folders from the component folders to your website's template folder as follows:
Copy
components/com_jxtcreadinglist/views/readinglist/tmpl folder as
templates/yourtemplate/html/com_jxtcreadinglist/readinglist folder.
Copy
components/com_jxtcreadinglist/views/share/tmpl folder as
templates/yourtemplate/html/com_jxtcreadinglist/share folder.
Note: "yourtemplate" is the folder name of your active Joomla template.
You can then edit the copied files to change the layout of contents in any of the component views. Start with
default.php file to see how each content item is processed and presented to the user. Keep in mind a certain level of HTML, CSS, PHP and JavaScript knowledge may be required to develop some of the more advanced customizations.
Module
The module has only one layout available, customize it as follows:
Copy
modules/mod_jxtc_readinglist/tmpl/default.php file as
templates/yourtemplate/html/mod_jxtc_readinglist/default.php file.
Modules are a bit different when it comes to custom layouts, as you can have more than one .php file in the tmpl folder of the module itself, and then choose which one to use using the "Alternative Layout" in the Advanced parameters section.
Plugins
Joomla plugins do not allow for custom template overrides, but we have made our plugins follow the same principle for ease of styling, these are the files to copy for each:
For Joomla content plugin:
Copy
plugins/content/jxtcreadinglist/tmpl folder as
templates/yourtemplate/html/jxtcreadinglist folder.
For K2 content plugin:
Copy
plugins/content/jxtcreadinglistk2/tmpl folder as
templates/yourtemplate/html/jxtcreadinglistk2 folder.
Plugins have two main .php files each:
add.php and
remove.php. These are the programs that render the Add and Remove buttons visible on content Articles and Items in the frontend.
More customizations
The default Reading List component views make use of the standard Joomla Sliders functionality and a custom .css file to present the articles, of course you are free to change this when using template overrides, however to change the "looks" and styling of the default Joomla Sliders you must edit the corresponding classes in your Joomla template's .css file.
Copyright 2012,2013 Monev Software LLC
www.joomlaxtc.com


 Copy list links option can be used to paste the actual links of article pages in social networks, forums and more. Just click on the "Copy List Links" and a pop-up window will be shown where you can copy the HTML code for the articles shown in the list to be pasted elsewhere.
Share this list option allows users to email a secure link of the Reading list to their friends, they in turn can visit the site to see what's on their friend's Reading list. Friends can also keep visiting the Reading List for future content updates.
These features can be enabled or disabled by the Administrator by editing the component and/or module parameters as follows:
For the component:

